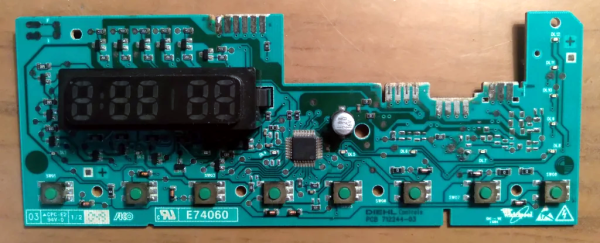
[Johnny] had a monitor that he was particularly fond of. The whole monitor appeared dead, and he decided to open it up and find out what could be wrong. He wound up fixing it — sort of — using a hairdryer. While we think his explanation of the problem is unlikely, we hate to armchair quarterback, and we applaud that he opened it up and got it working.
When something is dead, it is always a good idea to check the power and power supply, but that didn’t pan out in this case. In fact, the power supply board inside had what looked like reasonable voltage values throughout. The problem had to be something more subtle.
A huge part of the work our community does, aside from making things and doing a lot of talking about the things we’d like to make, involves repair. We have the skills to fix our own stuff when it breaks, we can fix broken stuff that other people throw out when it breaks, and we can fix broken stuff belonging to other people. As our consumer society has evolved around products designed to frustrate repairs and facilitate instead the sale of new replacements for broken items this is an essential skill to keep alive; both to escape having to incessantly replace our possessions at the whim of corporate overlords, and to fight the never-ending tide of waste.
Repair Cafés: A Good Thing
So we repair things that are broken, for example on my bench in front of me is a formerly-broken camera I’ve given a new life, on the wall in one of my hackerspaces is a large screen TV saved from a dumpster where it lay with a broken PSU, and in another hackerspace a capsule coffee machine serves drinks through a plastic manifold held together with cable ties.
We do it for ourselves, we do it within our communities, and increasingly, we do it for the wider community at large. The Repair Café movement is one of local groups who host sessions at which they repair broken items brought in by members of the public, for free. Their work encompasses almost anything you’d find in a home, from textiles and furniture to electronics, and they are an extremely good cause that should be encouraged at all costs.
For all my admiration for the Repair Café movement though, I have chosen not to involve myself in my local one. Not because they aren’t a fine bunch of people or because they don’t do an exceptionally good job, but for a different reason. And it symbolically comes back to an afternoon over thirty years ago, when sitting in a university lab in Hull, I was taught how to wire a British mains plug. Continue reading “Ask Hackaday: Repair Café Or Not?”→
We all know the havoc that water in the wrong place can do to a piece of electronics, and thus we’ve probably all had devices damaged beyond repair. Should [Solderking] have thrown away the water-damaged PCB from a Nintendo Pokemon Ruby cartridge? Of course he should, but when faced with a board on which all vias had succumbed to corrosion he took the less obvious path and repaired them.
Aside from some very fine soldering in the video below the break there’s little unexpected. He removes the parts and tries a spot of reworking, but the reassembled board doesn’t boot. So he removes them again and this time sands it back to copper. There follows a repair of every single vial on the board, sticking fine wires through the holes into a sponge and soldering the top, before turning it over and fixing the forest of wires on the other side. Fixing the ROM results in a rather challenging fitment involving the chip being mounted at an angle and extra wires going to its pads, which demonstrates the value in this story. It’s not one of monetary value but of persevering with some epic rework to achieve a PCB which eventually boots. Of course a replacement board would make more sense. But that’s not the point, is it?
[Stephen] writes to us about an LCD repair tool he has created. We’ve all seen old devices with monochrome LCDs connected by thin film, where connections between the PCB and the LCD have deteriorated and the LCD would no longer show parts of the picture. This is a connection heating gadget, that [Stephen] affectionately dubs as World’s Smallest Hair Straightener, made specifically to bring cool old tech back to life.
A resin-printed mold houses a coil of Kanthal wire, easy to source and simple to make. He reuses a hair clip as a housing for the heating element, which also provides pressure needed to squish the film-printed conductive traces into the LCD as the adhesive melts. High-temperature epoxy brings the two together, and with a variable power supply, this tool successfully brought an old Tiger 99x handheld back to life.
This hack was made possible, in part, because of [JohnDevin Duncan] in Hackaday comment section sharing his experience on repairing LCD ribbons back in 2015, giving valuable insights on the problem that we initially thought would be solve-able with a soldering iron. The knowledge shared was distilled by [Stephen] into a tool that we all can now use when we encounter a device we really, really want to revive.
When we see [Ken Shirriff] reverse engineering something, it tends to be on the microscopic level. His usual forte is looking at die photos of strange and obsolete chips and figuring out how they work. And while we love those efforts, it’s nice to see him in the macro world this time with a teardown and repair of a 1960s-era solderless breadboard system.
If you’d swear the “Elite 2 Circuit Design Test System” featured in [Ken]’s post looks familiar, it’s probably because you caught his partner-in-crime [CuriousMarc]’s video on the very same unit, an eBay score that arrived in non-working condition. The breadboard, which retailed for $1,300 in 1969 — an eye-watering $10,000 today — was clearly not aimed at the hobbyist market. Truth be told, we didn’t even know that solderless breadboards were a thing until the mid-70s, but live and learn. This unit has all the bells and whistles, including three variable power supplies, an array of switches, buttons, indicator lamps, and jacks for external connections, and a pulse generator as well as a legit function generator.
Legit, that would be, if it actually worked. [Ken]’s contribution to the repair was a thorough teardown of the device followed by reverse-engineering the design. Seeing how this thing was designed around the constraints of 1969 technology is a real treat; the metal can transistor and ICs and the neat and tidy PCB layout are worth the price of admission alone. And the fact that neon lamps and their drivers were cheaper and easier to use than LEDs says a lot about the state of the art at the time.
Hackers are often of the sentimental type, falling in love with the look and feel of quality old hardware. Of course, sometimes that older hardware needs a little TLC to keep it running in the modern world. [Lex] had a beautiful vintage multimeter that sadly had a broken screen, and set about a nifty repair to restore it to working condition.
The HSN Avometer DA116 is a handsome thing, controlled with two dials and featuring a clean two-tone aesthetic. Even the font on the PCB’s silkscreen is gloriously pretty (can anyone ID that?). However, the original LCD was non-functional. A direct replacement part was sadly unavailable. Instead, to rectify this, [Lex] first hunted down another segmented LCD screen that had the same segment layout.
However, the new screen had a completely different pinout to the original part. Thus, after taking some notes and figuring out what all the pins did, [Lex] whipped up an adapter board to carry the new screen. With some protoboard, some pin headers, and a bunch of point-to-point wiring, the new screen worked just fine, and [Lex] had a functioning vintage meter once again!
Here’s an interesting and detailed teardown and repair of a Keithley 2001 7.5 Digit multimeter that is positively dripping with detail. It’s also not every day that we get to see someone using x-ray imaging to evaluate the extent of PCB damage caused by failed electrolytic capacitors.
Sadly, this particular model is especially subject to that exact vintage electronics issue: electrolytic capacitor failure and leakage. These failures can lead to destroyed traces, and this particular unit had a number of them (in addition to a few destroyed diodes, just for good measure.) That’s where the x-ray machine comes in handy, because some of the damage is hidden inside the multi-layer PCBs.
[Shahriar], perhaps best known as [The Signal Path], narrates the entire process of fixing up the high-quality benchtop multimeter in a video, embedded below (or you can skip directly to the x-ray machine being broken out.) [Shahriar] was able to repair the device, thanks in part to it being in relatively good shape, and having the right tools available. Older electronics are not always so cooperative; the older a device is, the more likely one is to run into physical and logical standards that no longer exist.