Ever wonder what makes a cellphone’s operating system secure, or what that app you just installed is saying about you behind your back? In a brand new video series, [Jiska] gives us a peek into different topics in smartphone software reverse engineering.
For instance, her latest video, embedded below takes us through some steps to poke at Apple’s RTKit OS, which is the realtime OS that runs inside most of their peripheral devices, including AirPods, but also on their bigger devices too. We don’t know much about RTKit OS, but [Jiska]’s trick in this video is to get a foothold by looking through two different RTKit OS versions and noting which symbols are common — these are probably OS function names. Now you’ve got something to look for.
Each of the videos is short, to the point, and contains nice tips for perhaps the intermediate-to-advanced reverser who is looking to get into phones. Heck, even if you’re not, her demonstrations of the Frida dynamic tracing tool are worth your time.
And if you want a longer introduction into the internals of cellphones, we heartily recommend her talk, “All Wireless Stacks Are Broken“.
We all know that it’s sometimes better to beg forgiveness than ask permission to do something, and we’ll venture a guess that more than a few of us have taken that advice to heart on occasion. But [Todd Humphreys] got the order of operations a bit mixed up with his attempt to leverage the Starlink network as a backup to the Global Positioning System, and ended up doing some interesting reverse engineering work as a result.
The story goes that [Todd] and his team at the University of Texas Austin’s Radionavigation Lab, on behalf of their sponsors in the US Army, approached Starlink about cooperating on a project to make their low-Earth orbit constellation provide position, navigation, and timing capabilities. Although initially interested in the project, Starlink honcho [Elon Musk] put the brakes on things, leaving [Todd]’s team high and dry. Not to be dissuaded, they bought a Starlink user terminal, built what amounts to a small radiotelescope — although we’ve seen something similar done with just an RTL-SDR — and proceeded to reverse-engineer the structure of Starlink’s Ku-band downlink signal. The paper (PDF link) on their findings is densely packed with details, such as the fact that Starlink uses an orthogonal frequency-division multiplexing (OFDM) scheme.
It’s important to note that their goal was not to break encryption or sniff in on user data; rather, they wanted access to the synchronization and timing signals embedded in the Starlink data structures. By using this data along with the publically available ephemera for each satellite, it’s possible to quickly calculate the exact distance to multiple satellites and determine the receiver’s location to within 30 meters. It’s not as good as some GPS-Starlink hacks we’ve seen, but it’s still pretty good in a pinch. Besides, the reverse engineering work here is well worth a read.
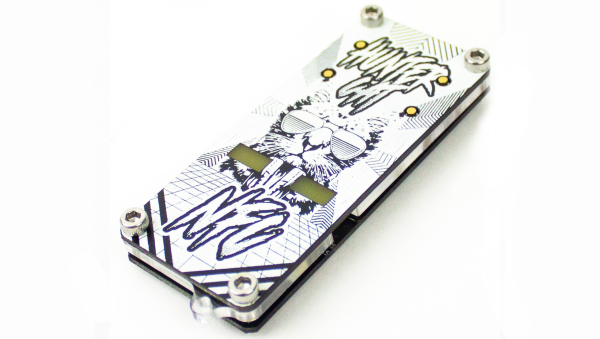
NFC hacking can be a daunting task with many specialized tools, a proliferation of protocols, and a multitude of different devices. [ElectronicCats] has done a lot of work to try to make this investigation accessible by creating an open-source, hardware-certified NFC tool called the HunterCatNFC that can read and emulate a multitude of NFC devices.
The HunterCatNFC device is meant to be portable and self contained, with LED indicator lights that can give information about the various modes, and feedback about what data is being received. At its core, the HunterCatNFC has an NXP PN7150 NFC controller chip to handle the NFC communication. The main processing controller is a Microchip SAMD21 which also provides USB functionality, and the whole device is powered by a 3.7V 150mAh Li-ion battery.
The HunterCatNFC has three main modes, ’emulation’, ‘read/write’ and ‘peer-to-peer’. Emulation mode allows the HunterCatNFC to mimic the functionality of a passive NFC device, only responding when an NFC reader issues a request. The read/write mode allows it to emulate an NFC reader or writer, with the ability to communicate with nearby passive NFC devices. The peer-to-peer mode gives the device the ability to have two way communication, for instance, between two HunterCatNFC devices.
We’ve covered NFC hacking before, including the Flipper Zero. The HunterCatNFC is a fine addition to the NFC hackers arsenal of tools with some very nice documentation to learn from. For those not wanting to send out their own boards to be printed and assembled, [ElectronicCats] has them for sale.
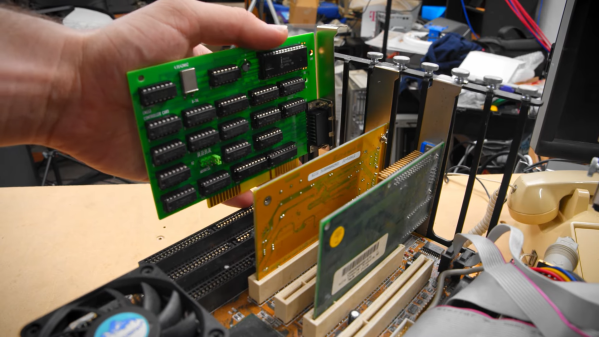
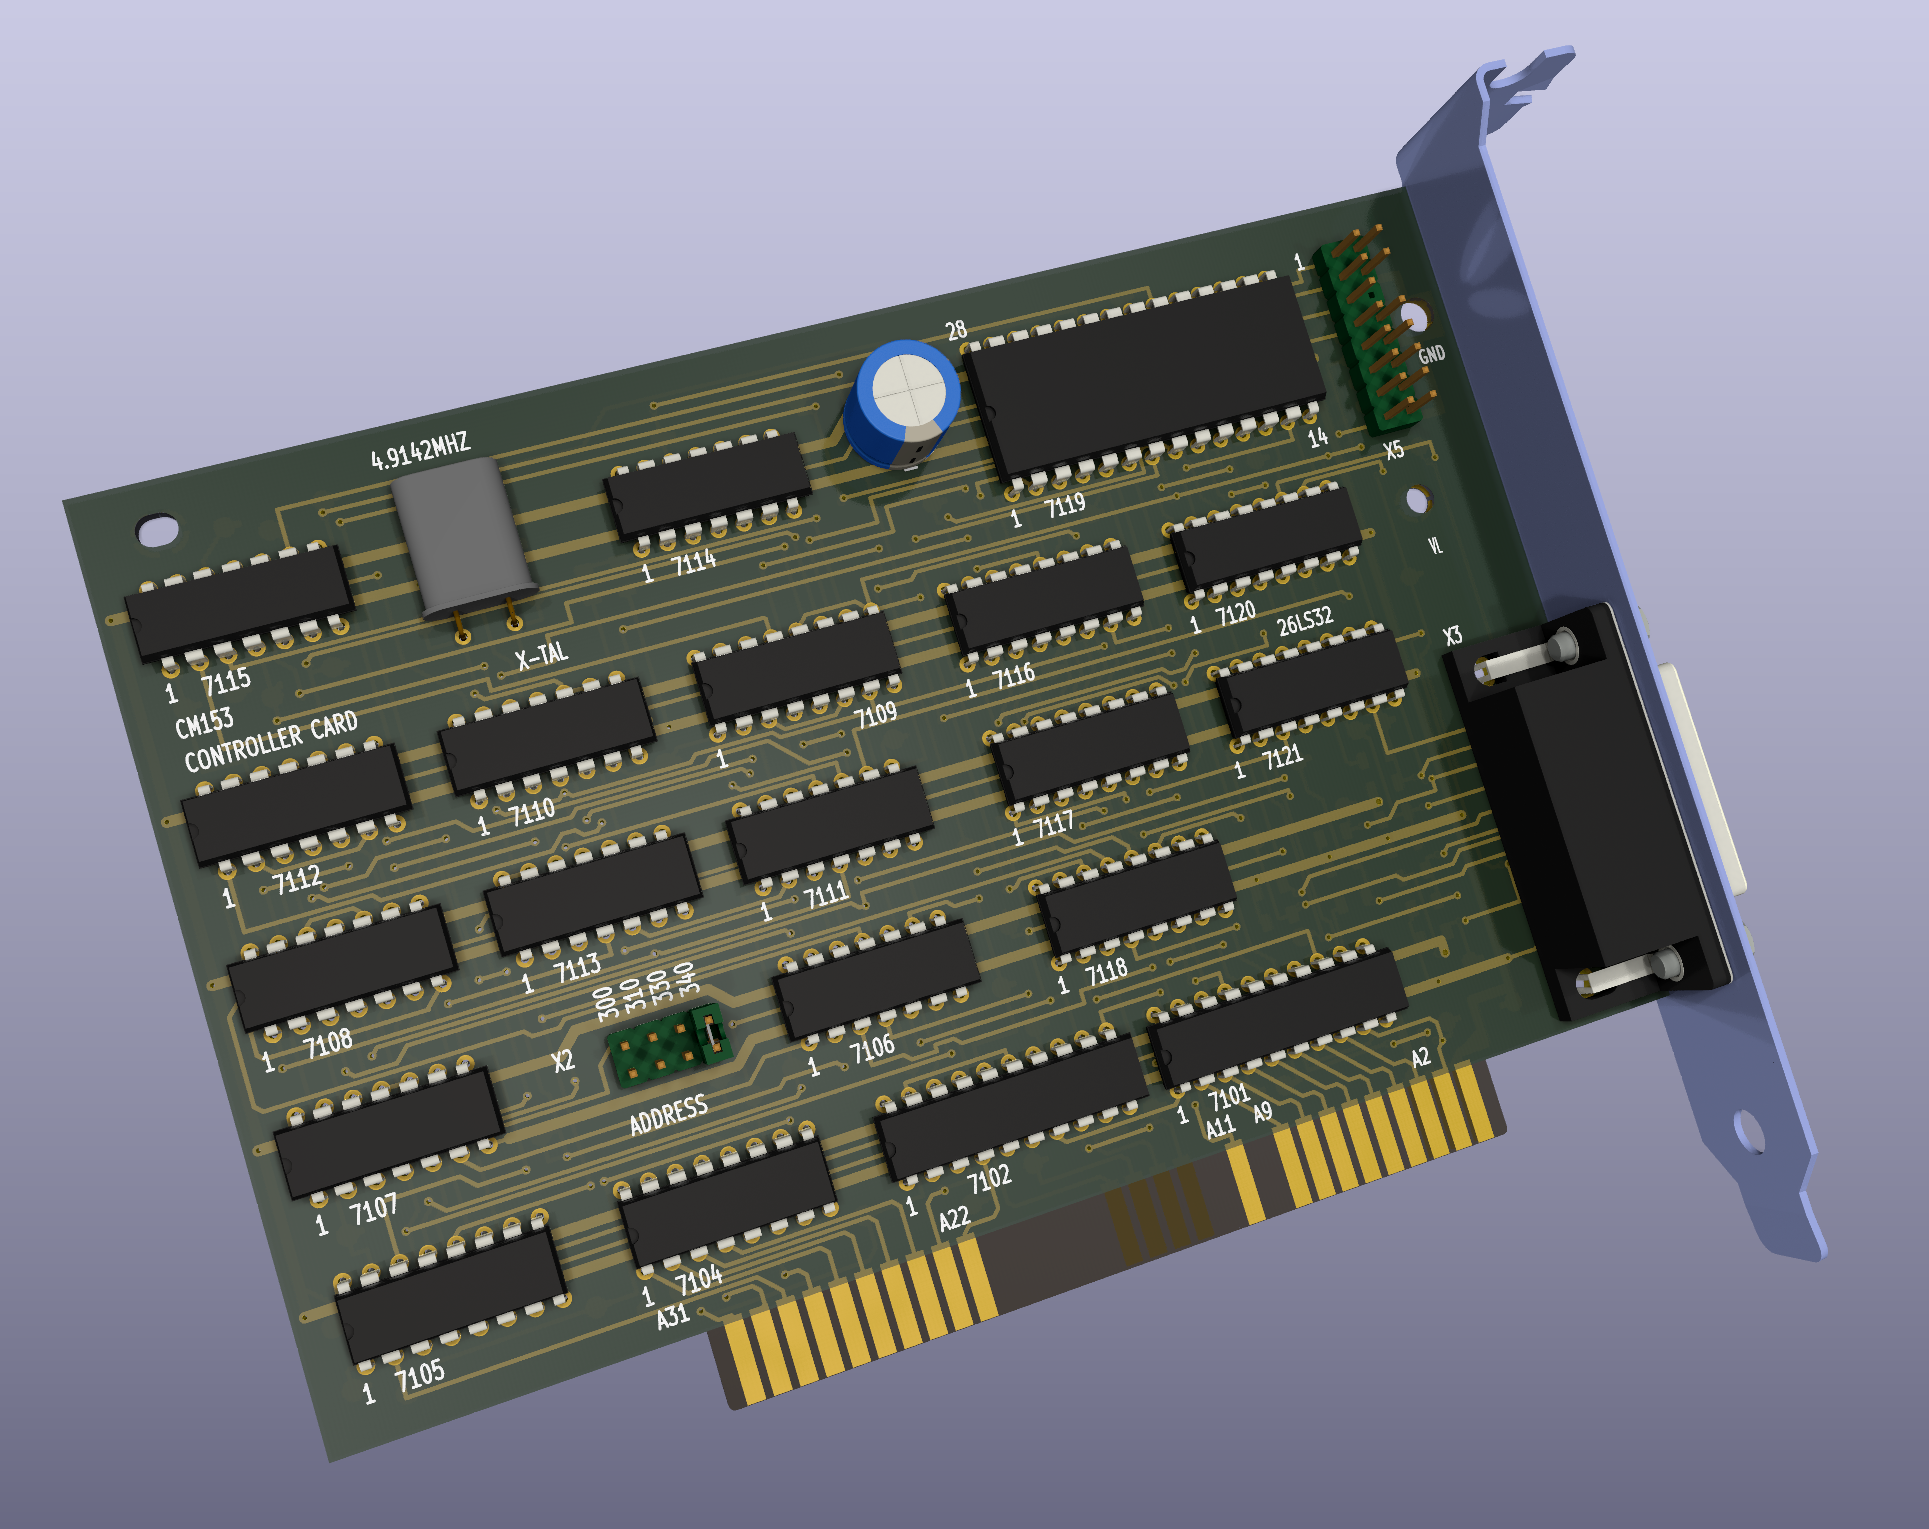
Being an early adopter is great if you enjoy showing off new gadgets to your friends. But any new technology also brings the risk of ending up at the wrong side of a format war: just ask anyone who committed to HD-DVD fifteen years ago. If, on the other hand, you were among the few who invested in CD-ROM when it was first released in the mid-1980s, you definitely made the right choice when it came to storage media. However, it was a bit of a different story for the interface that hooks up the CD drive to your computer, as [Tech Tangents] found out when he managed to get his hands on a first-generation CM100 drive. (Video, embedded below.)
That wonderful piece of 1985 technology is not much smaller than the IBM PC it was designed to connect to, and it originally came with its own CM153 ISA interface card. But while most eBay sellers recognized the historic value of a pioneering CD-ROM drive, the accompanying PC was typically a dime-a-dozen model and was thrown out with the rare interface card still inside. Even after searching high and low for over a year, the only information [Tech Tangents] could find about the card was a nine year old YouTube video that showed what the thing looked like.
Luckily, the maker of that video was willing to take high-resolution pictures of the card, which allowed [Tech Tangents] to figure out how it worked. As it turned out, the card was entirely made from standard 7400 series logic chips as well as an 8251 USART, which meant that it should be possible to design a replacement simply by following all the traces on the board. [Tech Tangents] set to work, and after a few weeks of reverse-engineering he had a complete schematic and layout ready in KiCAD.
After the PCBs were manufactured and populated with components, it was time to test the new card with the old drive. This wasn’t a simple process either: as anyone who’s tried to get obscure hardware to work in MS-DOS will tell you, it involves countless hours of trying different driver versions and setting poorly documented switches in CONFIG.SYS. Eventually however, the driver loaded correctly and the ancient CD-ROM drive duly transferred the files stored on a Wolfenstein 3D disk.
If you’re lucky enough to own a CM100 or a similar drive from that era, you’ll be happy to know that all design files for the CM153 clone are available on GitHub. This isn’t the first time someone has had to re-create an interface board from pictures alone: we’ve seen a similar project involving a SCSI card for a synthesizer. Thanks for the tip, [hackbyte]!
In a perfect world, all of our electronic devices would come with complete documentation, and there’d be open source libraries available for interfacing them with whatever we wanted. There’d never be arbitrary lockouts preventing us from using a piece of hardware in a way the manufacturer didn’t approve of, and the “cloud” wouldn’t be a black-box server in some data center on the other side of the planet, but a transparent and flexible infrastructure for securely storing and sharing information.
Unfortunately, that’s not the world we live in. What’s worse, rather than moving towards that electronic utopia, the industry appears to be heading in the opposite direction. It seems like every month we hear about another service shutting down and leaving viable hardware to twist in the wind. Just yesterday Google announced they’d be retiring their Stadia game streaming service early next year — leaving users with unique Internet-connected controllers that will no longer have a back-end to communicate with.
Matthew Alt
Luckily for us, there’s folks like Matthew [wrongbaud] Alt out there. This prolific hacker specializes in reverse engineering, and has a knack not just for figuring out how things work, but in communicating those findings with others. His conquests have graced these pages many times, and we were fortunate enough to have him helm the Introduction to Reverse Engineering with Ghidra class for HackadayU back in 2020. This week, he stopped by the Hack Chat to talk about the past, present, and future of reverse engineering.
Matthew got his start in reverse engineering during college, when he was working in a shop that specialized in tuning engine control units (ECUs). He was responsible for figuring out how the ECUs functioned, which ultimately would allow them to be modified to improve engine performance beyond the vehicle’s stock configuration. Sometimes that involved uploading modified calibration data, or disabling functions that were detrimental to engine performance. These software changes could potentially increase engine output by as much as 50 HP, though he says that sometimes the goal was to simply increase throttle response so the vehicle would feel more aggressive on the road.
Moving on to the tools of the trade, Matthew explained why he prefers using Ghidra for embedded targets over classic reverse engineering tools like IDA Pro. As an example he points to a recent project where he used Ghidra’s API and intermediary language PCode to crack passwords in Game Boy Advance games. Though he does mention that IDA still has its place if you’re looking to peek into some Windows C++ software.
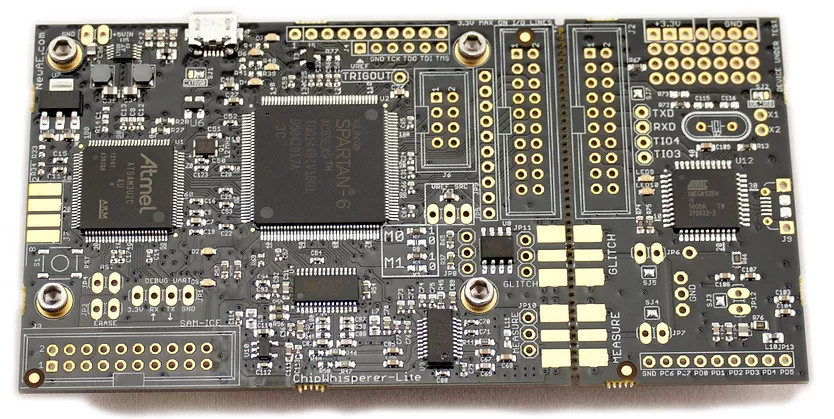
Matthew also pointed to new techniques and tools for working with fault injection which have opened up a lot of exciting possibilities over the last few years. In fact, he says tools like ChipWhisperer will become invaluable as newer devices adopt advanced security features. When gadgets are using secure boot and encrypted firmware, gaining access is going to take a bit more than just finding an unleaded serial port on the board. Glitching attacks will become more commonplace, so you might as well get up to speed now.
Colin O’Flynn’s ChipWhisperer makes side-channel power analysis and glitching attacks far more accessible.
We’d like to thank Matthew Alt for not just stopping by the Hack Chat, but for being such a good friend to the Hackaday community. His work has been inspirational for all of us here, and it’s always exciting when he’s penned a new blog post detailing another challenge bested. The next time your favorite MegaCorp releases some anti-consumer gadget, you can take some comfort in knowing he’s still out there bending hardware to his will.
The Hack Chat is a weekly online chat session hosted by leading experts from all corners of the hardware hacking universe. It’s a great way for hackers connect in a fun and informal way, but if you can’t make it live, these overview posts as well as the transcripts posted to Hackaday.io make sure you don’t miss out.
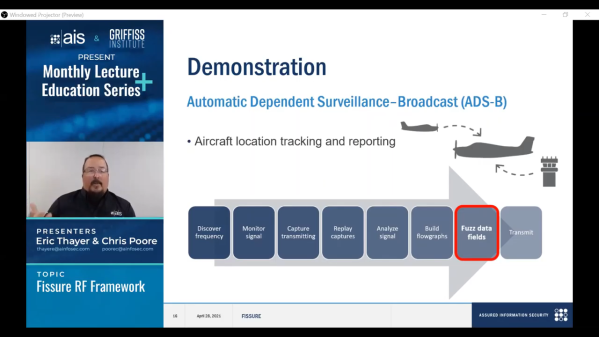
No matter what the job at hand is, if you’re going to tackle it, you’re going to need the right kit of tools. And if your job includes making sense out of any of the signals in the virtual soup of RF energy we all live in, then you’re going to need something like the FISSURE RF framework.
Exactly what FISSURE is is pretty clear from its acronym, which stands for Frequency Independent SDR-Based Signal Understanding and Reverse Engineering. This is all pretty new — it looks like [Chris Poore] presented a talk at DEFCON a few weeks back about using FISSURE to analyze powerline communications between semi-trucks and their trailers, and they’ve got a talk scheduled for next month’s GNU Radio Conference as well. We’ve been looking through all the material we can find on FISSURE, and it appears to be an RF hacker’s dream come true. They’ve got a few examples on Twitter, like brute-forcing an old garage door opener with a security code set by a ten-position DIP switch, and sending tire pressure monitoring system (TPMS) signals to a car. They also mention some of the framework’s capabilities on the GitHub README; we’re especially interested in packet crafting for various protocols. The video below has some more examples of what FISSURE can do.
It looks like FISSURE could be a lot of fun, and very handy for your RF analysis and reverse engineering work. If you’ve been using Universal Radio Hacker like we have, this looks similar, only more so. We’ll be downloading it soon and giving it a try, so be on the lookout for a hands-on report.
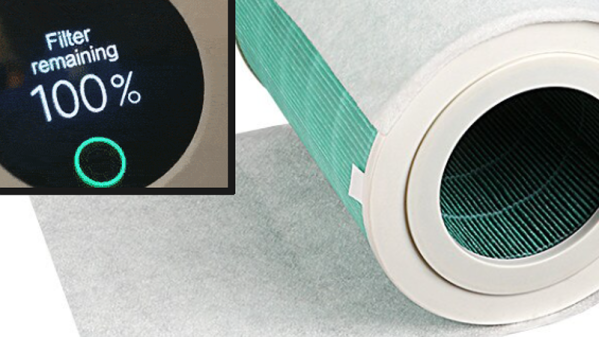
[Flamingo-tech]’s Xiaomi air purifier has a neat safety feature: it will refuse to run if a filter needs replacement. Of course, by “neat” we mean “annoying”. Especially when the purifier sure seems to judge a filter to be useless much earlier than it should. Is your environment relatively clean, and the filter still has legs? Are you using a secondary pre-filter to extend the actual filter’s life? Tough! Time’s up. Not only is this inefficient, but it’s wasteful.
Every Xiaomi filter contains an NTAG213 NFC tag with a unique ID and uses a unique password for communications, but how this password was generated (and therefore how to generate new ones) was not known. This meant that compatible tags recognized by the purifier could not be created. Until now, that is. [Flamingo-tech] has shared the discovery of how Xiaomi generates the password for communication between filter and purifier.
A small NFC sticker is now all it takes to have the purifier recognize a filter as new.
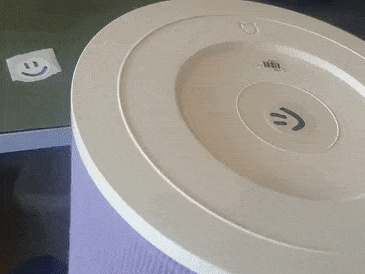
[Flamingo-tech] has long been a proponent of fooling Xiaomi purifiers into acting differently. In the past, this meant installing a modchip to hijack the DRM process. That’s a classic method of getting around nonsense DRM on things like label printers and dishwashers, but in this case, reverse-engineering efforts paid off.
It’s now possible to create simple NFC stickers that play by all the right rules. Is a filter’s time up according to the NFC sticker, but it’s clearly still good? Just peel that NFC sticker off and slap on a new one, and as far as the purifier is concerned, it’s a new filter!
If you’re interested in the reverse-engineering journey, there’s a GitHub repository with all the data. And for those interested in purchasing compatible NFC stickers, [Flamingo-tech] has some available for sale.