A Machine Shop In A Toolbox: Just Add Time

You don’t need any fancy tools. A CNC machine is nice. A 3D printer can help. Laser cutters are just great. However, when it comes to actually making something, none of this is exactly necessary. With a basic set of hand tools and a few simple power tools, most of which can be picked up for a pittance, many things of surprising complexity, precision, and quality can be made.

Not as pretty, but worked just the same.

A while back I was working on a ring light for my 3D printer. I already had a collection of LEDs, as all hackers are weak for a five-dollar assortment box. So I got on my CAD software of choice and modeled out a ring that I was going to laser cut out of plywood. It would have holes for each of the LEDs. To get a file ready for laser cutting ook around ten minutes. I started to get ready to leave the house and do the ten minute drive to the hackerspace, the ten minutes firing up and using the laser cutter (assuming it wasn’t occupied) and the drive back. It suddenly occurred to me that I was being very silly. I pulled out a sheet of plywood. Drew three circles on it with a compass and subdivided the circle. Under ten minutes of work with basic layout tools, a power drill, and a coping saw and I had the part. This was versus the 40 minutes it would have taken me to fire up the laser cutter.

Continue reading “A Machine Shop In A Toolbox: Just Add Time”

Stop Buying Expensive Circular Saw Blades, Use Paper Instead

[John Heisz] was contemplating the secrets of the universe when an errant thought led him to wonder, could I use a sheet of paper as the blade in my table saw?

He takes a sheet of regular printer paper, draws a circle on it the same diameter as his regular blades, and cuts it out. He then bolts it into place on the spindle, slots in the table saw insert for really really thin kerf blades, and fires it up.

The blade is surprisingly dangerous. One would maybe expect a paper blade to be minimally damaging to a finger at best, but it quickly shows itself to be capable of tearing through paper and cutting through wood at a reasonable clip. Since the paper is minimally conductive, a SawStop couldn’t save someone from a lack of caution.

The blade finally meets its match half way through a half-inch thick piece of wood scrap. Wood and paper dust explode outward as the experiment ends. Video after the break.

Continue reading “Stop Buying Expensive Circular Saw Blades, Use Paper Instead”

Mechanized One-Man Sawmill

The title of ‘maker’ is conventionally applied to the young-adult age group. In the case of 84 year-old Ralph Affleck, a lifelong sawmiller, ‘maker’ perhaps undersells the accomplishment of building a fully functioning sawmill that can be operated by a single individual.

Starting in the trade at the age of 16 under his father’s tutelage, fifty years of working in sawmills saw him still loving what he did as retirement loomed. So, with pen, paper, and a simple school ruler he designed the entire shop from scratch. Decades of expertise working with wood allowed him to design the machines to account for warping and abnormalities in the timber resulting in incredibly accurate cuts.

With no other examples to guide his design — aside from perhaps old style steam-powered sawmills, and newer portable ones that he feels are inadequate for the job — much of the shop is built from scratch with scavenged parts. And, that list is impressive: four hydraulic cylinders from a Canberra bomber, levers from an old locomotive, differentials and gearboxes from a MAC and 1912 Republic trucks, a Leyland engine that operated for 13 years without the need for maintenance, and an assortment of old military and air force vehicle parts. This is complimented by his log skidder — also custom — that would look at home in a post-apocalyptic wasteland. Built from two tractors, it combines three gearboxes for 12 forward and 8 reverse gears(what!?), and can hit 42mph in reverse!

Continue reading “Mechanized One-Man Sawmill”

A Very Tidy Circular Saw Bench

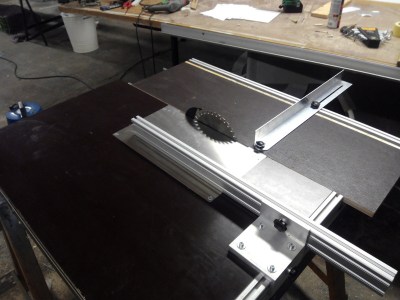
If your parents had a workshop as you grew up, the chances are it harbored some tools you came to know and love as you used them for your formative projects. Our reader [Joerg]’s father for instance has a circular saw bench that [Joerg] sorely misses, now living over 500km away. Our subject today is his response to this problem, now needing to cut aluminium he set about creating a  saw bench of his own, and the result is a rather nice build.

table-sawHe put together a variety of CAD models to formulate his ideas, and arrived at a structure in 18mm waterproof plywood with moving table linear bearings. The saw blade itself was mounted on a 5mm aluminum plate, though he doesn’t tell us what motor it uses. All the wooden parts came from a single sheet of plywood, and the result is a very tidy creation indeed.

Power saws are among the more hazardous tools in your workshop arsenal, whatever their type. If this was a commercial saw it would probably have a guard over the top of its blade, but even without that its sturdy construction and relatively low profile blade make this one stand above some of the more basic home-made saws we’ve seen. Building a power saw is something you have to take seriously.

We’ve featured quite a few home-made saws over the years. At least one other large table saw, a rather powerful but surprisingly tiny saw bench, this scroll saw using a sewing machine mechanism, or how about this simple jigsaw table?

Hackaday Links: May Day, 2016

Humble Bundle is a great way to fill up your Steam library – just pay what you want, and get some indie video games. The Humble Bundle is much more than video games, because No Starch Press just put up a bundle of books on hacking. No, there are no books about wearing balaclavas and using laptops with one hand. I haven’t written that book yet. There’s some choice books in this bundle, including [Bunnie]’s Hacking the XboxAutomate the Boring Stuff with Python, and Practical Malware Analysis.

The Raspberry Pi camera – the $25 add-on webcam that plugs directly into the Pi – is getting an upgrade. The original camera was a five Megapixel sensor that was EOL’d at the end of 2014. The Raspberry Pi foundation bought up a lot of stock, but eventually there would be a replacement. The new sensor is a Sony IMX219 eight Megapixel deal, available at the same price. We assume a NoIR version without the IR filter will be released shortly.

Here’s a little hardware review that doesn’t quite merit a full post. The Raspberry Pi Zero is great, and will be even better once production ramps up again and stock lands in warehouses. One problem with the Zero is the lack of USB ports, leading to at least two Hackaday posts with the exact same headline, ‘Yet Another Pi Zero USB Hub‘. Obviously, there’s a market for an easy to use USB hub for the Zero, and this company is stepping up to fill the need. The killer feature here is the use of pogo pins to tap into the USB differential lines, power and ground pads on the bottom of the Pi Zero. The USB hub is based on the popular FE 1.1 4-port USB hub controller, giving the Pi Zero four USB 2.0 ports. Does it work? Yeah, and it’s only $10. A pretty neat little device that will be very useful when Pi Zeros flood workbenches the world over.

It was announced in 2014, released in 2015, but the STM32F7 hasn’t seen a lot of action around these parts. A shame, because this is the upgrade to the famously powerful STM32F4 microcontroller that’s already capable of driving high-resolution displays through VGA, being an engine control unit for a 96 Ford Aspire, and being a very complex brushless motor driver. The STM32F7 can do all of these and more, and now ST is cutting prices on the F7’s Discovery Board. If you’re looking for a high-power ARM micro and don’t need to run Linux, you won’t do better elsewhere.

Need to reflow a board, but don’t have a toaster oven? Use a blowtorch! By holding a MAPP blowtorch a foot away from a board, [whitequark] was able to successfully reflow a large buck converter. There’s a lot of water vapor that will condense on the board, so a good cleaning afterward is a good idea.

A few weeks ago, [Mr. LeMieux] built a 360 degree, all-metal hinge. He’s been up to something a little more dangerous since then: building piles of mini table saws. Small table saws are useful for miniatures, models, and the like. [Mr. LeMieux]’s table saw is a piece of CNC’d aluminum, with a bearing and saw arbor that attaches to an electric drill. Dangerous, you say? Not compared to the competition. Behold the worst forty dollars I’ve ever spent. This Horror Freight mini table saw is by far the worst tool I’ve ever used. The bed was caked with streaky layers of paint, uneven, the blade wasn’t set at 90 degrees, and the whole thing was horrifically underpowered. Trust me when I say the CNC electric drill version is safer.

Engineering Meets Craftsmanship In This Guitar Fretting Jig

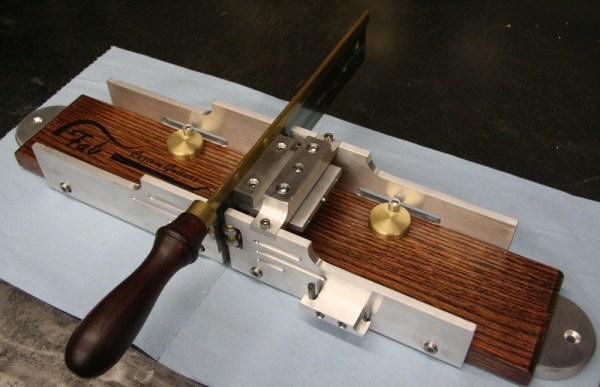
178-440Cutting the slots in a guitar’s neck for the frets requires special tooling, and [Gord]’s contribution to his friend’s recent dive into lutherie was this lovingly engineered and crafted fret mitering jig. We’d love to have a friend like [Gord].
We’ve covered a number of [Gord]’s builds before, and craftsmanship is the first thing that comes to mind whether the project is a man-cave clock or artisanal soaps. For this build, he stepped up the quality a notch – after all, if you’re going to build something you could buy for less than $200, you might as well make it a thing to behold.

There’s plenty to feast the eyes on here – an oak bed with custom logo, the aluminum jig body with brass accents, and the precision bearings that guide the pricey backsaw. Functionality abounds too – everything is adjustable, from the depth of cut to the width of the saw blade. There’s even a place to store the adjustment tool.

The result? Well, let’s just say that [Gord] and his friend [Fabrizio] are kindred spirits in the craftsmanship department. And [Fab]’s not a bad axeman either, as the video below shows.

Continue reading “Engineering Meets Craftsmanship In This Guitar Fretting Jig”

DIY Drill Powered Band Saw

Hand Drill To Band Saw Conversion

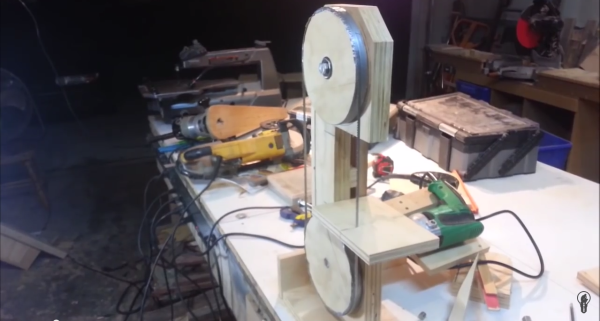
Need a band saw but only have a drill kicking around? That may not be a common problem but if you ever run into it, [Izzy] has got you covered. He’s on a mission to make a drill-powered workshop and in his YouTube video, he shows a small bench top band saw he made that is powered by a corded hand drill.

The main frame is made from doubled up 3/4″ plywood. The saw blade is strung between two wooden wheels. Those wheels have tape applied to their outer diameter to create a crowned roller. That crown keeps the saw blade tracking in the middle of the wheel. The bottom wheel is mounted to an axle that is supported by bearings in the main frame. That axle pokes out the back and is connected to the drill. The top wheel has integrated bearings and ride on a stud mounted to the frame. The blade seems to be pretty tight although there is no noticeable tensioning system.

The video shows that this DIY band saw can cut through 1.5 inch wood fairly easily. Even so, there are clearly some needed features, like guide bearings for the blade and an overall cover to prevent accidental lacerations. But we suppose, even professional saws can be dangerous if not treated with respect.