Smart Occupancy Sensor Knows All

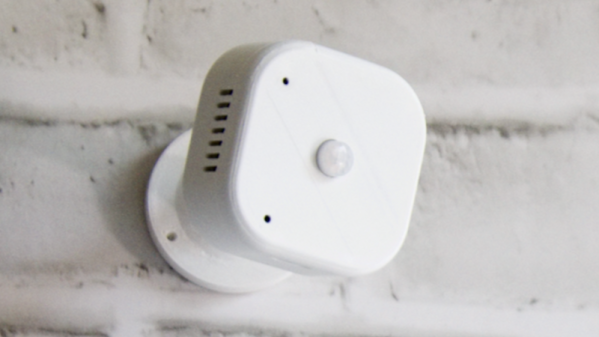
In the last few decades, building engineers and architects have made tremendous strides in improving the efficiency of various buildings and the devices that keep them safe and comfortable to live in. The addition of new technology like heat pumps is a major factor, as well as improvements on existing things like insulation methods and building materials. But after the low-hanging fruit is picked, technology like this smart occupancy sensor created by [Sina Moshksar] might be necessary to help drive further efficiency gains.

Known as RoomSense IQ, the small device mounts somewhere within a small room and uses a number of different technologies to keep track of the number of occupants in a room. The primary method is mmWave radar which can sense the presence of a person up to five meters away, but it also includes a PIR sensor to help prevent false positives and distinguish human activity from non-human activity. The device integrates with home automation systems to feed them occupancy data to use to further improve the performance of those types of systems. It’s also designed to be low-cost and easy to install, so it should be relatively straightforward to add a few to any existing system as well.

The project is also documented on this GitHub page, for anyone looking to build a little more data into their home automation system or even augment their home security systems. We imagine that devices like this could be used with great effect paired with a heating device like this, and we’ve also seen some other interesting methods of determining occupancy as well.

Continue reading “Smart Occupancy Sensor Knows All”

Remote Water Quality Monitoring

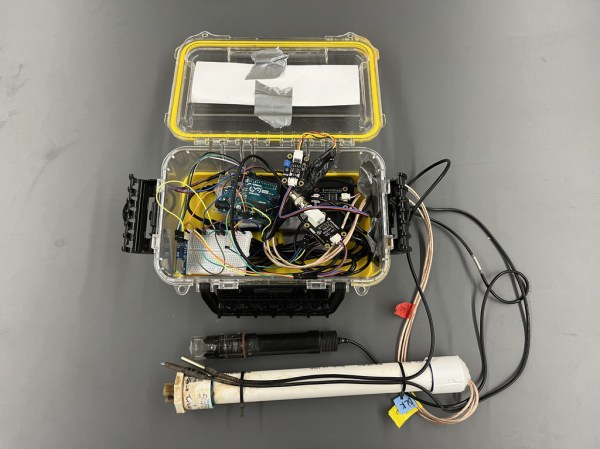
While it can be straightforward to distill water to high purity, this is rarely the best method for producing water for useful purposes. Even drinking water typically needs certain minerals in it, plants may need a certain pH, and wastewater systems have a whole host of other qualities that need to be measured. Measuring water quality is a surprisingly complex endeavor as a result and often involves a wide array of sensors, much like this water quality meter from [RowlesGroupResearch].

The water quality meters that they are putting to use are typically set up in remote locations, without power, and are targeting natural bodies of water and also wastewater treatment plants. Temperature and pH are simple enough to measure and grasp, but this device also includes sensors for total dissolved solids (TDS) and turbidity which are both methods for measuring various amounts and types of particles suspended in the water. The build is based around an Arduino so that it is easy for others to replicate, and is housed in a waterproof box with a large battery, and includes data logging to an SD card in order to make it easy to deploy in remote, outdoor settings and to gather the data at a later time.

The build log for this device also goes into detail about all of the steps needed to set this up from scratch, as well as a comprehensive bill of materials. This could be useful in plenty of professional settings such as community wastewater treatment facilities but also in situations where it’s believed that industrial activity may be impacting a natural body of water. For a water quality meter more focused on drinking water, though, we’d recommend this build that is trained on its own neural network.

Low-Power Wi-Fi Includes E-Paper Display

Designing devices that can operate in remote environments on battery power is often challenging, especially if the devices need to last a long time between charges or battery swaps. Thankfully there are some things available that make these tasks a little easier, such as e-ink or e-paper displays which only use power when making changes to the display. That doesn’t solve all of the challenges of low-power devices, but [Albertas] shows us a few other tricks with this development board.

The platform is designed around an e-paper display and is meant to be used in places where something like sensor data needs to not only be collected, but also displayed. It also uses the ESP32C3 microcontroller as a platform which is well-known for its low power capabilities, and additionally has an on-board temperature and humidity sensor. With Bluetooth included as well, the tiny device can connect to plenty of wireless networks while consuming a remarkably low 34 µA in standby.

With a platform like this that can use extremely low power when not taking measurements, a battery charge can last a surprisingly long time. And, since it is based on common components, adding even a slightly larger battery would not be too difficult and could greatly extend this capability as well. But, we have seen similar builds running on nothing more than a coin cell, so doing so might only be necessary in the most extreme of situations.

Wi-Fi Sensor For Rapid Prototyping

There might seem like a wide gulf between the rapid prototyping of a project and learning a completely new electronics platform, but with the right set of tools, these two tasks can go hand-in-hand. That was at least the goal with this particular build, which seeks to use a no-soldering method of assembling electronics projects and keeping code to a minimum, while still maintaining a platform that is useful for a wide variety of projects.

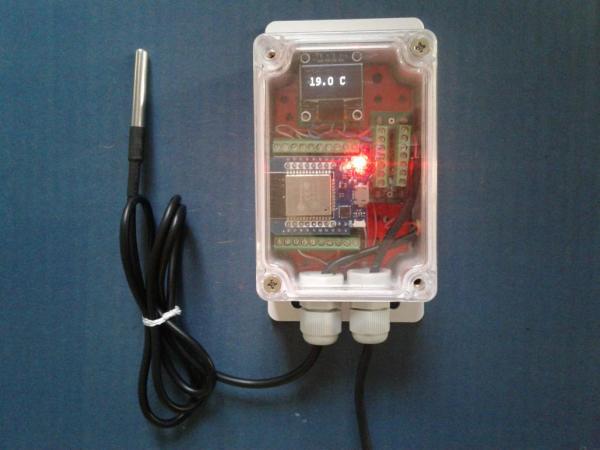
As a demonstration, this specific project is a simple Wi-Fi connected temperature monitoring station. Based around an ESP32 and using a DS18B20 digital temperature sensor, the components all attach to a back plate installed in a waterproof enclosure and are wired together with screw-type terminal breakout boards to avoid the need for soldering. The software suite is similarly easy to set up, revolving around the use of Tasmota and ESPHome, which means no direct programming — although there will need to be some configuration of these tools.

With the included small display, this build makes a very capable, simple, and quick temperature monitor. But this isn’t so much a build about monitoring temperature but about building and prototyping quickly without the need for specialized tools and programming. There is something to be said for having access to a suite of rapid prototyping tools for projects as well, though.

Not A Pot, Not An Encoder: Exploring Synchros For Rotational Sensing

We’re all familiar with getting feedback from a rotating shaft, for which we usually employ a potentiometer or encoder. But there’s another device that, while less well-known, has some advantages that just might make it worth figuring out how to include it in hobbyist projects: the synchro.

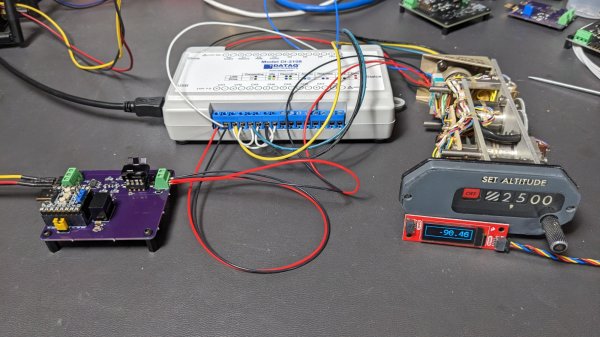
If you’ve never heard of a synchro, don’t feel bad; as [Glen Akins] explains, it’s an expensive bit of kit most commonly found in avionics gear. It’s in effect a set of coaxial transformers with a three-phase stator coil and a single-phase rotor. When excited by an AC reference voltage, the voltage induced on the rotor coil is proportional to the cosine of the angle between the rotor and stator. It seems simple enough, but the reality is that synchros present some interfacing challenges.

[Glen] chose a surplus altitude alert indicator for his experiments, a formidable-looking piece of avionics. Also formidable was the bench full of electronics needed to drive and decode the synchro inside it — a 26-volt 400-Hz AC reference voltage generator, an industrial data acquisition module to digitize the synchro output, and an ESP32 dev board with a little OLED display to show the results. And those are impressive; as seen in the video below, the whole setup is capable of detecting tenth-of-a-degree differences in rotation.

The blog post has a wealth of detail on using synchros, as does this Retrotechtacular piece from our own [Al Williams]. Are they practical for general hobbyist use? Probably not, but it’s still cool to see them put to use.

Continue reading “Not A Pot, Not An Encoder: Exploring Synchros For Rotational Sensing”

Exploring The Hall Effect For Haptic Feedback PS4 Joysticks

Modern gaming console controllers aren’t without their annoyances — Joy-Con drift, anyone? The problems might stem from design deficiencies, but we suspect that user enthusiasm and the mechanical stress it can introduce might play a significant role as well. Either way, [Marius Heier] decided to take a look at what would be required to build a better joystick and came up with some interesting results.

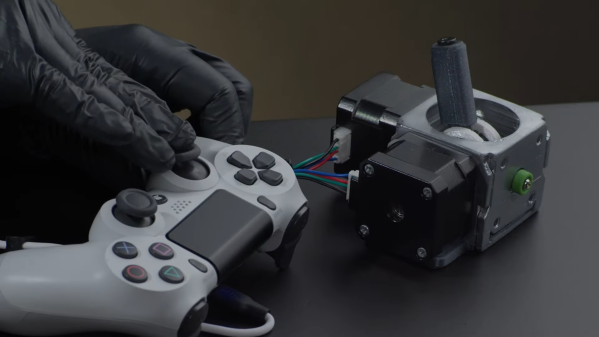
The first video below lays the basic groundwork, with a bunch of experiments with 3-axis Hall effect sensors, specifically the Texas Instruments TMAG5273 and TMAG5170. They’re essentially the same sensor with different interfaces — SPI for the 5170 and I2C for the 5273. Using just one of these sensors, he was able to build a joystick with the usual X- and Y- axis control, but also with a rotary axis. What’s more, he built a motorized version using two NEMA 17 steppers to mechanically drive the stick back to center.

The joystick is bulky, but it looks like he’s got plans for a much smaller one with [Carl Bugeja]-style PCB motors that should fit into a PS4 controller. That’s the subject of the second video below, which uses a different Hall sensor — an Allegro A1304 — and is mainly concerned with getting the output of a non-motorized but considerably miniaturized joystick stick talking the language that the controller expects. It’s not a simple process, but it seems to be coming along nicely, and we’ll be watching progress closely.

Continue reading “Exploring The Hall Effect For Haptic Feedback PS4 Joysticks”

Take A Deep Dive Into A Commodity Automotive Radar Chip

When the automobile industry really began to take off in the 1930s, radar was barely in its infancy, and there was no reason to think something that complicated would ever make its way into the typical car. Yet here we stand less than 100 years later, and radar has been perfected and streamlined so much that an entire radar set can be built on a single chip, and commodity radar modules can be sprinkled all around the average vehicle.

Looking inside these modules is always fascinating, especially when your tour guide is [Shahriar Shahramian] of The Signal Path, as it is for this deep dive into an Infineon 24-GHz automotive radar module. The interesting bit here is the BGT24LTR11 Doppler radar ASIC that Infineon uses in the module, because, well, there’s really not much else on the board. The degree of integration is astonishing here, and [Shahriar]’s walk-through of the datasheet is excellent, as always.

Things get interesting once he gets the module under the microscope and into the X-ray machine, but really interesting once the RF ASIC is uncapped, at the 15:18 mark. The die shots of the silicon germanium chip are impressively clear, and the analysis of all the main circuit blocks — voltage-controlled oscillator, power amps, mixer,  LNAs — is clear and understandable. For our money, though, the best part is the look at the VCO circuit, which appears to use a bank of fuses to tune the tank inductor and keep the radar within a tight 250-Mz bandwidth, for regulatory reasons. We’d love to know more about the process used in the factory to do that bit.

This isn’t [Shahriar]’s first foray into automotive radar, of course — he looked at a 77-GHz FMCW car radar a while back. That one was bizarrely complicated, though, so there’s something more approachable about a commodity product like this.

Continue reading “Take A Deep Dive Into A Commodity Automotive Radar Chip”