Silicone Devices: DIY Stretchable Circuits

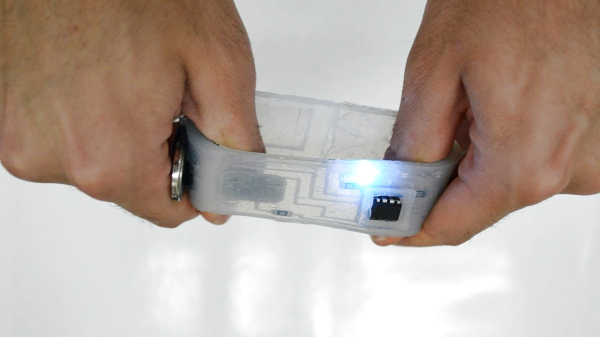
Flexible circuits built on polyimide film are now commonplace, you can prototype with them at multiple factories, at a cost that is almost acceptable to your average hacker. Polyimide film is pretty tough for something so thin, but eventually it will tear, and with larger components, bend radii are quite restricted. But what about stretchable circuits, as in circuits you can flex, twist and stretch? Let us introduce silicone devices. A research group from Hasselt University, Belgium, have been prototyping making truly flexible, silicone-based circuit substrates, managing to integrate a wide range of SMT component types with a dual layer interconnect, with vias and external contacts.

It should be possible to reproduce the process using nothing more special than your average Makerspace CO2 laser cutter, and a couple of special tools that can be easily made — a guide for that is promised — it is purely a matter of gathering a few special materials, and using off-cuts you have lying around for the rest. The interconnect uses Galinstan, which is a low melting point alloy of gallium, indium, and tin. Unfortunately, this material is fairly expensive and cannot be shipped by air due to the gallium content, without specialised handling, at considerable expense. But that aside, other than some acrylic sheets, some vinyl, copper foil and a few sprays, nothing is beyond reach.

The construction process is reverse to what we normally see, with the components and copper contact plates placed first, on to a primed vinyl sheet. This sheet is laser marked with the component outlines to enable them to be corrected placed. Yes, that’s right, they’re using a laser cutter to mark vinyl, a chlorine-containing plastic. Hold on to that thought for a bit.

Insulating layers and substrate layers are constructed by blade-coating with a layer of clear silicone. Interconnect layers are formed by sticking a fresh vinyl sheet onto the exposed contacts and laser cutting just though it to expose the pads and the interconnect traces. Next the fancy Galinstan is applied by brush and the vinyl stencil removed. Rinse and repeat for the next layer of insulating silicone, more circuit traces, then use the laser cutter to precisely etch through the via regions to allow more metalisation to be added. Finally a coating of silicone is applied over the whole assembly, the laser is again used to etch the silicone away from the contact pads, and with a little solder tinning of these, you’re done. Simple, if only our Makerspaces didn’t have rules against laser cutting vinyl.

This was clearly a very brief overview, here is a very detailed instructables guide ready for you, as well as a formal research paper, detailing why this came about and why you might want to try this yourself.

If you’re into custom wearables, you might remember this earlier piece about silicone circuits, and this one weird organic-looking thing from the same time-frame.

Continue reading “Silicone Devices: DIY Stretchable Circuits”

Printing In Silicone

When you think of making something out of silicone, you usually think of using a mold and injecting it with the material. Can you 3D print it? [Kimberly Beckett] answers that very question in a recent post. The short answer is yes, but you need specialized printing equipment.

Most consumer or hobby printers use either filament deposition or photoresin. Neither of these processes are good for printing silicone. For one thing, silicone doesn’t melt and reform like a thermoplastic. After all, that is why we like making hotend socks and oven utensils with the material. If you do melt silicone, you get a gooey mess, not a nice fluid you can push through an extruder nozzle. As for resin printing, silicone is resistant to UV so the chances of coming up with UV curable silicone are pretty small.

Continue reading “Printing In Silicone”

Epoxy lenses

The Ins And Outs Of Casting Lenses From Epoxy

If you need a lens for a project, chances are pretty good that you pick up a catalog or look up an optics vendor online and just order something. Practical, no doubt, but pretty unsporting, especially when it’s possible to cast custom lenses at home using silicone molds and epoxy resins.

Possible, but not exactly easy, as [Zachary Tong] relates. His journey into custom DIY optics began while looking for ways to make copies of existing mirrors using carbon fiber and resin, using the technique of replication molding. While playing with that, he realized that an inexpensive glass or plastic lens could stand in for the precision-machined metal mandrel which is usually used in this technique. Pretty soon he was using silicone rubber to make two-piece, high-quality molds of lenses, good enough to try a few casting shots with epoxy resin. [Zach] ran into a few problems along the way, like proper resin selection, temperature control, mold release agent compatibility, and even dealing with shrinkage in both the mold material and the resin. But he’s had some pretty good results, which he shares in the video below.

[Zach] is clear that this isn’t really a tutorial, but rather a summary of the highs and lows he experienced while he was working on these casting methods. It’s not his first time casting lenses, of course, and we doubt it’ll be his last — something tells us he won’t be able to resist trying this all-liquid lens casting method in his lab.

Continue reading “The Ins And Outs Of Casting Lenses From Epoxy”

Wearable soft robot grippers

Soft Robotics Hack Chat

Join us on Wednesday, October 27 at noon Pacific for the Soft Robotics Hack Chat with Ali Shtarbanov!

By this point in technological history, we’ve all been pretty well trained in how to think about robots. Designs vary wildly, but to achieve their goals, most robots have one thing in common: they’re rigid. Whether it’s a robot arm slinging a spot welder on an assembly line or a robot dog on patrol, they’re largely made of stiff, strong, materials that, more often than not, are powered by electric motors of some sort.

But just because that’s the general design palette for robotics doesn’t mean there aren’t other ways. Robots, especially those that are intended to be used in close association with humans, can often benefit from being a little more flexible. And that’s where the field of soft robotics shines. Rather than a skeleton of machined aluminum and powerful electric actuators, these robots tend more toward silicone rubber construction with pneumatic activation. Some soft robots are even compliant and safe enough to be wearable, giving humans the ability to do things they never could before, or perhaps restoring functions that have been lost to the ravages of entropy.

Soft robotics is a fascinating field with the potential to really revolutionize things like wearables and collaborative robotics. To help us understand a little more about what’s going on in this space, we’re pleased to welcome Ali Shtarbanov to the Hack Chat. Ali is a Ph.D. student at MIT’s famed Media Lab, where he studies Human-Computer Interaction. He’s particularly interested in making soft robotics as fast and easy to prototype as traditional robotics have become, and to this end, he invented FlowIO, an open-source platform for pneumatic control. We’ll use this as a jumping-off point to discuss the whole field of soft robotics, especially where it is now and where Ali sees it going in the future.

join-hack-chatOur Hack Chats are live community events in the Hackaday.io Hack Chat group messaging. This week we’ll be sitting down on Wednesday, October 27 at 12:00 PM Pacific time. If time zones have you tied up, we have a handy time zone converter.

Expanding On The Creation Of Collapsible Containers

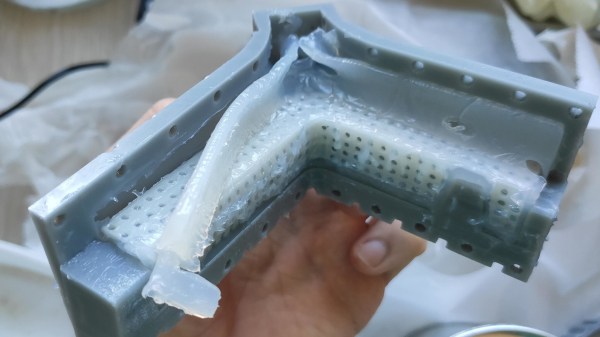
You might remember that industrial designer [Eric Strebel] tried to make a collapsible silicone container with 3D printed molds a few weeks ago, and was finally successful after dozens of attempts. Someone commented that commercial containers are molded in the collapsed position instead of the expanded position, so naturally, [Eric] had to try it once he saw the photographic proof of these molds.

Adding sand to a partially-cured silicone piece so it will take the shape of the expanded mold.This time around, [Eric] made things easier on himself by adding some handles to the mold and using both wax and spray mold release before pouring in the degassed silicone. The first one was a failure —  he had let it cure the whole time in the collapsed mold, and it just didn’t want to stay expanded. On the second attempt, [Eric] decided to pull the piece while it was curing, about 5 1/2 hours into the process.

After carefully de-molding the piece, he pressed it into the grooves of one of the older molds from the days of molding containers in the expanded state. Then he filled it with sand and let it cure the rest of the way. That worked out quite well, but even so, [Eric] made a third attempt that he pulled after 3.5 hours or so when the silicone was still sticky.  He did the sand trick again, but this time, he ran a piece of string up the wall and over the edge so that the air that gets trapped under the sand can escape. The final result looks great, albeit a little bit floppy, but [Eric] fits the final product into a frame that makes them much sturdier. Check out the process in the video after the break.

Did you miss the first installment? It’s worth a look into the science of creating collapsible walls.

Continue reading “Expanding On The Creation Of Collapsible Containers”

Injection Molding Silicone Parts For Under $50

You’ve likely seen many tutorials on making silicone parts using 3D printed molds online. The vast majority of these methods use a simple pour method to fill the mold. This relies on careful degassing and gentle pouring to reduce the presence of bubbles in the final result. [Jan Mrázek] has been working on an alternative method however, that allows for injection molding at low cost in the home shop.

The process relies on the use of printed resin molds. [Jan] notes that this generally necessitates the use of condensation-cure silicones, as additive types don’t cure well in resin molds. The condensation silicone is mixed up, degassed, and poured into a standard cartridge. From there, it’s installed in a silicone delivery air gun, which uses compressed air to force the silicone out of the nozzle and into the waiting mold.

It’s basically using a bunch of home DIY gear to create a cheap injection molding solution for silicone parts. [Jan] notes that there are a few mods needed to mold design to suit the process, and that 400-800 kPa is a good pressure to inject the silicone at.

Having the silicone injected under pressure is great for complex mold designs, as it forces the material into all the little difficult nooks and crannies. Of course, we’ve seen other methods for making silicone parts before, too. Be sure to sound off in the comments with your own favored techniques for producing quality silicone parts. Video after the break.

Continue reading “Injection Molding Silicone Parts For Under $50”

‘Quiet On The Set’ Goes For Objects, Too

Unless you’re sonically savvy, trying to sleep, or simply on edge, you probably don’t realize just how noisy common items can be. Pretty much everything makes enough racket to ruin a sound man’s day, or at the very least, their chance of picking up the dialogue between two characters. What you need on a set are noiseless but realistic versions of common noisemakers like paper bags, ice cubes, and to a lesser extent, billiard balls.

If you’ve spent any time at all on Reddit, you’ve probably seen frustratingly short GIFs of [Tim Schultz] quickly explaining how this or that noiseless prop is made. Embedded below is a compendium of prop hacks with more information worked in along the way. Talk about dream job! Problem solving and then hacking together a solution for a living sounds terrifying and delightful all at once.

Speaking of terrifying and delightful hacks, there’s still plenty of time to enter our Halloween Hackfest contest, which runs through Monday, October 11th. Halloween is the best time to go all out, so show us what you can do!

Continue reading “‘Quiet On The Set’ Goes For Objects, Too”