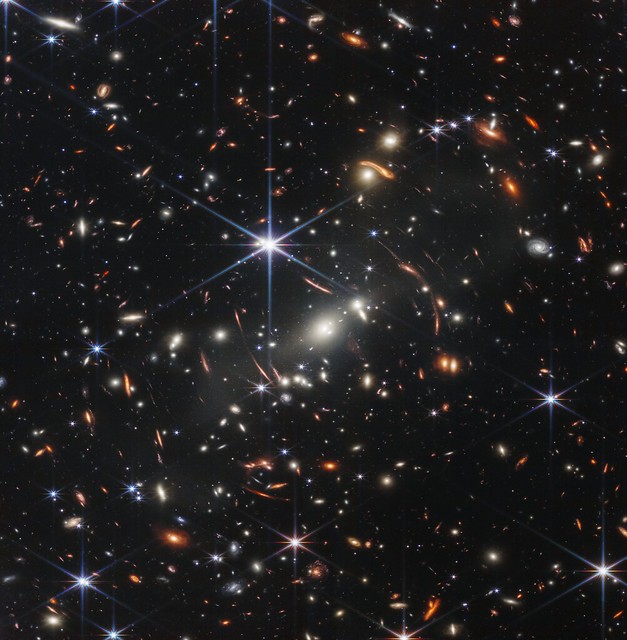
Grok The Z80 With This Simulator

Many of us will have at some point encountered a Z80 microprocessor, whether we’ve bare-metal programmed for it, or simply had a go at blasting some invaders on a game system using one. Like all the processors of its era, it’s got a relatively simple and accessible internal block diagram, so there’s a good chance that readers well even know how it works, too. But do any of know how it really works, down to the gate, transistor, and net level? [Goran] does, because he’s written a Z80 netlist simulator that allows the running of code alongside the examination of the chip and its signals. It’s not particularly fast, achieving a modest 2.3kHz clock speed when run of a fairly high-end PC, but we’re guessing readers needing to run Z80 code for anything other than learning would use the real thing anyway.

There’s a video of the software in operation which we’ve placed below the break, and we can see it will be a fascinating tool even to people who aren’t dedicated reverse engineers. To be able to bring up a logic analyzer view of the internals of a processor while it is in operation is truly astounding if you are used to it as a black box, and to have logic diagrams at your fingertips rather than puzzling out individual transistors really gives a window into what is going on.

This isn’t the only such simulator out there, in the past we’ve mentioned Visual6502, when we covered the Monster 6502.

Continue reading “Grok The Z80 With This Simulator”

P-51 Cockpit Recreated With Help Of Local Makerspace

It’s surprisingly easy to misjudge tips that come into the Hackaday tip line. After filtering out the omnipresent spam, a quick scan of tip titles will often form a quick impression that turns out to be completely wrong. Such was the case with a recent tip that seemed from the subject line to be a flight simulator cockpit. The mental picture I had was of a model cockpit hooked to Flight Simulator or some other off-the-shelf flying game, many of which we’ve seen over the years.

I couldn’t have been more wrong about the project that Grant Hobbs undertook. His cockpit simulator turned out to be so much more than what I thought, and after trading a few emails with him to get all the details, I felt like I had to share the series of hacks that led to the short video below and the story about how he somehow managed to build the set despite having no previous experience with the usual tools of the trade.

Continue reading “P-51 Cockpit Recreated With Help Of Local Makerspace”

3D Printable Stick Shift For Your Racing Simulator

If you don’t get enough driving in your real life, you can top it off with some virtual driving and even build yourself a cockpit. To this end [Noctiluxx] created a very nice 3D printable stick shifter you can build yourself.

The design is adapted for 3D printing from an older aluminium version by [Willynovi] over on the X-Simulator forums. Every version uses an off-the-shelf ball joint for the main pivot, below which is a guide plate with the desired shift pattern.  Each position has a microswitch, which can be connected to a USB encoder from eBay which acts as a HID. The position is held in the Y-axis position by a clever spring-loaded cam mechanism above the ball joint, while the X-position is held by the bottom guide plate. The gear knob can be either 3D printed or the real deal of your choice.

This design is the perfect example of the power of the internet and open source. The original aluminium design is almost a decade old, but has been built and modified by a number of people over the years to get us to the easy to build version we see today. [amstudio] created an excellent video tutorial  on how to built your own, see it after the break.

For more awesome cockpits check out this one to fly an actual (FPV) aircraft, and this dazzling array of 3D printable components for your own Garmin G1000 avionics glass cockpit. Continue reading “3D Printable Stick Shift For Your Racing Simulator”

3D Print Your Way To A Glass Cockpit Simulator

Today’s commercial aircraft are packed to the elevators with sensors, computers, and miles and miles of wiring. Inside the cockpit you’re more than likely to see banks of LCDs and push buttons than analog gauges. So what’s that mean for the intrepid home simulator builder? Modern problems require modern solutions, and this 3D printed simulator is about as modern as it gets.

Published to Thingiverse by the aptly named [FlightSimMaker], this project consists of a dizzying number of 3D-printed components that combine into a full-featured desktop simulator for the Garmin G1000 avionics system. Everything from the parking brake lever to the push buttons in the display bezels was designed and printed: over 200 individual parts in all. Everything in this X-Plane 11 compatible simulator is controlled by an Arduino Mega 2560 with the SimVim firmware.

To help with connecting dozens of buttons, toggle switches, and rotary encoders to the Arduino, [FlightSimMaker] uses five CD74HC4067 16-channel multiplexers. The display is a 12.1 inch 1024 x 768 LCD panel with integrated driver, and comes in at the second most expensive part of the build behind the rotary encoders. All told, the estimated cost per display is around $250 USD.

Even if you aren’t looking to build yourself a high-tech flight simulator, there’s plenty of ideas and tips here that could be useful for building front panels. We particularly like the technique used for doing 3D-printed lettering: the part is printed in white, spray painted a darker color, and then the paint is sanded off the faces of the letters to reveal the plastic. Even with a standard 0.4 mm nozzle, this results in clean high-contrast labels on the panel with minimal fuss.

Of course, while impressive, these panels are just the beginning. There’s still plenty more work to do if you want to build an immersive simulation experience. Including, in the most extreme cases, buying a Boeing 737 cockpit.

AMSAT CubeSat Simulator Hack Chat

Join us on Wednesday, December 4th at noon Pacific for the AMSAT CubeSat Simulator Hack Chat with Alan Johnston!

For all the lip service the world’s governments pay to “space belonging to the people”, they did a pretty good job keeping access to it to themselves for the first 50 years of the Space Age. Oh sure, private-sector corporations could spend their investors’ money on lengthy approval processes and pay for a ride into space, but with a few exceptions, if you wanted your own satellite, you needed to have the resources of a nation-state.

All that began to change about 20 years ago when the CubeSat concept was born. Conceived as a way to get engineering students involved in the satellite industry, the 10 cm cube form factor that evolved has become the standard around which students, amateur radio operators, non-governmental organizations, and even private citizens have designed and flown satellites to do everything from relaying ham radio messages to monitoring the status of the environment.

But before any of that can happen, CubeSat builders need to know that their little chunk of hardware is going to do its job. That’s where Alan Johnston, a teaching professor in electrical and computer engineering at Villanova University, comes in. As a member of AMSAT, the Radio Amateur Satellite Corporation, he has built a CubeSat simulator. Built for about $300 using mostly off-the-shelf and 3D-printed parts, the simulator lets satellite builders work the bugs out of their designs before committing them to the Final Frontier.

Dr. Johnston will stop by the Hack Chat to discuss his CubeSat simulator and all things nanosatellite. Come along to learn what it takes to make sure a satellite is up to snuff, find out his motivations for getting involved in AMSAT and CubeSat testing, and what alternative uses people are finding the platform. Hint: think high-altitude ballooning.

join-hack-chatOur Hack Chats are live community events in the Hackaday.io Hack Chat group messaging. This week we’ll be sitting down on Wednesday, December 4 at 12:00 PM Pacific time. If time zones have got you down, we have a handy time zone converter.

Click that speech bubble to the right, and you’ll be taken directly to the Hack Chat group on Hackaday.io. You don’t have to wait until Wednesday; join whenever you want and you can see what the community is talking about.

Feel The Virtual Road With Force Feedback

When you’re driving your virtual supercar around the Italian countryside the last thing you want is an inauthentic steering wheel feel, that’s where Open FFBoard comes in. Racing game enthusiasts will go to impossible and sometimes incredibly expensive lengths to build extravagant simulators. [Yannick] feels many of these products are just a little too pricey without much need.

Right now his board is still in a process of iteration, though it can integrate with Assetto Corsa already. You can see in the demo video after the break that it responds quite realistically to the video game state, however problems keep cropping up in search of solutions. Motor drivers burn out and power resistors are added: that energy has to go somewhere. Next up will be switching to the increasingly popular Trinamic drivers. Either way we can’t wait to see the next revision and to get another amazing simulator build sent in to us, maybe centered around the Open FFBoard.

Continue reading “Feel The Virtual Road With Force Feedback”

Simulate City Blocks With Circuit Blocks In A LEGO Box

Have you ever looked around your city’s layout and thought you could do better? Maybe you’ve always wanted to see how she’d run on nuclear or wind power, or just play around with civic amenities and see how your choices affect the citizens.

[Robbe Nagel] made this physical-digital simulator for a Creative Programming class within an industrial design program. We don’t have all the details, but as [Robbe] explains in the video after the break, each block has a resistor on the bottom, and each cubbyhole has a pair of contacts ready to mate with it. An Arduino nestled safely in the LEGO bunker below reads the different resistance values to determine what block was placed where.

[Robbe] wrote a program that evaluates various layouts and provides statistics for things like population, overall health, education level, pollution, etc. As you can see after the break, these values change as soon as blocks are added or removed. Part of what makes this simulator so cool is that it could be used for serious purposes, or it could be totally gamified.

It’s no secret that we like LEGO, especially as an enclosure material. Dress it up or dress it down, just don’t leave any pieces on the floor.

Continue reading “Simulate City Blocks With Circuit Blocks In A LEGO Box”