When [Michael Gardi] finished his scaled down DEC VT100 replica a few months ago, he made it very clear that the project was only meant to look like a vintage terminal on the outside. A peek into the case revealed nothing more exotic than a Raspberry Pi running its default operating system, making the terminal just as well suited to emulating classic games as it was dialing into a remote system. But as any hacker knows, some projects end up developing a life of their own.
It started simply enough. The addition of an RS-232 Serial HAT to the Raspberry Pi meant that the 3D printed VT100 could actually operate as a serial terminal using software such as minicom. Then [Lars Brinkhoff] got involved. He loved the look of the printed VT100, and thought it deserved better than a generic terminal emulator. So he went ahead and started developing a custom terminal simulator for it to run.
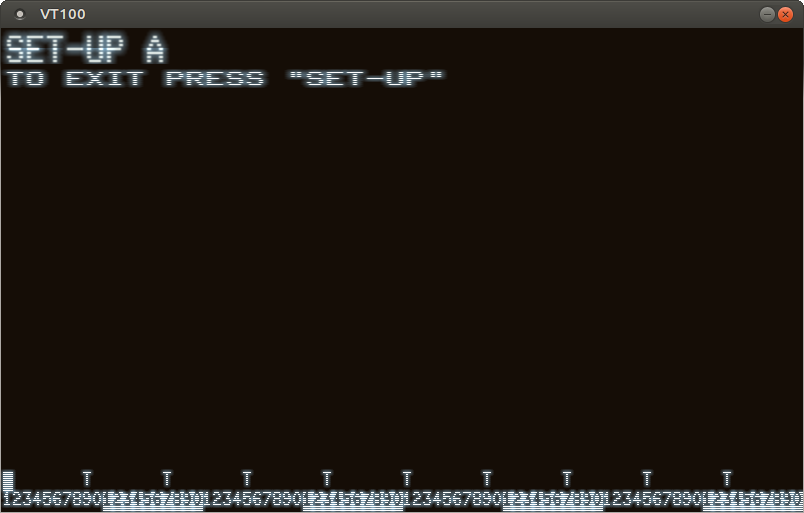
Reliving those CRT glory days.
The idea here is that an an 8080 emulator actually runs an original VT100 firmware ROM, warts and all. It makes all the beeps and chirps you’d expect from the real hardware, and there’s even some OpenGL trickery used to mimic an old CRT display, complete with scan lines and a soft glow around characters.
Naturally the visual effects consume a fair amount of processing power, so [Lars] cautions that anything lower than the Pi 4 will likely experience slowdowns. Of course, nothing is stopping you from running the simulator on your desktop machine if you’re looking for that classic terminal experience.
Did this gorgeous recreation of the VT100 need to have a true serial interface or a simulator that recreates the unique menu system of the original? Not at all. Even without those additions, it blew us away when [Michael] first sent it in. But are we happy that these guys have put in the time to perfect this already stellar project? We think you already know the answer.
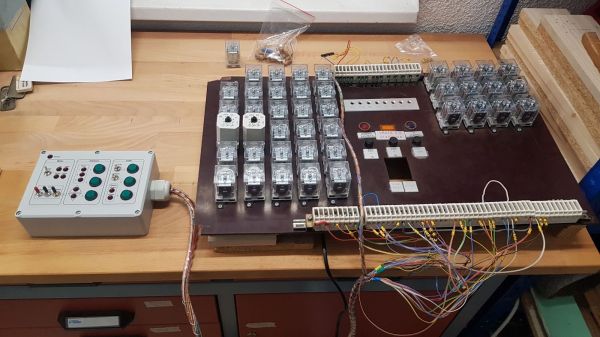
We have to admit that in the hardware hacking universe, there aren’t generally too many chances to hack elevators. Well, at least not opportunities that don’t also include the risk of incarceration. But fortune favors the bold, and when he found the remains of an elevator control panel in an abandoned Croatian resort hotel, [Davor Cihlar] undertook an extensive and instructive reverse-engineering of the panel.
The video below highlights his efforts, which were considerable given the age and state of the panel. This is a relay-only control panel, after all, with most of the relays missing and a rat’s nest of wires connecting the sockets. So [Davor] put his “RevIng” concept to work. This uses a custom PCB with a microcontroller on-board that plugs into each relay socket and probes the connections between it and every other socket. Very clever stuff, and it presented him with the data needed to develop a ladder-logic diagram of the board, with the help of some custom software.
With the original logic in hand, [Davor] set about building a simulator for the panel. It’s a lovely piece of work, with buttons and lights to mimic the control panel inside the elevator car, as well as the call stations that would have graced each lobby of the hotel. Interestingly, he found logic that prevented the elevator from being called to some floors from anywhere but inside the car. The reason remains a mystery, but we suppose that a hotel built by Penthouse publisher [Bob Guccione] would have plenty of secrets.
We love the supremely satisfying clickiness of this build, and the reverse engineering prowess on display, but we can’t find much practical use for something like this. Then again, DIY elevators are a thing.
Circuit simulations are great because you can experiment with circuits and make changes with almost no effort. In Circuit VR, we look at circuits using a simulator to do experiments without having to heat up a soldering iron or turn on a bench supply. This time, we are going to take a bite of a big topic: op amps.
The op amp — short for operational amplifier — is a packaged differential amplifier. The ideal op amp — which we can’t get — has infinite gain and infinite input impedance. While we can’t get that in real life, modern devices are good enough that we can pretend like it is true most of the time.
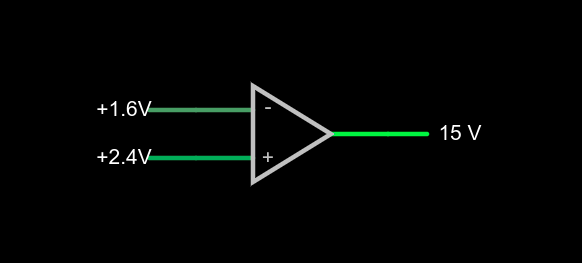
a very simple op amp circuit with some detail omitted
If you open this circuit in the Falstad simulator, you’ll see two sliders to the right where you can tweak the input voltage. If you make the voltages the same, the output will be zero volts. You might think that a difference amplifier would take inputs of 1.6V and 2.4V and either produce 0.8V or -0.8V, but that’s not true. Try it. Depending on which input you set to 2.4V, you’ll get either 15V or -15V on the output. That’s the infinite gain. Any positive or negative output voltage will quickly “hit the rail” or the supply voltage which, in this case, is +/-15V.
Practical Concerns
The biggest omitted detail in the schematic symbol above is that there’s no power supply here, but you can guess that it is +/- 15V. Op amps usually have two supplies, a positive and a negative and while they don’t have to be the same magnitude, they often are. Some op amps are specifically made to work with a single-ended supply so their negative supply can connect to ground. Of course, that presupposes that you don’t need a negative voltage output.
The amount of time it takes the output to switch is the slew rate and you’ll usually find this number on the device datasheet. Obviously, for high-speed applications, a fast slew rate is important, particularly if you want to use the circuit as a comparator as we are here.
Other practical problems arise because the op amp isn’t really perfect. A real op amp would not hit the 15V rail exactly. It will get close depending on how much current you draw from the output. The higher the current, the further away from the rails you get. Op amps will also have some offset that will prevent it from hitting zero when the inputs are equal, although on modern devices that can be very low. Some older devices or those used in high-precision designs will have a terminal to allow you to trim the zero point exactly using an external resistor.
Op Amps Can Provide Steady Voltage Under Variable Load
Rather than dig through a lot of math, you can deal with nearly all op amp circuits if you remember two simple rules:
The inputs of the op amp don’t connect to anything internally.
The output mysteriously will do what it can to make the inputs equal, as far as it is physically possible.
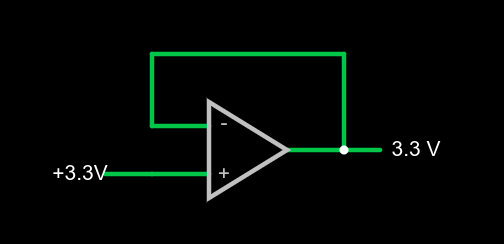
1x amplifier
That second rule will make more sense in a minute, but we already see it in action. Set the simulator so the – input (the inverting input) is at 0V and the noninverting input (+) is at 4V. The output should be 15V. The output is trying to make the inverting input match the noninverting one, but it can’t because there is no connection. The output would like to provide an infinite amount of voltage, but it can only go up to the rail which is 15V.
We can exploit this to make a pretty good x1 amplifier by simply shorting the output to the – terminal. Remember, our rules say the input terminals appear to not connect to anything, so it can’t hurt. Now the amplifier will output whatever voltage we put into it:
You might wonder why this would be interesting. Well, we will learn how to increase the gain, but you actually see this circuit often enough because the input impedance is very high (infinite in theory, but not practice). And the output impedance is very low which means you can draw more current without disturbing the output voltage much.
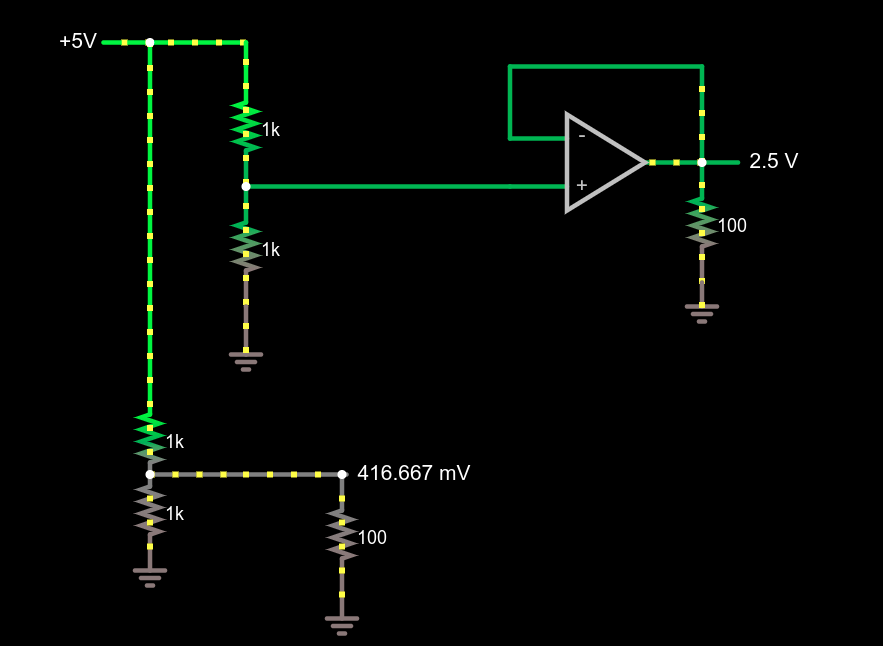
Comparing voltage divider performance with and without a 1x amplifier
This circuit demonstrates the power of a 1x amplifier. Both voltage dividers produce 2.5V with no load. However, with a 100 ohm load at the output, the voltage divider can only provide around 400mV. You’d have to account for the loading in the voltage divider design and if the load was variable, it wouldn’t be possible to pick a single resistor that worked in all cases. However, the top divider feeds the high impedance input of the op amp which then provides a “stiff” 2.5V to whatever load you provide. As an example, try changing the load resistors from 100 ohms to different values. The bottom load voltage will swing wildly, but the top one will stay at 2.5V.
Don’t forget there are practical limits that won’t hold up in real life. For example, you could set the load resistance to 0.1 ohms. The simulator will dutifully show the op amp sourcing 25A of current through the load. Your garden-variety op amp won’t be able to do that, nor are you likely to have the power supply to support it if it did.
What’s Being Amplified?
This is an amplifier even though the voltage stayed the same. You are amplifying current and, thus, power. Disconnect the bottom voltage divider (just delete the long wire) and you’ll see that the 5V supply is providing 12.5 mW of power. The output power is 62.5 mW and, of course, varies with the load resistor.
Notice how this circuit fits the second rule, though. When the input changes, the op amp makes its output equal because that’s what makes the + and – terminals stay at the same voltage.
Of course, we usually want a higher voltage when we amplify. We can do that by building a voltage divider in the feedback loop. If we put a 1:2 voltage divider in the loop, the output will have to double to match the input and, as long as that’s physically possible, that’s what it will do. Obviously, if you put in 12V it won’t be able to produce 24V on a 15V supply, so be reasonable.
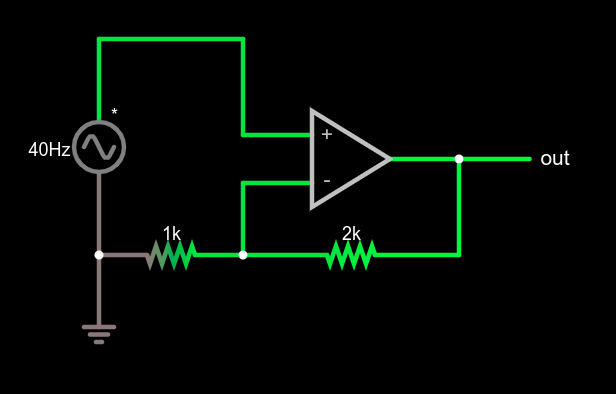
Non-inverting amplifier example
This type of configuration is called a non-inverting amplifier because, unlike an inverting amplifier, an increase in the input voltage causes an increase in the output voltage and a decrease in input causes the output to follow.
Note that the feedback voltage divider isn’t drawn like a divider, but that’s just moving symbols on paper. It is still a voltage divider just like in the earlier example. Can you figure the voltage gain of the stage? The voltage divider ratio is 1:3 and, sure enough, a 5V peak on input turns into a 15V peak on the output, so the gain is 3. Try changing the divider to different ratios.
What’s Next?
While it isn’t mathematically rigorous, thinking of the op amp as a machine that makes its inputs equal is surprisingly effective. It certainly made the analysis of these simple circuits, the comparator, the buffer amplifier, and a general non-inverting amplifier simple.
There are, of course, many other types of amplifiers, as well as other reasons to use op amps such as oscillators, filters, and other even more exotic circuits. We’ll talk about some of them next time and the idea of a virtual ground, which is another helpful analysis rule of thumb.
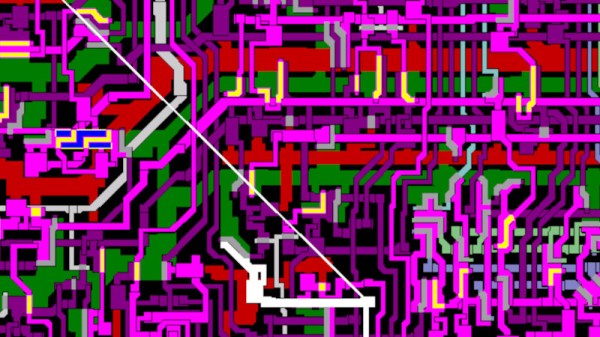
Many of us will have at some point encountered a Z80 microprocessor, whether we’ve bare-metal programmed for it, or simply had a go at blasting some invaders on a game system using one. Like all the processors of its era, it’s got a relatively simple and accessible internal block diagram, so there’s a good chance that readers well even know how it works, too. But do any of know how it really works, down to the gate, transistor, and net level? [Goran] does, because he’s written a Z80 netlist simulator that allows the running of code alongside the examination of the chip and its signals. It’s not particularly fast, achieving a modest 2.3kHz clock speed when run of a fairly high-end PC, but we’re guessing readers needing to run Z80 code for anything other than learning would use the real thing anyway.
There’s a video of the software in operation which we’ve placed below the break, and we can see it will be a fascinating tool even to people who aren’t dedicated reverse engineers. To be able to bring up a logic analyzer view of the internals of a processor while it is in operation is truly astounding if you are used to it as a black box, and to have logic diagrams at your fingertips rather than puzzling out individual transistors really gives a window into what is going on.
This isn’t the only such simulator out there, in the past we’ve mentioned Visual6502, when we covered the Monster 6502.
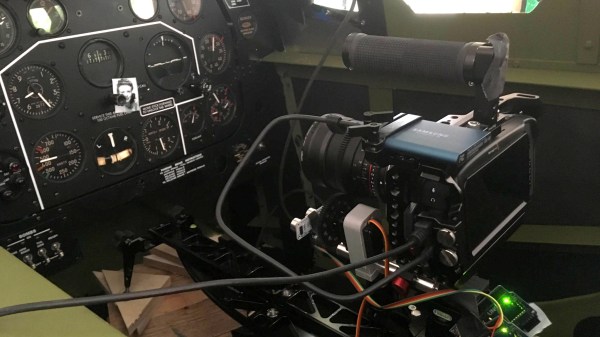
It’s surprisingly easy to misjudge tips that come into the Hackaday tip line. After filtering out the omnipresent spam, a quick scan of tip titles will often form a quick impression that turns out to be completely wrong. Such was the case with a recent tip that seemed from the subject line to be a flight simulator cockpit. The mental picture I had was of a model cockpit hooked to Flight Simulator or some other off-the-shelf flying game, many of which we’ve seen over the years.
I couldn’t have been more wrong about the project that Grant Hobbs undertook. His cockpit simulator turned out to be so much more than what I thought, and after trading a few emails with him to get all the details, I felt like I had to share the series of hacks that led to the short video below and the story about how he somehow managed to build the set despite having no previous experience with the usual tools of the trade.
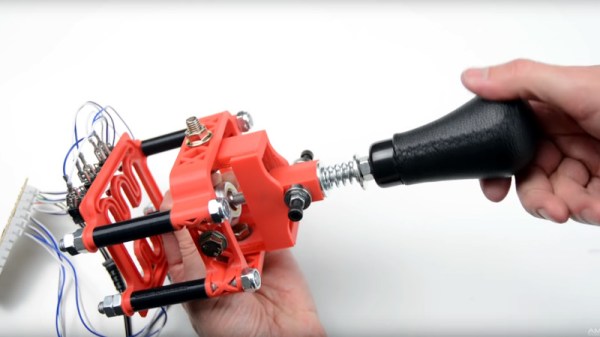
If you don’t get enough driving in your real life, you can top it off with some virtual driving and even build yourself a cockpit. To this end [Noctiluxx] created a very nice 3D printable stick shifter you can build yourself.
The design is adapted for 3D printing from an older aluminium version by [Willynovi] over on the X-Simulator forums. Every version uses an off-the-shelf ball joint for the main pivot, below which is a guide plate with the desired shift pattern. Each position has a microswitch, which can be connected to a USB encoder from eBay which acts as a HID. The position is held in the Y-axis position by a clever spring-loaded cam mechanism above the ball joint, while the X-position is held by the bottom guide plate. The gear knob can be either 3D printed or the real deal of your choice.
This design is the perfect example of the power of the internet and open source. The original aluminium design is almost a decade old, but has been built and modified by a number of people over the years to get us to the easy to build version we see today. [amstudio] created an excellent video tutorial on how to built your own, see it after the break.
Today’s commercial aircraft are packed to the elevators with sensors, computers, and miles and miles of wiring. Inside the cockpit you’re more than likely to see banks of LCDs and push buttons than analog gauges. So what’s that mean for the intrepid home simulator builder? Modern problems require modern solutions, and this 3D printed simulator is about as modern as it gets.
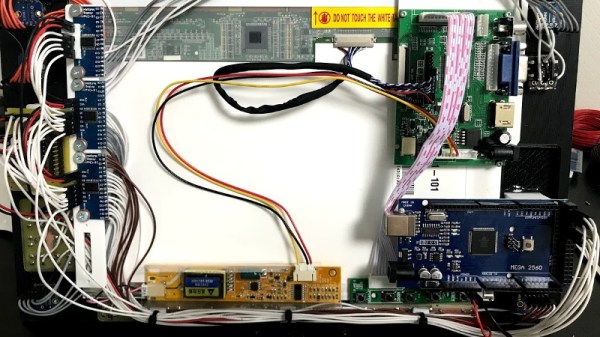
Published to Thingiverse by the aptly named [FlightSimMaker], this project consists of a dizzying number of 3D-printed components that combine into a full-featured desktop simulator for the Garmin G1000 avionics system. Everything from the parking brake lever to the push buttons in the display bezels was designed and printed: over 200 individual parts in all. Everything in this X-Plane 11 compatible simulator is controlled by an Arduino Mega 2560 with the SimVim firmware.
To help with connecting dozens of buttons, toggle switches, and rotary encoders to the Arduino, [FlightSimMaker] uses five CD74HC4067 16-channel multiplexers. The display is a 12.1 inch 1024 x 768 LCD panel with integrated driver, and comes in at the second most expensive part of the build behind the rotary encoders. All told, the estimated cost per display is around $250 USD.
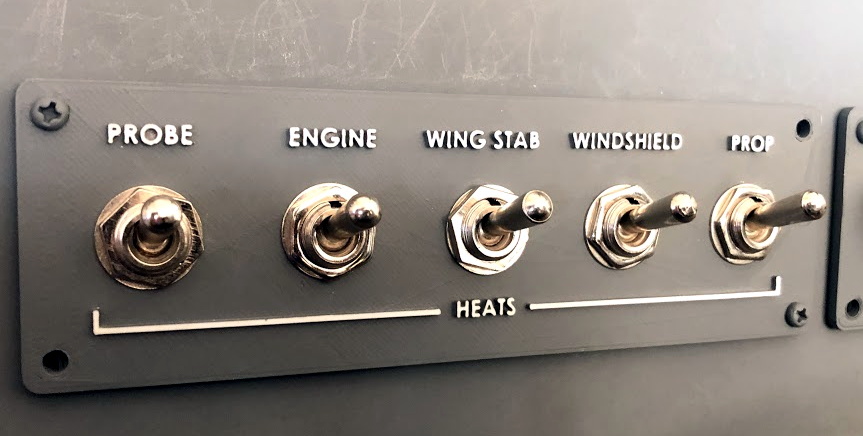
Even if you aren’t looking to build yourself a high-tech flight simulator, there’s plenty of ideas and tips here that could be useful for building front panels. We particularly like the technique used for doing 3D-printed lettering: the part is printed in white, spray painted a darker color, and then the paint is sanded off the faces of the letters to reveal the plastic. Even with a standard 0.4 mm nozzle, this results in clean high-contrast labels on the panel with minimal fuss.