A Box With A Pocket Sized Boom

[Discreet Electronics Guy] sends in his very pocket sized boom box.

One thing we love about [Discreet Electronics Guy]’s projects is how they really showcase that a cool hack is possible without access to 3D printers, overnight PCB services, and other luxuries. Everything in this board is hand made by electronics standards. The board is etched, the vias are wires, and even the case seems to be a modified plastic mint container.

The boombox itself uses an ATiny85 at its core which plays .wav files from an SD card. This is routed through an audio amp which powers two small speakers. We love the volume knob being a board mount potentiometer. The device even features its own small LiON battery pack. If you don’t want to enjoy the deep sound of the two small speakers there’s a headphone jack.

He’s got a great write-up on the circuit design on his website and you can see a video of him presenting the project here or after the break.

Continue reading “A Box With A Pocket Sized Boom”

Laser-Based Audio Injection On Voice-Controllable Systems

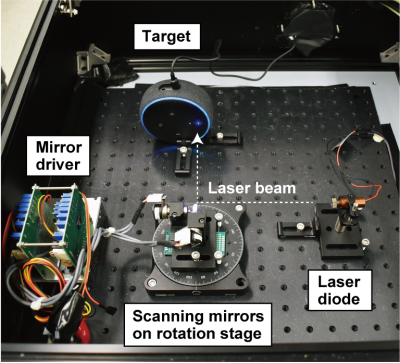
In one of the cooler hacks we’ve seen recently, a bunch of hacking academics at the University of Michigan researched the ability to flicker a laser at audible sound frequencies to see if they could remotely operate microphones simply by shining a light on them. The results are outstanding.

While most Hackers will have heard about ‘The Thing’ – a famous hack where Russian KGB agents would aim a radio transmitter at the great seal in the US embassy,  almost none of us will have thought of using lasers shined in from distant locations to hack modern audio devices such as Alexa or Google Assistant. In the name of due diligence, we checked it out on Wikipedia: ‘The Photoacoustic Effect’ , and indeed it is real – first discovered in 1880 by Alexander Bell! The pulsing light is heating the microphone element and causing it to vibrate along with the beam’s intensity. Getting long range out of such a system is a non-trivial product of telescopes, lasers, and careful alignment, but it can be made to work.

Digging deeper into the hack, we find that the actual microphone that is vulnerable is the MEMS type, such as the 
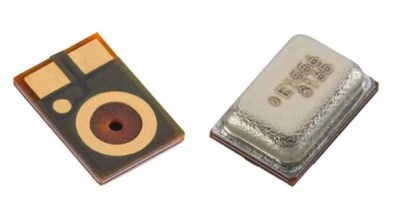
Knowles SPV0842LR5H. This attack is relatively easy to prevent; manufacturers would simply need to install screens to prevent light from hitting the microphones. For devices already installed in our homes, we recommend either putting a cardboard box over them or moving them away from windows where unscrupulous neighbors or KGB agents could gain access. This does make us wonder if MEMS mics are also vulnerable to radio waves.

As far as mobile phones are concerned, the researchers were able to talk into an iPhone XR at 10 metres, which means that, very possibly, anybody with a hand held ultra violet / infra red equipped flashlight could hack our phones at close range in a bar, for example. The counter-measures are simple – just stick some black electrical tape over the microphone port at the bottom of the phone. Or stay out of those dodgy bars. Continue reading “Laser-Based Audio Injection On Voice-Controllable Systems”

Everything Makes Sound If You Try Hard Enough

Speaker cone materials can be a deep rabbit hole ranging from inexpensive paper to kevlar. We’ve all cut apart, or blown out, the cheapies to see their inner workings, but the exotic material list does not stop at audiophile-quality models. It can include mirrors, microwave ovens, and a European hacker’s forehead. Video also after the break. In addition to the speakers with expensive elements, there are sound-generating transducers with no cones. These are sometimes called surface speakers, and they vibrate something, anything, to make a sound. At their cores, they have many of the same parts, and making a surface speaker from a traditional speaker is not difficult.

The first step is to find a raw speaker, one with no crossover components, possibly from a garage sale or from a set your spouse insists are outdated, ugly, and better off as firewood. Power specifications should not change since we will be using the same solenoid, and that means your amplifier can follow the speakers back from the dead. The video provides step-by-step instructions, and the goal is to create a module with a moving shaft, but the range must be limited so it cannot be pushed back into the speaker or pulled away, both could destroy it. Once you have that, go around and make everything noisy. Don’t use this on pets or children, but spouses are fair game.

We would love to see a chip bender experiment with different speaker mediums to add an extra layer of complexity, but for the rest of us, bone conduction is already a real thing, and if you enjoy impractical speakers, you are not the only one with your head in the clouds.

Continue reading “Everything Makes Sound If You Try Hard Enough”

Creative Limitation And The Super Nintendo Sound Chips

The Super Nintendo recently experienced a surge in popularity, either from a combination of nostalgic 30-somethings recreating their childhoods, or because Nintendo released a “classic” version of this nearly-perfect video game system. Or a combination of both. But what made the system worthy of being remembered at all? With only 16 bits and graphics that look ancient by modern standards, gameplay is similarly limited. This video from [Nerdwriter1] goes into depth on a single part of the console – the sound chips – and uses them to illustrate a small part of what makes this console still worth playing even now.

The SNES processed sound with two chips, a processing core and a DSP. They only had a capacity of 64 kb, meaning that all of a game’s sounds and music had to fit in this tiny space. This might seem impossible if you’ve ever played enduring classics like Donkey Kong Country, a game known for its impressive musical score. This is where the concept of creative limitation comes in. The theory says that creativity can flourish if given a set of boundaries. In this case it was a small amount of memory, and within that tiny space the composer at Rare who made this game a work of art was able to develop a musical masterpiece within strict limitations.

Even though this video only discusses the sound abilities of the SNES, which are still being put to good use, it’s a good illustration of what made this system so much fun. Even though it was limited, game developers (and composers) were able to work within its limitations to create some amazingly fun games that seem to have withstood the test of time fairly well. Not all of the games were winners, but the ones that were still get some playtime from us even now.

Continue reading “Creative Limitation And The Super Nintendo Sound Chips”

Building DIY Acoustic Panels To Cut Down On Echoes

Plenty of hackers and makers are passionate about content creation. In the dog-eat-ice-bucket-challenge world of online video, production value is everything. If you want to improve your audio quality then cutting down on echoes is a must, and these acoustic panels will help you to do just that. 

The build starts with aluminium L-channel, affixed together into an equilateral triangle with the help of some 3D printed brackets. Two of the triangular frames are then fitted together via a series of hexagonal standoffs. Foam or housing insulation is then added to act as the primary sound absorbing material. To give an attractive finish, the panels are covered in fabric. The panels are then placed on to drywall using nails glued into the standoffs.

While the panels are likely more expensive to build than off-the-shelf foam alternatives, they have an attractive look which is key in video studio environments. If you’re wondering where to position them for the best results, there’s a simple and easy approach to figure it out. Video after the break.

Continue reading “Building DIY Acoustic Panels To Cut Down On Echoes”

Junkbox MIDI

Do you ever peer into the void…of your hardware scrap box? It may be a wonderland of parts with near-infinite potential, and they just need to be assembled and depending on what you hoard, programmed. Access to a laser engraver doesn’t hurt either. The stuff in [Mr. Sobolak]’s bin is cooler than average, at least by Hackaday writer standards. His sound palette project is a wild mixture of interfaces, hardware, channels, and color. There are arcade pushbuttons, slider potentiometers, rotary potentiometers, miniature laser harp, touch piano, and drum pads which earns the title of junk box build extraordinaire.

Under the hood, we find the usual copper tape, wire and solder connecting operators to a Teensy 3.2. In the more esoteric part of the BOM, we find some fancy SoftPots which look like great fun to play. All the code is linked in the Instructable, but there is absolutely no reason to make an exact copy. MIDI is from the 80s and libraries abound for this protocol so the building may be the hardest part of making an interface that fits your character. Some of the techniques in the Instructable may help you, like how to connect a piezo element so it can read something lighter than a wrecking ball or the laser harp roughly the size of your palm.

We are not short of MIDI interfaces if you are thinking of making your own or be truly random.

Continue reading “Junkbox MIDI”

DIY Piano: Look, Ma, No Moving Parts

[Michael Sobolak] has a penchant for pianos, concern for capacitive touch, and special sentiment for solid state. This alliterate recipe results in a DIY PCB piano that leaves out the levers and is barren of buttons unless you count the stock RESET button on the Teensy. A real stickler might point out that speakers have moving cones. Beyond these tangential parts, which have motionless options, it is an electronic instrument with no moving parts.

The heart of the project is a Teensy 3.2 which natively supports twelve capacitive touch sensors. The infamous demo board is mounted to a homemade PCB featuring twelve keys but is actually an incomplete octave plus another key one octave above the first. If you look sharp, you already noticed the missing and extra touchpads. PCB traces were made in Illustrator because if you have a familiar tool, you use what you know and you cannot argue that it works. The design was transferred to a copper board using the old magazine page trick that we love and reliable old ferric acid.

We couldn’t help but notice that the posts of the Teensy were soldered to the top of the board, rather than drilling through, IMT-style. Again, the results speak, even if there is room for improvement. Reportedly, there is a second version on the way which includes every expected key.

Continue reading “DIY Piano: Look, Ma, No Moving Parts”