Home Automation For Fans Of Quick-and-Dirty Solutions

At Hackaday, we celebrate all kinds of projects, but we’ll have to admit that the polished and professional-looking builds tend to catch our eye a lot more than perhaps they should. There’s plenty of love to be had for the rougher builds, though, of which this quick-and-dirty home automation system is a perfect example.

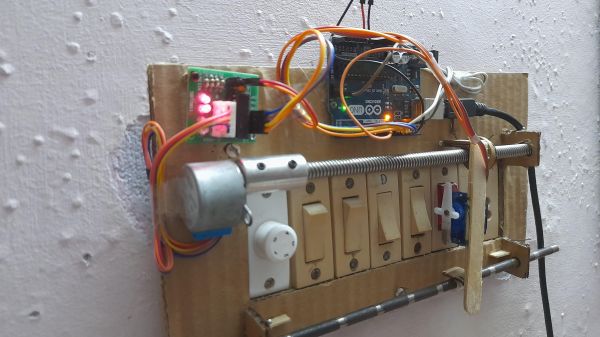
Before anyone rushes to state the obvious with, “Should have used some relays,” consider that [MAKE_IT_WITH_ME]’s stated goal was to get the basics of a home automation system built with pretty much nothing but what can be found in one of those Arduino starter kits. And further, consider that landlords might not look kindly on tenants who wire a bunch of SSRs or Sonoff switches into the walls of their building. So this minimalist build is perfect for certain use cases. Its interface to the building’s electrical system is 100% mechanical, via a servo that travels along the bank of switches on a stepper-driven leadscrew. The servo has a modified horn to properly flick the rocker-style switches, and although changing from switch to switch is a bit slow, it works surprisingly well. The video below shows it in action.

While we can see it possibly working as-is for Decora-style switches that are seen in some markets, we’d think some mods would be in order for the more standard toggle-style switch — perhaps a finger extending out from the horn, along with a second servo to tilt the whole assembly away from the wall to allow it to clear the switch bats.

Continue reading “Home Automation For Fans Of Quick-and-Dirty Solutions”

Rock-A-Bye Baby, On The Mechatronic Crib Shaker

While an engineering mindset is a valuable tool most of the time, there are some situations where it just seems to be a bad fit. Solving problems within the family unit would seem to be one such area, but then again, this self-rocking mechatronic crib seems to be just the cure for sleepytime woes.

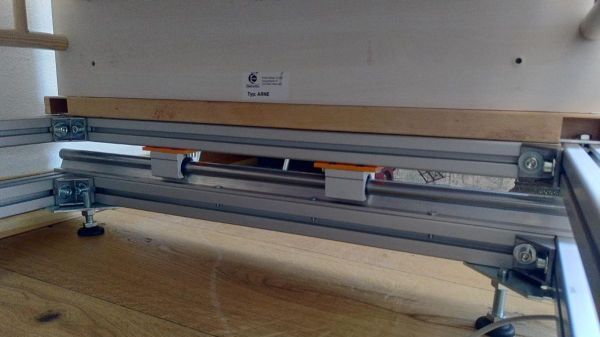
From the look of [Peter]’s creation, this has less of a rocking motion and more of a gentle back-and-forth swaying. Its purpose is plainly evident to anyone who has ever had to rock a child to sleep: putting a little gentle motion into the mix can help settle down a restless infant pretty quickly. Keeping the right rhythm can be a problem, though, as can endurance when a particularly truculent toddler is fighting the urge to sleep. [Peter]’s solution is a frame of aluminum extrusion with some nice linear bearings oriented across the short axis of the crib, which sits atop the whole thing.

A recirculating ball lead screw — nothing but the best for [Junior] — and a stepper drive the crib back and forth. [Peter] took care to mechanically isolate the drivetrain from the bed, and with the selection of the drive electronics and power supply, to make sure that noise would be minimal. Although thinking about it, we’ve been lulled to sleep by the whining steppers of our 3D printer more than once. Or perhaps it was the fumes.

Hats off to [Peter] for a setup that’s sure to win back a little of the new parent’s most precious and elusive commodity: sleep.

CNC Scroll Saw Add-On Cuts Beautiful Wooden Spirals

If there’s one thing that woodworkers have always been good at, it’s coming up with clever jigs and work-holding solutions. Most jigs, however, are considerably simpler and more static than this CNC-controlled scroll saw add-on that makes cool wooden spirals a snap.

As interesting as the products of this setup are, what we like about this is the obvious care and craftsmanship [rschoenm] put into making what amounts to a hybrid between a scroll saw and a lathe. Scroll saws are normally used to make narrow-kerf cuts in thin, delicate materials, often with complicated designs using very tight radius turns. In this case, though, stock is held between centers on the lathe-like carriage. The jig uses a linear slide driven by a stepper and a lead screw to translate the workpiece perpendicular to the scroll saw blade while a geared headstock rotates it. Starting with the blade inserted into a through-hole, the saw slowly cuts a beautiful nested spiral down the length of the workpiece. An Uno, a GRBL shield, and some stepper drivers let a little G-code control the two axes of the jig.

The video below shows it in action; things do get a bit wobbly as the cut progresses, but in general the jig works wonderfully and results in some lovely pieces. At first we thought these would purely be objets d’art, but then we thought about this compression screw grinder for DIY injection molding machines and realized these wooden screws look pretty similar.

Continue reading “CNC Scroll Saw Add-On Cuts Beautiful Wooden Spirals”

Clock-of-Clocks Adds Light-Pipe Hands For Beauty And Function

We’ve gotten used to seeing “meta clocks,” clocks that use an array of analog clock faces and piece together characters using the hands of the clocks. They’re very clever, and we always like to see them, especially when they come with detailed build instructions like this one does.

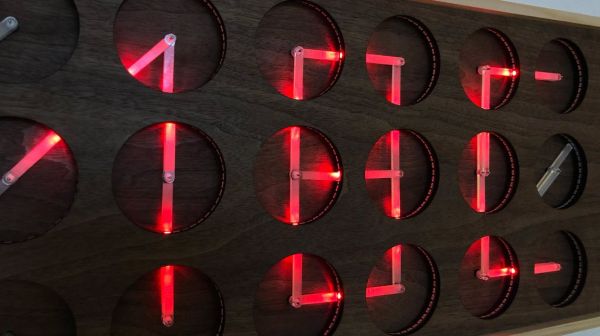
What’s also nice about [Erich Styger]’s “MetaClockClock” display is the twist on the original concept. Where most clock-of-clocks depend on the contrast between the hands and the faces of the analog movements, [Erich] added light to the mix. Hidden inside the bezel of each clock is a strip of RGB LEDs; coupled with the clear acrylic hands of the clock, which act as light pipes, each clock can contribute different shapes of different colors to the display. Each clock is built around a dual-shaft stepper motor of the kind used in car dashboard gauges; the motors each live on a custom PCB, while the LEDs are mounted on a ring-shaped PCB of their own. Twenty-four of the clocks are mounted in a very nice walnut panel, which works really well with the light-pipe hands. The video below shows just some of the display possibilities.

[Erich] has documented his build process in extreme detail, and has all the design files up on GitHub. We won’t say that recreating his build will be easy — there are a lot of skills needed here, from electronics to woodworking — but at least all the information is there. We think this is a beautiful upgrade to [Erich]’s earlier version, and we’d love to see more of these built.

Continue reading “Clock-of-Clocks Adds Light-Pipe Hands For Beauty And Function”

Capstan Winch Central To This All-Band Adjustable Dipole Antenna

The perfect antenna is the holy grail of amateur radio. But antenna tuning is a game of inches, and since the optimum length of an antenna depends on the frequency it’s used on, the mere act of spinning the dial means that every antenna design is a compromise. Or perhaps not, if you build this infinitely adjustable capstan-winch dipole antenna.

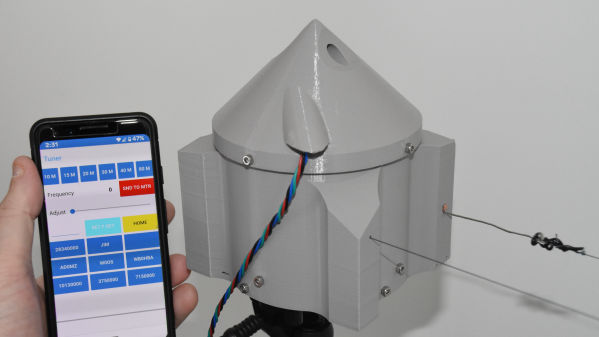
Dipoles are generally built to resonate around the center frequency of one band, and with allocations ranging almost from “DC to daylight”, hams often end up with a forest of dipoles. [AD0MZ]’s adjustable dipole solves that problem, making the antenna usable from the 80-meter band down to 10 meters. To accomplish this feat it uses something familiar to any sailor: a capstan winch.

The feedpoint of the antenna contains a pair of 3D-printed drums, each wound with a loop of tinned 18-gauge antenna wire attached to some Dacron cord. These make up the adjustable-length elements of the antenna, which are strung through pulleys suspended in trees about 40 meters apart. Inside the feedpoint enclosure are brushes from an electric drill to connect the elements to a 1:1 balun and a stepper motor to run the winch. As the wire pays out of one spool, the Dacron cord is taken up by the other; the same thing happens on the other side of the antenna, resulting in a balanced configuration.

We think this is a really clever design that should make many a ham happy across the bands. We even see how this could be adapted to other antenna configurations, like the end-fed halfwave we recently featured in our “$50 Ham” series.

Pen Plotter Draws Maps Directly On The Wall

For map-lovers like [Christopher Getschmann], poring over a quality map can be as satisfying as reading a good book. Good maps can be hard to come by, though, especially at a scale worth looking at, or worth using as adornment on a dull, lifeless wall. The solution is obvious: build a wall-mount CNC plotter to draw maps directly on the wall.

[Christopher] began his map quest by scraping world map data from a number of sources, including OpenStreetMap, Natural Earth, and GEBCO. This gave him data for coastlines, terrain, and bathymetry — enough for a map of the world large enough to fill a wall. Since the scale of the map would preclude the use of even a large-format inkjet printer, [Christopher] set about building a wall-covering pen-plotter to render the map. The CoreXY-style plotter is large, but still light enough to hang on the wall while it works, and to be repositioned to cover a larger area.

The plotter runs on steppers driven by ultra-quiet Trinamic TMC5160 drivers, so the plotter wouldn’t be a nuisance while it worked. The map was plotted on eight pieces of cardboard mounted directly to the wall, filling the 2- x 3-meter space almost entirely. Landmasses and elevation contours were plotted as continuous lines in black ink, while bathymetric data was rendered in blue ink as cross-hatching with variable spacing, to make deeper oceans darker blue.

We find [Christopher]’s map breathtaking, all the more so considering the work that went into making it. It would be interesting to find alternate uses for the plotter, which reminds us a little of a cross between a draw-bot and a Maslow vertical CNC router, now that it’s done with its cartographic duties.

A Camera Slider With A Twist

“Scope creep” is often derided as an obstacle between your idea and the delivery of a finished project. That may be, but sometimes the creep is the whole point. It’s how we end up with wonderful builds like this multi-axis differential camera slider.

We mention scope creep because that’s what [Jan Derogee] blames for this slider’s protracted development time, as well as its final form. The design is a bit unconventional in that it not only dollies the camera left and right but also works in pan and tilt axes, and it does this without putting any motors on the carriage. Instead, the motors, which are located near the end of the slider rails, transmit power to the carriage via loops of 217timing belt. It’s a little like the CoreXY mechanism; rotating the motors in the same direction and speed slides the carriage, while moving them in opposite directions pans the camera. A Sparkfun Pro Micro in the controller coordinates the motors for smooth multi-axis motion, and the three steppers — there’s a separate motor for the tilt axis — sound really cool all working at the same time. Check out the video below for the full story.

We’ve seen a few fun projects from [Jan] before. Check out his linear clock, the persistence of phosphorescence display, or his touchpad for retrocomputers.

Continue reading “A Camera Slider With A Twist”