How Safe Is That Ultrasonic Bath For Flux Removal?

How do you clean the residual flux off your boards? There are plenty of ways to go about the job, ranging from “why bother?” to the careful application of isopropyl alcohol to every joint with a cotton swab. It seems like more and more people are turning to ultrasonic cleaners to get the job done, though, and for good reason: just dunk your board and walk away while cavitation does the work for you.

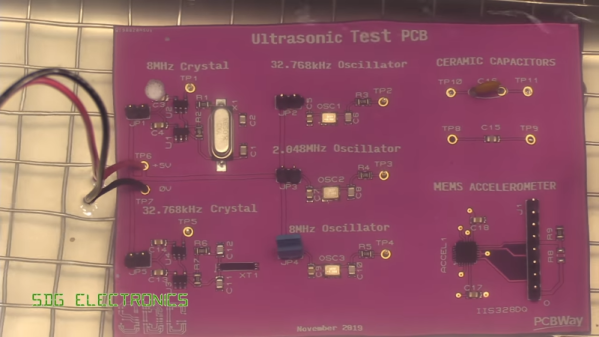
But just how safe is it to sonically blast the flux off your boards? [SDG Electronics] wanted to know, so he ran some cleaning tests to get to the bottom of things. On the face of it, dunking a PCB in an aqueous cleaning solution seems ill-advised; after all, water and electricity famously don’t mix. But assuming all the nooks and crannies of a board can be dried out before power is applied, the cleaning solution itself should be of little concern. The main beef with ultrasonic cleaning seems to be with the acoustic energy coupling with mechanical systems on boards, such as crystal oscillators or micro-electrical-mechanical systems (MEMS) components, such as accelerometers or microphones. Such components could resonate with the ultrasonic waves and be blasted to bits internally.

To test this, [SDG Electronics] built a board with various potentially vulnerable components, including the popular 32.768-kHz crystal, cut for a frequency quite close to the cleaner’s fundamental. The video below goes into some detail on the before-and-after tests, but the short story is that nothing untoward happened to any of the test circuits. Granted, no components with openings as you might find on some MEMS microphones were tested, so be careful. After all, we know that ultrasound can deal damage, and if it can levitate tiny styrofoam balls, it might just do your circuit in.

Continue reading “How Safe Is That Ultrasonic Bath For Flux Removal?”

Aging Alcohol In 30 Minutes

Many alcoholic beverages are aged in barrels for long periods of time. The aim is to impart flavors from the wood of the barrel into the liquid, and allow a whole host of chemical reactions to happen, changing the character of the taste. However, this takes time, and time is money. There’s potentially a faster way, however, and [The Thought Emporium] set out to investigate.

Inspired by several research papers, the goal was to examine whether using ultrasound to agitate these fluids could speed the aging process. Initial tests consisted of artificially aging milk, apple cider, and vodka in a small ultrasonic jewelry cleaner for 30 minutes, with cognac chips for flavor. Results were positive amongst the tasters, with the vodka in particular showing a marked color change from the process. A later test expanded the types of wood chip and beverages under test. Results were more mixed, but with a small sample size of tasters, it’s to be expected.

While taste is subjective, there were definite visible results from the aging process. It’s a technique that’s being explored by industry, too. We’ve seen hackers brew up plenty of tasty beverages before, too – often with a little automation thrown in Video after the break.

Continue reading “Aging Alcohol In 30 Minutes”

Capture A Star In A Jar With Sonoluminescence

If nothing else, [Justin Atkin] is persistent. How else do you explain a five-year quest to create sonoluminescence with simple tools?

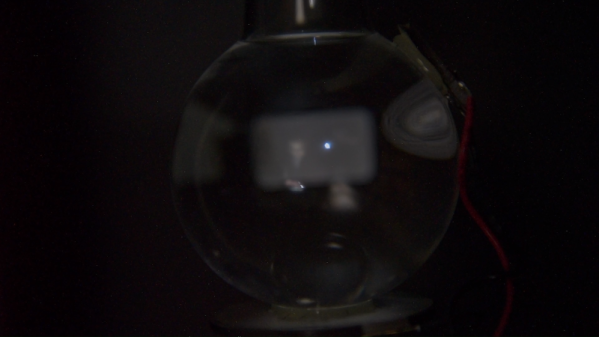
So what exactly is sonoluminescence? The short answer is as the name suggests: a release of light caused by sound. In [Justin]’s case, he used an ultrasonic transducer to set up a standing wave at the resonant frequency of a flask of water. A drop of water is used to entrain a small air bubble, which is held in a stable position in the flask in much the same way as styrofoam beads are in an acoustic levitator. Turn off the lights and you’ll see that the bubble glows with a ghostly blue light.

What causes the glow? Good question. According to [Justin], we just don’t know for sure what causes it, although the leading theory is that cavitation of the bubble causes the trapped gas to compress and heat violently, turning into a brief bit of plasma. But there are problems with that theory, which is one of the reasons he wanted to show just how easy the process can be – now that he’s shaken out the bugs with five years of effort. It wasn’t easy getting the transducers attached and the driver circuit properly tuned, but with little more than a signal generator, an audio amp, and a spool of magnet wire, you too can make your own “star in a jar.”

We applaud [Justin]’s determination to bring this project to a successful conclusion. It’s not unlike his dogged effort to make a cold plasma torch, or even his desktop radio telescope.

Continue reading “Capture A Star In A Jar With Sonoluminescence”

Lessons Learned From An Art Installation Build

Art installations are an interesting business, which more and more often tend to include electronic or mechanical aspects to their creation. Compared to more mainstream engineering, things in this space are often done quite a bit differently. [Jan Enning-Kleinejan] worked on an installation called Prendre la parole, and shared the lessons learned from the experience.

The installation consisted of a series of individual statues, each with an LED light fitted. Additionally, each statue was fitted with a module that was to play a sound when it detected visitors in proximity. Initial designs used mains power, however for this particular install battery power would be required.

Arduinos, USB power banks and ultrasonic rangefinders were all thrown into the mix to get the job done. DFplayer modules were used to run sound, and Grove System parts were used to enable everything to be hooked up quickly and easily. While this would be a strange choice for a production design, it is common for art projects to lean heavily on rapid prototyping tools. They enable inexperienced users to quickly and effectively whip up a project that works well and at low cost.

[Jan] does a great job of explaining some of the pitfalls faced in the project, as well as reporting that the installation functioned near-flawlessly for 6 months, running 8 hours a day. We love to see a good art piece around these parts, and we’ve likely got something to your tastes – whether you’re into harmonicas, fungus, or Markov chains.

Vintage Fairchild IC Proves Tough To Decap

You’d think that something called “white fuming nitric acid” would be more than corrosive enough to dissolve just about anything. Heck, it’s rocket fuel – OK, rocket fuel oxidizer – and even so it still it wasn’t enough to pop the top on this vintage Fairchild μL914 integrated circuit, at least not without special measures.

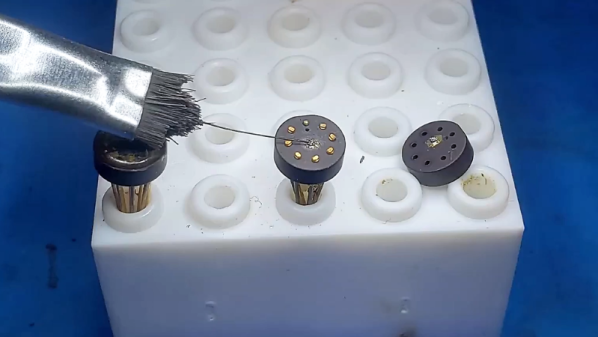
As [John McMaster], part of the team that analyzed the classic dual 2-input NOR gate RTL chip from the 1960s, explains it, decapping modern chips is a straightforward if noxious process. Generally a divot is milled into the epoxy, providing both a reservoir for the WFNA and a roughened surface for it to attack. But the Fairchild chip, chosen for dissection for the Maker Faire Bay Area last week specifically because the features on the die are enormous by modern standards, was housed in an eight-lead TO-99 case with epoxy that proved nigh invulnerable to WFNA. [John] tried every chemical and mechanical trick in the book, going so far as to ablate epoxy with a Nd:YAG laser. He eventually got the die exposed, only to discover that it was covered with silicone rather than the silicon dioxide passivation layer of modern chips. Silicone can be tough stuff to remove, and [John] resorted to using lighter fluid as a solvent and a brush with a single bristle to clean up the die.

We applaud the effort that this took, which only proves that decapping is more art than science sometimes. And the results were fabulous; as Hackaday editor-in-chief [Mike Szczys] notes, the decapping led to his first real “a-ha moment” about how chips really work.

Continue reading “Vintage Fairchild IC Proves Tough To Decap”

Simple Ultrasound Machine Shows The Skeleton Lurking Inside Us All

That first glimpse of a child in the womb as a black and white image on a screen is a thrilling moment for any parent-to-be, made possible by several hundred thousand dollars worth of precision medical instrumentation. This ultrasound machine cobbled together from eBay parts and modules is not that machine by a long shot, but it’s still a very cool project that actually gives a peek inside the skin.

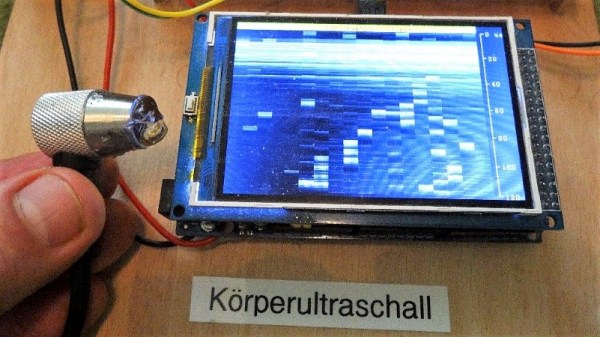
The ultrasound transducer used by [stoppi71] in this build has an unusual source: a commercial paint-thickness meter. Cue the jokes about watching paint dry, but coatings measurement is serious stuff. Even so, the meter in question only ran about $40 on eBay, and provided the perfect transducer for the build. The sender needs a 100V pulse at about 5 MHz, so [stoppi71] had some fun with a boost converter and a 74121 Schmitt-trigger one-shot driving a MOSFET to switch the high voltage. On the receive side, the faint echo is sent through a three-stage amp using AD811 op amps before going through an LM7171 op amp acting as a rectifier and peak detector. Echos are sent to an Arduino Due for display on a 320×480 LCD. The resolution isn’t great, but the video below shows that it’s enough to see reflections from the skin of [stoppi71]’s forearm and from the bones within.

[stoppi71] says that he was inspired to tackle this build by Murgen, an open-source ultrasound project. That project got further refined and entered into the “Best Product” category in the 2018 Hackaday Prize. We like that because focusing on turning projects into products is what this year’s Hackaday Prize is all about.

Continue reading “Simple Ultrasound Machine Shows The Skeleton Lurking Inside Us All”

72 Tranducers For Acoustic Levitation

Levitation has a way of arousing curiousity and wonder wherever it appears. There’s a multitude of ways to do it, each with their own strengths and weaknesses and ideal use cases. [Julius Kramer] tried his hand at acoustic levitation, and decided to share his build.

The build relies on an astounding number of ultrasonic transducers – 72, in fact. The device operates at 40 kHz to be well above the human range of hearing. 36 each are placed in the top and bottom shells of the device’s 3D printed chassis. Through careful construction, the transducers are placed an integer multiple of half the wavelength apart. This allows the device to create a standing wave, with several low-energy nodes in which small objects can be levitated. In this case, [Julius] uses small scraps of styrofoam, but notes that water droplets can also be used if one is careful to avoid spilling any on the electronics.

The transducers are energised with a square wave generated by an Arduino Nano. This allows the possibility of the frequency and phase of the wave to be altered, which can help tune the device and allow some movement in the vertical axis. Unfortunately, movement in the other axes isn’t possible as the transducers appear to be connected in parallel. However, this could be a good upgrade in a later revision.

This project shows that a device relying on incredibly precise measurement and control can now be constructed at home with a 3D printer and some off the shelf electronics.

Now that you’ve whet your whistle, perhaps you’d like to tackle laser levitation?

[Thanks to Baldpower for the tip!]