Homemade Camera Stabilizer

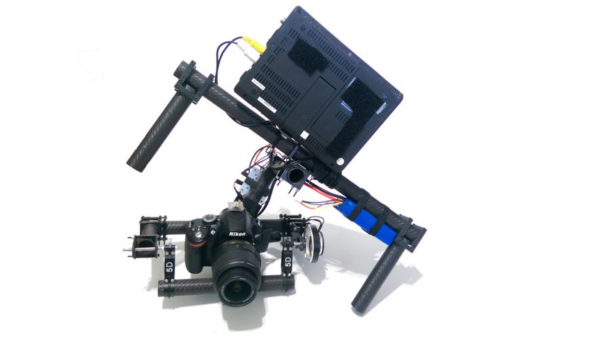
We’ve featured quite a few camera gimbals and steady cams here, but this one stands out. For one, [Daniel Rhyoo] was in his sophomore year when he built it. His 2-axis camera gimbal uses brushless DC motors, and is made out of carbon fiber.

[Daniel] machined the carbon fiber parts on a CNC desktop mill and some hand tools. And he also had to teach himself Solid Works to design it. In his slick DIY guide, he starts off by listing the parts and where to source them from, along with the tools needed. Most gimbals use servos for axis movements, which limits the range and do not provide very smooth motion. Brushless motors overcome these limitations allowing a nice, smooth moving gimbal to be built with a wide range of movement. When [Aleksey Moskalenko] introduced the AlexMos brushless motor controller, [Daniel] ordered it out, and then waited until he could get his hands on the right kind of motors. CAD files for all of the machined parts are available for download (.zip file).

He then goes on to blog his build progress, with ample photos to describe the machining and assembly. He does a couple of nice design choices along the way – like using press-nuts to make assembly and dis-assembly easy, and dismantling one of the motors and replacing its shaft with a custom, longer one instead of using a coupler to extend it. At the end, the result is not only a nice looking, light weight rig, but one that works very well thanks to the motors and controller that he used. Check out the video below to see it in action.

Continue reading “Homemade Camera Stabilizer”

Better VGA On The STM32F4

[Cliff] is pushing VGA video out of a microcontroller at 800×600 resolution and 60 frames per second. This microcontroller has no video hardware. Before we get to the technical overview, here’s the very impressive demo.

The microcontroller in question is the STM32F4, a fairly powerful ARM that we’ve seen a lot of use in some pretty interesting applications. We’ve seen 800×600 VGA on the STM32F4 before, with a circles and text demo and the Bitbox console. [Cliff]’s build is much more capable, though; he’s running 800×600 @ 60FPS with an underclocked CPU and most (90%) of the microcontroller’s resources free.

This isn’t just a demo, though; [Cliff] is writing up a complete tutorial for generating VGA on this chip. It begins with an introduction to pushing pixels, and soon he’ll have a walkthrough on timing and his rasterization framework.

Just because [Cliff] has gone through the trouble of putting together these tutorials doesn’t mean you can’t pull out an STM Discovery board and make your own microcontroller video hacks. [Cliff] has an entire library of for graphics to allow others to build snazzy video apps.

Raspberry Pis And A Video Triptych

A filmmaker friend of [Thomas] mentioned that she would like to display a triptych at the 2015 Venice Art Walk. This is no ordinary triptych with a frame for three pictures – this is a video triptych, with three displays each showing a different video, and everything running in sync. Sounds like a cool engineering challenge, huh?

The electronics used in the build were three Raspberry Pi 2s and a trio of HDMI displays. Power is provided by a 12V, 10A switching supply with 5V stepdown converters for the Pis. The chassis is a bunch of aluminum bars and U channel encased in an extremely well made arts and crafts style frame. So far, nothing out of the ordinary.

Putting three monitors and three Pis in a frame isn’t the hard part of this build; getting three different displays all showing different videos is. For this, [Thomas] networked the Pis through an Ethernet hub, got the videos to play independently on a RAM disk with omxplayer. One of the Raspberry Pis serves as the master, commanding the slaves to start, stop, and rewind the video on cue. According to [Thomas], it’s a somewhat hacky solution with a bunch of sleep statements at the beginning of the script to allow the boot processes to finish. It’s a beautiful build, though, and if you ever need to command multiple monitors to display the same thing, this is how you do it.

Real Time Video Anonymizer

If you’re wondering, Cornell is just like every other university in one respect: the grad students are starving, and wherever there is free food, students circle like vultures. The engineering and CS departments have a mailing list alerting people to free food, but a more automated solution was desired. The first web cam ever was used to notify grad students if a coffee pot was full, but Cornell shot down this idea on the basis of privacy concerns.

It’s final project time for [Bruce Land]’s courses, and a project by [Ferian Chen] and [Sean Ogden] solved the privacy concerns of a webcam in a kitchen. It’s a real-time video anonymizer, that can also be used to livestream ransom demands if you’re so inclined.

There are actually two parts to this project. The first part pixellates faces and any other skin tone, just like you’d see on a true crime TV show. This part of the project was based on an FPGA-based face detection project. ‘Skin’ pixels are defined as having a difference between the red and green channels within a certain range. With the right lighting, it works very well.

You can identify someone with their voice, too, so [Ferian] and [Sean] also made efforts to disguise hungry student’s voices as well. This was done with a phase vocoder that changes the pitch of someone’s voice, but not the spectral characteristics. The result should have been an audio channel that can’t be pinned down to one person, but is still recognizable as speech. The audio processing didn’t work as intended, with noticeable artifacts in the output. There’s still some work to be done, and now that [Ferian] and [Sean] aren’t checking the kitchen every ten minutes, the might have the time to do it.

FPGAs Keep Track Of Your Ping Pong Game

It’s graduation time, and you know what that means! Another great round of senior design projects doing things that are usually pretty unique. [Bruce Land] sent in a great one from Cornell where the students have been working on a project that uses FPGAs and a few video cameras to keep score of a ping-pong game.

The system works by processing a live NTSC feed of a ping pong game. The ball is painted a particular color to aid in detection, and the FPGAs that process the video can keep track of where the net is, how many times the ball bounces, and if the ball has been hit by a player. With all of this information, the system can keep track of the score of the game, which is displayed on a monitor near the table. Now, the players are free to concentrate on their game and don’t have to worry about keeping score!

This is a pretty impressive demonstration of FPGAs and video processing that has applications beyond just ping pong. What would you use it for? It’s always interesting to see what students are working on; core concepts from these experiments tend to make their way into their professional lives later on. Maybe they’ll even take this project to the next level and build an actual real, working ping pong robot to work with their scoring system!

Continue reading “FPGAs Keep Track Of Your Ping Pong Game”

Bike Cinema

A Pedal Powered Cinema

When the apocalypse hits and your power goes out, how are you going to keep yourself entertained? If you are lucky enough to be friends with [stopsendingmejunk], you can just hop on his pedal powered cinema and watch whatever movies you have stored on digital media.

This unit is built around an ordinary bicycle. A friction drive is used to generate the electricity via pedal power. In order to accomplish this, a custom steel stand was fabricated together in order to lift the rear wheel off the ground. A 24V 200W motor is used as the generator. [stopsendingmejunk] manufactured a custom spindle for the motor shaft. The spindle is made from a skateboard wheel. The motor is mounted in such a way that it can be lowered to rub the skateboard wheel against the bicycle wheel. This way when the rear bicycle wheel spins, it also rotates the motor. The motor can be lifted out of the way when cruising around if desired.

The power generated from the motor first runs through a regulator. This takes the variable voltage from the generator and smooths it out to a nice even power signal. This regulated power then charges two Goal Zero Sherpa 100 lithium batteries. The batteries allow for a buffer to allow the movie to continue playing while changing riders. The batteries then power the Optomo 750 projector as well as a set of speakers.

Hackaday Prize Entry: A Better KVM Switch

Now it’s not uncommon to have a desktop and a laptop at a battlestation with tablets waiting in the wings. Add in a few Raspis, consoles, and various cheap computers, and it’s pretty easy to have an enormous number of machines and monitors on a desk. Traditionally, a KVM switch would be the solution to this, sharing a keyboard, mouse, and monitor with many different boxes, but this is an ugly solution. [frankstripod] has a device that fixes that with some interesting software and a few USB hacks.

[frankstripod] is in love with a program called Synergy this program combines the keyboard, mouse, and display of several computers over a network so you’ll only ever have to use one keyboard and mouse; it’s as simple as dragging your mouse from one computer to the other. There are a few limitations, though: keyboards don’t work until the OS has loaded (no BIOS access, then), it doesn’t work if the network is down, and setup can be complicated. This project aims to replace the ‘server’ part of a Synergy setup with a small, networkable KVM.

Right now the plan is to use a small embedded board running Linux to read a USB keyboard and switch the output between several computers. A few scripts detect the mouse moving from one screen to another, and a microcontroller switches USB output between each computer. If it sounds weird, you’re right, but it does work: [frank]’s 2014 Hackaday Prize project was a mouse that worked with two computers at once.


The 2015 Hackaday Prize is sponsored by: