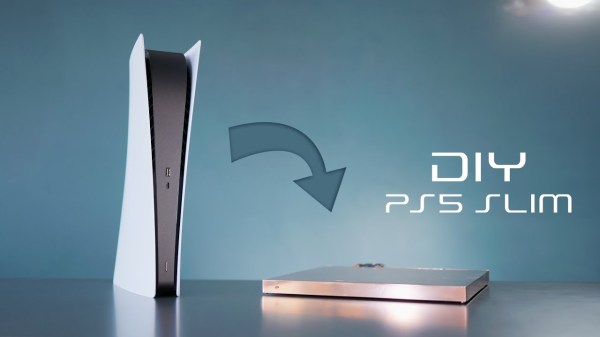
For the past few decades, most console makers have first come out with a large flagship model, and then a few years later, released a smaller, more compact slim edition. Not content to wait for it, [Matt] at DIY Perks made his own PS5 Slim, and the results are awe-inspiring.
Generally, slim editions are made by lowering the TDP of the chip under the hood. A lower power draw means less cooling is needed, a smaller power supply can be used, and a design that is overall easier to manage. Unfortunately, [Matt] had none of these benefits and instead had to contend with the full 180 W that the AMD CPU inside the PlayStation can draw.
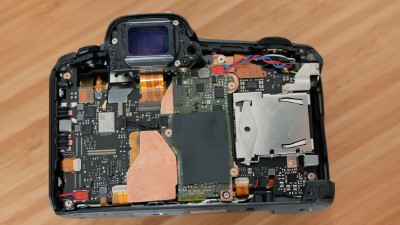
 Taking apart the console left him with the main board that was quite thick as it had heat pipes on both sides. His first thought was water cooling as it can rapidly move the heat needed, but even with right-angle fittings, it didn’t fit within the ambitious thickness goal he had set for himself of less than 2 cm (about 3/4″). To do that, [Matt] had to fabricate a copper water block from three sheets of copper. The first one connects to the motherboard via standoffs and has cut-outs for various connectors and parts. The middle layer has a channel through which water can flow, and the last layer seals it together.
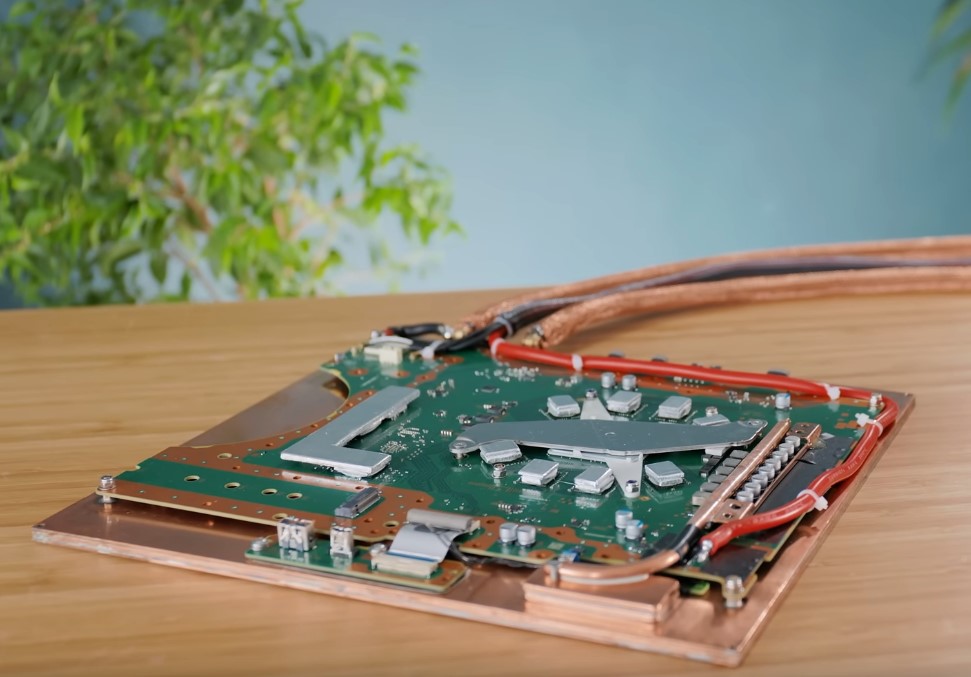
With the three layers together, he soldered them in a toaster oven repurposed as a reflow oven. Cleverly, he used silicone grease to prevent solder from getting into areas he didn’t want, like the fins in the CPU block. Luckily, the grease dissolved in alcohol, and after flushing the chamber, he had a solid copper, water-tight, custom loop. However, on his road to glory, [Matt] ran into a snag. He accidentally covered the intake vent on the radiator, and the PS5 overheated, killing it. With a fried mainboard and a project almost on the cusp of completion, he resorted to using the PS5 he had received for B-roll.
Last-minute motherboard swap aside, the final project is gorgeous. The polished exterior and sheer thinness of it are striking. [Matt] has already disguised his PS5 before and after this, we’re not quite sure where he could possibly take it next. But we’re excited to find out.
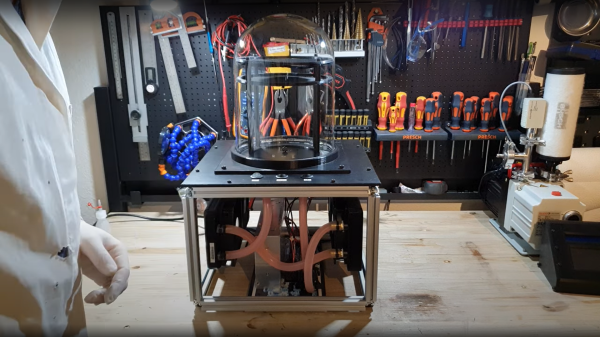
 heat pump, so you need to dump the hot-side heat elsewhere. The method [Advanced Tinkering] chose here was to use a pair of off-the-shelf water cooling blocks, mounted into a 3D printed plate. The hot side dumps into a pair of fan-cooled radiators. Four double-layer Peltier modules are wired in parallel to a 60A power supply, which seems like a lot, but Peltier modules are hungry little things. A reasonable amount of power is needed to drive the cooling fans and water pump. The vapor source is a simple pad of liquid alcohol at the top of the stack, just above a metal screen which is held at a high voltage. The vertical electric field allows visualization of the charge of emitted particles, which will curve up or down depending on their polarity.