Spark Goes Cellular With The Electron

A few years ago, small and cheap WiFi modules burst onto the scene and with that the Spark was born. It’s a tiny dev board with a TI CC3000 WiFi module, capable of turning any device into an Internet-connected device. It’s only the very beginning of the Internet of Things, yes, but an important step in the right direction. Now, Spark is unshackling itself from WiFi networks with the Spark Electron, a dev kit that comes with a cellular radio and data plan.

If you’ve ever tried to build a high altitude balloon, a project that will be out of range of WiFi, or anything else where cellular data would be a godsend, you’ll quickly realize Verizon, AT&T, Sprint, and all the other carriers out there don’t necessarily care about your project. As far as we can tell, Spark is the first company to fix this gaping hole in what cellular can do by offering their own service – 20,000 messages for $3/month and no contracts. Officially, that’s 1MB of data spread over 20k messages that are about 50 bytes in length.

There are a few dozen companies and organizations working on the next generation of The Internet Of Things, but these require completely new silicon and spectrum allocations or base stations. Right now, there’s exactly one way of getting a Thing on the Internet without WiFi, and that’s with cellular data. We have to hand it to Spark for this one, and can’t wait to see the projects that will be possible due to a trickle of Internet everywhere.

Double Pendulum

Powered Double Pendulum Is A Chaotic Display

If you’ve never seen a double pendulum before, it’s basically just a pendulum with another pendulum attached to the end. You might not think that’s anything special, but these devices can exhibit extremely chaotic behavior if enough energy is put into the system. The result is often a display that draws attention. [David] wanted to build his own double pendulum display, but he wanted to make it drive itself. The result is a powered double pendulum.

There aren’t many build details here, but the device is simple enough that we can deduce how it works from the demonstration video. It’s broken into two main pieces; the frame and the pendulum. The frame appears to be made mostly from wood. The front plate is made of three layers sandwiched together. A slot is cut out of the middle to allow a rail to slide up and down linearly. The rail is designed in such a way that it fits between the outer layers of the front plate like a track.

The pendulum is attached to the linear rail. The rail moves up and down and puts energy into the pendulum. This causes the pendulum to actually move and generate the chaotic behavior. The rail slides up and down thanks to an electric motor mounted to the base. The mechanics work similar to a piston on a crankshaft. The motor looks as though it is mounted to a wooden bracket that was cut with precision on a laser cutter. The final product works well, though it is a bit noisy. We also wonder if the system would be even more fun to watch if the rotation of the motor had an element of randomness added to it. Or he could always attach a paint sprayer to the end. Continue reading “Powered Double Pendulum Is A Chaotic Display”

Synth Guitar

Arduino Synth Guitar Really Rocks

[Gr4yhound] has been rocking out on his recently completed synth guitar. The guitar was built mostly from scratch using an Arduino, some harvested drum pads, and some ribbon potentiometers. The video below shows that not only does it sound good, but [Gr4yhound] obviously knows how to play it.

The physical portion of the build consists of two main components. The body of the guitar is made from a chunk of pine that was routed out by [Gr4yhound’s] own home-made CNC. Three circles were routed out to make room for the harvested Yamaha drum pads, some wiring, and a joystick shield. The other main component is the guitar neck. This was actually a Squire Affinity Strat neck with the frets removed.

For the electronics, [Gr4yhound] has released a series of schematics on Imgur. Three SoftPot membrane potentiometers were added to the neck to simulate strings. This setup allows [Gr4yhound] to adjust the finger position after the note has already been started. This results in a sliding sound that you can’t easily emulate on a keyboard. The three drum pads act as touch sensors for each of the three strings. [Gr4yhound] is able to play each string simultaneously, forming harmonies.

The joystick shield allows [Gr4yhound] to add additional effects to the overall sound. In one of his demo videos you can see him using the joystick to add an effect. An Arduino Micro acts as the primary controller and transmits the musical notes as MIDI commands. [Gr4yhound] is using a commercial MIDI to USB converter in order to play the music on a computer. The converter also allows him to power the Arduino via USB, eliminating the need for batteries.

Continue reading “Arduino Synth Guitar Really Rocks”

Openhand Combines 3D Printing With Urethane Casting

Yale University brings us quite a treat with their Openhand Project.

If you’ve ever operated a robotic arm, you know that one of the most cumbersome parts is always the end effector. It will quickly make you realize what an amazing work of engineering the human hand really is, and what a poor intimation a simple open-close gripper ends up being.

[Yale] is working to bring tendon-driven robotic hands to the masses with an interesting technique of combining 3D printing and resin/urethane casting. Known as Hybrid Deposition Manufacturing (HDM), it allows the team to 3D print robotic fingers that also contain the mold for finger pads and joints, all built right into the 3D part.  The tendon-driven fingers allow for a very simple design that are not only easy to make, but have a low parts count as well. Because of the human-like tendons, the fingers naturally curl around the object, distributing it’s force much more evenly and naturally, much like a human hand would. In the videos after the break, you can see the building process, as well as the hand in action.

Best news is that it’s all open source. They also include some python libraries so you can customize the CAD files fit your needs.

Continue reading “Openhand Combines 3D Printing With Urethane Casting”

Hacking Oklahoma State University’s Student ID Cards

[Sam] took an information security class at Oklahoma State University back in 2013. For his final project, he and a team of other students had to find a security vulnerability and then devise a theoretical plan to exploit it. [Sam’s] team decided to focus on the school’s ID cards. OSU’s ID cards are very similar to credit cards. They are the same size and shape, they have data encoded on a magnetic strip, and they have a 16 digit identification number. These cards were used for several different purposes. Examples include photo ID, physical access to some areas on campus, charges to an online account, and more.

[Sam] and his team analyzed over 100 different cards in order to get a good sample. They found that all cards started with same eight digits. This is similar to the issuer identification number found in the first six digits of a credit card number. Th analysis also showed that there were only three combinations used for the next two digits. Those were either 05, 06, or 11. With that in mind, the total possible number of combinations for card numbers was mathematically calculated to be three million.

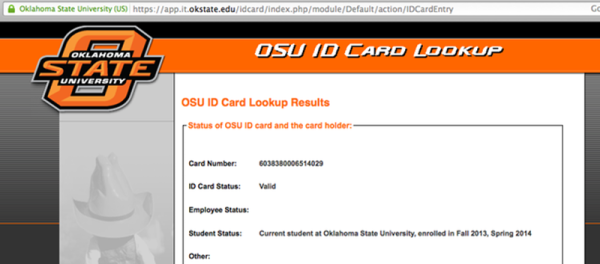
OSU also had a URL printed on the back of each card. This website had a simple form with a single field. The user can enter in a 16 digit card number and the system would tell the user if that card was valid. The page would also tell you if the card holder was an employee, a student, or if there were any other special flags on the card. We’re not sure why every student would need access to this website, but the fact is that the URL was printed right on the back of the card. The website also had no limit to how many times a query could be made. The only hint that the university was aware of possible security implications was the disclaimer on the site. The disclaimer mentioned that usage of the tool was “logged and tracked”.

The next step was to purchase a magnetic card reader and writer. The team decoded all of the cards and analyzed the data. They found that each card held an expiration date, but the expiration date was identical for every single card.  The team used the reader/writer to copy the data from [Sam’s] card and modify the name. They then wrote the data back onto a new, blank magnetic card. This card had no printing or markings on it. [Sam] took the card and was able to use it to purchase items from a store on campus. He noticed that the register reached back to a server somewhere to verify his real name. It didn’t do any checks against the name written onto the magstripe. Even still, the cashier still accepted a card with no official markings.

The final step was to write a node.js script to scrape the number verification website. With just 15 lines of code, the script will run through all possible combinations of numbers in a random sequence and log the result. The website can handle between three and five requests per second, which means that brute forcing all possible combinations can be completed in roughly two days. These harvested numbers can then be written onto blank cards and potentially used to purchase goods on another student’s account.

[Sam’s] team offers several recommendations to improve the security of this system. One idea is to include a second form of authorization, such as a PIN. The PIN wouldn’t be stored on the card, and therefore can’t be copied in this manner. The primary recommendation was to take down the verification website. So far OSU has responded by taking the website offline, but no other changes have been made.

Diode Steering And Counting With A 555

While you’re not likely to see this technique used very much today, there’s a lot you can do with a 555, some logic chips, and a handful of diodes. [Fran] is here with a great example of using these simple parts to build a circuit that counts to zero, using parts you can probably find under your workbench.

[Fran] was inspired to build this diode counter from one of [Dave]’s Mailbags and [Colin Mitchell]’s 555 circuit book. The 555 is the standard component found in every parts drawer, but since we have tiny microcontrollers that cost the same as a 555, we’re not seeing the artistry of a simple timer chip and a few logic chips much these days.

This circuit began with a 555 attached to a 4017B decade counter. Simply by tying a few LEDs to the output of the 4017, [Fran] made a bunch of LEDs light up in sequence. Cool, but nothing unexpected. The real trick uses a few diodes and six LEDs to build a scanner – a line of LEDs that will blink from left to right, then right to left. Impressive, and with a little more circuitry it’s a Larson Scanner, as seen in Battlestar Galactica and Knight Rider.

The real trick for this technique comes when [Fran] pulls out a piece of protoboard, several dozen diodes, and seven old transistors to have a seven-segment display count from zero to nine. The 4017 simply counts out on ten pins, and each of these pins is wired to a bunch of diodes for each segment in the display. Add in a few resistors and a transistor, and [Fran] replicated what’s inside a seven-segment driver with discrete parts.

If counting to zero isn’t enough proof that you can do a whole lot with some diodes and logic chips, how about programming an Atari 2600 with one?

Video below.

Continue reading “Diode Steering And Counting With A 555”

Arduino V. Arduino

Arduino LLC is suing Arduino Srl (the Italian version of an LLC). Sounds confusing? It gets juicier. What follows is a summary of the situation as we learned it from this article at MakeMagazin.de (google translatrix)

Arduino LLC is the company founded by [Massimo Banzi], [David Cuartielles], [David Mellis], [Tom Igoe] and [Gianluca Martino] in 2009 and is the owner of the Arduino trademark and gave us the designs, software, and community support that’s gotten the Arduino where it is. The boards were manufactured by a spinoff company, Smart Projects Srl, founded by the same [Gianluca Martino]. So far, so good.

Things got ugly in November when [Martino] and new CEO [Federico Musto] renamed Smart Projects to Arduino Srl and registered arduino.org (which is arguably a better domain name than the old arduino.cc). Whether or not this is a trademark infringement is waiting to be heard in the Massachussetts District Court.

According to this Italian Wired article, the cause of the split is that [Banzi] and the other three wanted to internationalize the brand and license production to other firms freely, while [Martino] and [Musto] at the company formerly known as Smart Projects want to list on the stock market and keep all production strictly in the Italian factory.

Naturally, a lot of the original Arduino’s Open Source Hardware credentials and ethos are hanging in the balance, not to mention its supply chain and dealer relationships. However the trademark suit comes out, we’re guessing it’s only going to be the first in a series of struggles. Get ready for the Arduino wars.

We’re not sure if this schism is at all related to the not-quite-open-source hardware design of the Yun, but it’s surely the case that the company is / the companies are going through some growing pains right now.

Thanks [Philip Steffan] for the pointer to the MakeMagazin.DE article. (And for writing it.)