Wood game piece being carved by a CNC mill with a hacked rotary axis

This $12 CNC Rotary Axis Will Make Your Head Spin

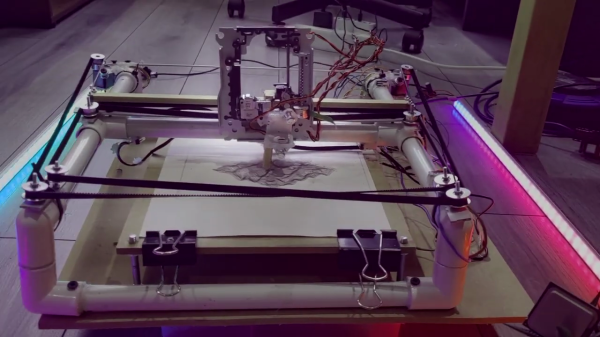
[legolor] brings us a great, cheap rotary axis to add to your small 3 axis CNC mills. How are you going to generate G-Code for this 4th axis? That’s the great part, and the hack, that [legolor] really just swapped the Y axis for the rotation. To finish the workflow and keep things cheap accessible to all there’s a great trick to “unwrap” your 3D model so your CAM software of choice thinks it’s still using a linear Y axis and keeps your existing workflow largely intact. While this requires an extra step in Blender to do the unwrapping, we love the way this hack changes as little of the rest of your process as possible. The Blender script might be useful for many other purposes too.

Wood game pieces carved from wood by a CNC mill with a hacked rotary axis

The results speak for themselves too! We thought the 3D printed parts were suspect in a CNC setup, but for the small scale of game pieces and milling wood, the setup is stable enough to produce a surprisingly accurate and detailed finish. If you want to try the same approach with something larger or a tougher material, [legolor] has a suggestion of a tailstock setup that’s still under $100 USD. Continue reading “This $12 CNC Rotary Axis Will Make Your Head Spin”

CNC Feeds And Speeds, Explained As A First-Timer

If you’ve ever looked into CNC cutting tools, you’ve probably heard the term “feeds and speeds”. It refers to choosing the speed at which to spin the cutting tool, and how fast to plow it into the material being cut. They’re important to get right, and some of the reasons aren’t obvious. This led [Callan Bryant] to share his learned insights as a first-timer. It turns out there are excellent (and somewhat non-intuitive) reasons not to simply guess at the correct values!

A table of variables and how they relate to one another (click to enlarge).

The image above shows a tool damaged by overheating. [Callan] points out that as a novice, one might be inclined to approach a first cutting jobs conservatively, with a low feed rate. But doing this can have an unexpected consequence: a tool that overheats due to spinning too quickly while removing too little material.

CNC cutting creates a lot of heat from friction, and one way to remove that heat is by having the tool produce shavings, which help carry heat away. If a tool is making dust instead of shavings — for example if the feed rate is too conservative — the removed pieces will be too small to carry significant energy, and the tool can overheat.

[Callan] makes a table of variables at work in a CNC system in order to better understand their relationship before getting into making a formula for calculating reasonable feed and speed rates. Of course, such calculations are a reasonable starting point only, and it’s up to the operator to ensure things are happening as they should for any given situation. As our own Elliot Williams observed, CNC milling is a much more manual process than one might think.

The $50 Pen Plotter

[Arca] sets out to build himself a low-cost pen plotter that doesn’t require access to a 3D printer. The plotter uses a coreXY arrangement, powered by 28BYJ-48 stepper motors, which he overdrives with +12 VDC to increase the torque. Pen up and down control is done using a stepper motor salvaged from a DVD reader. The frame is constructed using PVC electrical conduit and associated fittings, and [Arca] uses the hot glue gun quite liberally. Steppers were driven by A4988 modules with heatsinks, and motion control is provided by GRBL running on an Arduino UNO.

He has a few issues with glitches on the limit switches, and is continuing to tweak the design. There is no documentation yet, but you can discern the construction easily from the video if you want to try your hand at making one of these. This is a really cool DIY plotter, and many parts you probably have laying around your parts boxes. As [Arca] says, it’s not an AxiDraw, but the results are respectable. Keep a lookout for part 2 of this project on his YouTube channel.

Continue reading “The $50 Pen Plotter”

Powercore Aims To Bring The Power Of EDM To Any 3D Printer

The desktop manufacturing revolution has been incredible, unleashing powerful technologies that once were strictly confined to industrial and institutional users. If you doubt that, just look at 3D printing; with a sub-$200 investment, you can start making parts that have never existed before.

Sadly, though, most of this revolution has been geared toward making stuff from one or another type of plastic. Wouldn’t it be great if you could quickly whip up an aluminum part as easily and as cheaply as you can print something in PLA? That day might be at hand thanks to Powercore, a Kickstarter project that aims to bring the power of electric discharge machining (EDM) to the home gamer. The principle of EDM is simple — electric arcs can easily erode metal from a workpiece. EDM machines put that fact to work by putting a tool under CNC control and moving a precisely controlled electric arc around a workpiece to machine complex shapes quickly and cleanly.

Compared to traditional subtractive manufacturing, EDM is a very gentle affair. That’s what makes EDM attractive to the home lab; where the typical metal-capable CNC mill requires huge castings to provide the stiffness needed to contain cutting forces, EDM can use light-duty structures and still turn out precision parts. In fact, Powercore is designed to replace the extruder of a bog-standard 3D printer, and consists almost entirely of parts printed on the very same machine. The video below shows a lot of detail on Powercore, including the very interesting approach to keeping costs down by creating power resistors from PCBs.

While we tend to shy away from flogging crowdfunded projects, this one really seems like it might make a difference to desktop manufacturing and be a real boon to the home lab. It’s also worth noting that this project has roots in the Hackaday community, being based as it is on [Dominik Meffert]’s sinker EDM machine.

Continue reading “Powercore Aims To Bring The Power Of EDM To Any 3D Printer”

Will Carmakers Switch Clay For Computers?

The 3D printing revolution has transformed a lot of industries, but according to [Insider Business] the car industry still uses clay modeling to make life-sized replicas of new cars. The video below shows a fascinating glimpse of the process of taking foam and clay and making it look like a real car. Unlike the old days, they do use a milling machine to do some rough work on the model, but there’s still a surprising amount of manual work involved. Some of the older film clips in the video show how hard it was to do before the CNC machines.

The cost of these models isn’t cheap. They claim that some of the models have cost $650,000 to create. We assume most of that is in salaries. Some models take four years to complete and a ton of clay.

Continue reading “Will Carmakers Switch Clay For Computers?”

3 Ways To DIY Custom CNC Dust Covers

Home shop machinists know dust shields are important for keeping swarf out of expensive linear rails and ball screws. [Petteri Aimonen] demonstrates three inexpensive ways to DIY some bellows-style dust covers. Such things can of course be purchased, but they’re priced at a premium and not always available in the size one needs.

A bellows-style dust cover ideally maximizes extension length while minimizing side wall distortion. It should hold its shape without external support.

The first method is to fold a suitable flat plastic or paper sheet into a bellows pattern. This method is all about the fold pattern, and thankfully, there’s no need to reinvent the wheel. [Petteri] used a fellow enthusiast’s bellows folding pattern generator which is, believe it or not, itself inspired by a remarkably comprehensive US Patent Number 6,054,194.

The downside to this method is the thickness of the bellows when it is fully collapsed. The corners always contain the most material, because it is there that the material is folded upon itself, and this limits how close to the end of travel the CNC carriage can move with the bellows attached.

The second method is to cut a large number of C-shaped sections from fabric and sew them together to make bellows. This method collapses down well and holds its shape well, but the cutting and sewing it requires can be a barrier.

The final method — and the one [Petteri] found most useful — was to hack some IKEA window blinds. IKEA Schottis pleated blinds are inexpensive, with a slick finish on one side and polyester fabric.  The polyester is perfect for gluing. By cutting the material at a 45-degree angle into three sections and gluing them into a U-shape, one can create a serviceable bellows-style cover for a minimum of work.

Any of the explored methods can do the job, but [Petteri] has formulas to determine the maximum extensions and folded thicknesses of each method just in case one would like to see for themselves before choosing. And if a bellows-style cover isn’t your cup of tea, check out this method for turning a plastic strip into a spring-like tube that does the same job.

Irreproducible, Accumulative Hacks

Last weekend, I made an incredibly accurate CNC pen-plotter bot in just 20 minutes, for a total expenditure of $0. How did I pull this off? Hacks accumulate.

In particular, the main ingredients were a CNC router, some 3D-printed mounts that I’d designed and built for it, and a sweet used linear rail that I picked up on eBay as part of a set a few years back because it was just too good of a deal. If you had to replicate this build exactly, it would probably take a month or two of labor and cost maybe $2,000 on top of that. Heck, just tuning up the Chinese 6040 CNC machine alone took me four good weekends and involved replacing the stepper motors. Continue reading “Irreproducible, Accumulative Hacks”