Editing GameCube Memory With A Raspberry Pi

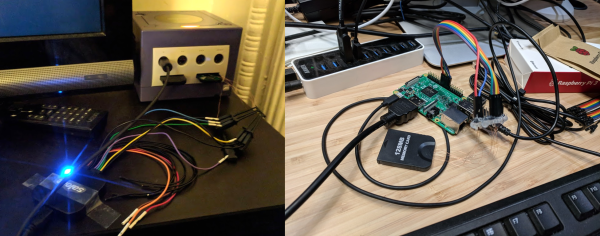
[James] has been working with GameCubes, emulators, and Animal Crossing for a while now, and while emulators are sufficient, he’d like to play on real hardware. This means he needs to write to a GameCube memory card. While there are a few options to do this, they either require a Wii or hardware that hasn’t been made in a decade. The obvious solution to this problem is to reverse engineer the GameCube memory card to read and write the memory with a Raspberry Pi.

There’s an incredible amount of unofficial documentation for every console, and [James] stumbled upon a GC-Forever forum post that describes the electrical signals inside the GameCube memory card. There’s your standard compliment of power and ground pads, along with a DI, DO, CS, Clk, and an INT pin. [James] broke out the magnet wire and soldered up a pin header to these cards. Data was then captured with a Salae logic analyzer, and lo and behold, it looked like a standard SPI protocol.

With the low-level protocol worked out, [James] checked out the Yet Another GameCube Documentation to get the main functions allowed through the SPI bus. The ‘read block’, for instance, starts off with 0x52 and an address offset. A little bit of Python on a Raspberry Pi meant [James] could read and write the entire GameCube memory card. Right now the code is a little rough, but all the work is available should you want to edit your Animal Crossing save with a Raspberry Pi.

This work follows [James]’ earlier work on getting into the debug menu of Animal Crossing, allowing him to add items to his inventory. With this latest advancement, it’s only a matter of time before we plug Raspberry Pis directly into a GameCube.

Rooting The Amazon Fire TV Cube With An Arduino

Amazon might not be happy about it, but at least part of the success of their Fire TV Stick was due to the large hacking and modification scene that cropped up around the Android-powered device. A quick search on YouTube for “Fire Stick Hack” will bring up a seemingly endless array of videos, some with millions of views, which will show viewers how to install unofficial software on the little media dongle. Now it looks like their latest media device, the Fire TV Cube, is starting to attract the same kind of attention.

The team at [Exploitee.rs] has recently taken the wraps off their research which shows the new Fire TV Cube can be rooted with nothing more than an Arduino and an HDMI cable you’re willing to cut apart. Of course, it’s a bit more complicated than just that, but between the video they’ve provided and their WiKi, it looks like all the information is out there for anyone who wants to crack open their own Cube. Just don’t be surprised if it puts you on the Amazon Naughty List.

The process starts by putting the device’s Amlogic S905Z into Device Firmware Upgrade (DFU) mode, which is done by sending the string “boot@USB” to the board over the HDMI port’s I2C interface. That’s where the HDMI cable comes in: you can cut into one and wire it right up to your Arduino and run the sketch [Exploitee.rs] has provided to send the appropriate command. Of course, if you want to get fancy, you could use an HDMI breakout board instead.

With the board in DFU mode in you gain read and write access to the device’s eMMC flash, but that doesn’t exactly get you in because there’s still secure boot to contend with. But as these things tend to go, the team was able to identify a second exploit which could be used in conjunction with DFU mode to trick the device into disabling signature verification. Now with the ability to run unsigned code on the Fire TV Cube, [Exploitee.rs] implemented fastboot to make it easier to flash their custom rooted firmware images to the hardware.

As with the Fire TV Stick before it, make sure you understand the risks involved when you switch off a device’s security features. They’re often there to protect the end user as much as the manufacturer.

Continue reading “Rooting The Amazon Fire TV Cube With An Arduino”

Eight Player GameCube Adapter Is Ready For Smash

With the release of Smash Ultimate fast approaching for the Nintendo Switch, [Patrick Hess] wanted to get ahead of the game and make sure his squad had the equipment they’d need. Namely, support for the GameCube controllers that serious Smash Bros players demand. But it wasn’t enough to have one or two of them hooked up, or even four. Not even six GameCube controllers could satiate his desire. No, he needed to have support for eight simultaneous GameCube controllers, and he wanted to look good doing it too.

Enter his meticulously designed eight player GameCube to USB adapter. Made out of dual official Nintendo GameCube to USB adapters (intended for the Wii U) merged together in a 3D printed case, the final result looks like something that could earn the coveted Nintendo Seal of Approval. Or at least, something that might pop up on the import sites in the next month or two for a few bucks.

[Patrick] started the project by recreating the official adapter PCBs and their housings in 3D using a pair of calipers. After a couple of test prints to make sure he had all the dimensions right, he could then move on to designing his final enclosure knowing he had accurate data to model around.

In addition to the two adapter boards, there’s also a four port USB hub inside the device’s case. Each adapter has two USB leads, here shortened to fit inside the case, which connect up to the hub. The integrated hub allows connecting all eight GameCube controllers through only a single USB connection. All controllers worked as expected during intense testing on the Wii U’s version of Smash Bros, though at this point [Patrick] can only assume it will work when the Switch version is released.

If there’s a downside to this project, it’s that the design for the 3D printed case is so intricate that [Patrick] was only able to print it on a machine that supported water-soluble PVA supports. A somewhat tall order for the average hacker; it would be interesting to see if somebody could make a second pass on the enclosure that is geared more towards printability than aesthetics.

While the design of the GameCube controller remains somewhat controversial after all these years, there’s no denying it retains an impressive following. Whether turning them into USB devices, shrinking them to preposterously small dimensions, or just finding increasingly creative ways to use them on Nintendo’s latest console, hackers are definitely in love with the gonzo little controller that’s now pushing 20 years old.

Prototype Proves Wii Was Two Gamecubes Taped Together All Along

Say what you will about Nintendo’s little purple lunchbox, the Gamecube, but it was home to many delightful experiences from Super Smash Bros. Melee to The Legend of Zelda: Twilight Princess. We now know it was also home to one of the very first Nintendo Wii remotes as well thanks to the recent listing from [Kuriaisu1122] on Yahoo Auctions.

The prototype Wii remote is a wired design and features a proprietary Gamecube controller cable. Notable differences include the two buttons toward the bottom are labeled ‘B’ and ‘A’ respectively. This shows that Nintendo always intended to have players hold the remote sideways in order to play Virtual console games. The large white button next to the directional pad is unlabeled, and along the middle are the traditional ‘Start’ and ‘Select’ labels on either side of ‘Home’. However, these all would go through multiple revisions on the way to the final design. Interestingly there is an Ethernet jack at the base used to connect accessories. That connector would eventually become the often maligned “Nunchuk interface”, but what modder wouldn’t have loved it if that Ethernet port had carried on to the final design?

Much like the “invaluable” Mario Party 6 microphone, the prototype’s IR sensor bar communicates via the Gamecube memory card port. The auction listing featured a photo size comparison of the prototype sensor bar is around four inches wider than the final design. Missing from the prototype Wii remote is the small tinny speaker, but that always seemed like an after thought anyway.

Credence as to the controller’s validity was given in a tweet from WayForward’s James Montagna who said on Twitter, “Wow, it’s the prototype Wii Remote & Nunchuk! I remember seeing these back when it was still known as the Nintendo Revolution!”. Montagna would go on to post photos of the Wii remote from E3 2006 that featured ‘Back’ and ‘Pause’ buttons where the plus and minus buttons would ultimately reside on the final design. These photos of the missing links in the evolution of the Wii remote help fill in the design process at Nintendo. They also further the idea that Nintendo always wanted players to measure each of their new consoles’ processing power in “X number of Gamecubes duct taped together”.

[via Nintendo Life]

For more on the console formerly known as the Nintendo Revolution, check out this incredible Wii console mod in an Altoids tin featured on Hackaday.

Robot Solves Rubik’s Cube With One Hand Tied Behind Its Back

For all those who have complained about Rubik’s Cube solving robots in the past by dismissing purpose-built rigs that hold the cube in a non-anthropomorphic manner: checkmate.

The video below shows not only that a robot can solve the classic puzzle with mechanical hands, but it can also do it with just one of them – and that with only three fingers. The [Yamakawa] lab at the University of Tokyo built the high-speed manipulator to explore the kinds of fine motions that humans perform without even thinking about them. Their hand, guided by a 500-fps machine vision system, uses two opposing fingers to grip the lower part of the cube while using the other finger to flick the top face of the cube counterclockwise. The entire cube can also be rotated on the vertical axis, or flipped 90° at a time. Piecing these moves together lets the hand solve the cube with impressive speed; extra points for the little, “How’s that, human?” flick at the end.

It might not be the fastest cube solver, or one that’s built right into the cube itself, but there’s something about the dexterity of this hand that we really appreciate.

Continue reading “Robot Solves Rubik’s Cube With One Hand Tied Behind Its Back”

Self-Solving Rubik’s Cube

Rubik’s Cube has been around for what seems like forever now, and has spawned an entire subculture devoted to solving the puzzle with automation. Most Rubik robots put the cube in a specially designed cradle bristling with actuators and sensors, and while those rigs are impressive, they don’t come close to this robotic Rubik solver built into the cube itself.

Fair warning that [Human Controller] doesn’t provide much detail on this build other than pictures; even translating the Japanese web page doesn’t offer much more information. But there are pictures, plus the video below, which reveal the engineering masterpiece encased within the standard sized Rubik’s cube. The internal mechanism of the original cube had been replaced by a spherical assembly around which the cube’s faces rotate. The sphere, which appears to be 3D-printed, houses six motors and gear trains, along with a microcontroller board and what appear to be Hall sensor boards to detect the position of each face. Everything is wired up with magnet wire to keep bundles to a minimum size, and buried deep inside is a LiPo battery pack. A disassembly video offers further clues to this ingenious device’s inner workings.

Once the cube senses that it has been scrambled, it sets to work on the solution, walking all over the table in the process. It’s clearly not just recording the scrambling steps and playing them back in reverse; the video below shows far more moves to solve the cube than the 15 it took to scramble it.

While we’re always impressed by marvels of speed like this robot with a 637 millisecond solve time, putting everything needed to solve the cube inside it is a feat worth celebrating. Here’s hoping that a build log shows up soon to satisfy our need for details.

Continue reading “Self-Solving Rubik’s Cube”

Katherine Scott: Earth’s Daily Photo Through 200 Cubesat Cameras

Every year at Supercon there is a critical mass of awesome people, and last year Sophi Kravitz was able to sneak away from the festivities for this interview with Katherine Scott. Kat was a judge for the 2017 Hackaday Prize. She specializes in computer vision, robotics, and manufacturing and was the image analytics team lead at Planet Labs when this interview was filmed.

You’re going to chuckle at the beginning of the video as Kat and Sophi recount the kind of highjinks going on at the con. In the hardware hacking area there were impromptu experiments in melting aluminum with gallium, and one of the afternoon’s organized workshop combined wood and high voltage to create lichtenberg figures. Does anyone else smell burning? Don’t forget to grab your 2018 Hackaday Superconference tickets and join in the fun this year!

Below you’ll find the interview which dives into Kat’s work with satellite imaging.

Continue reading “Katherine Scott: Earth’s Daily Photo Through 200 Cubesat Cameras”