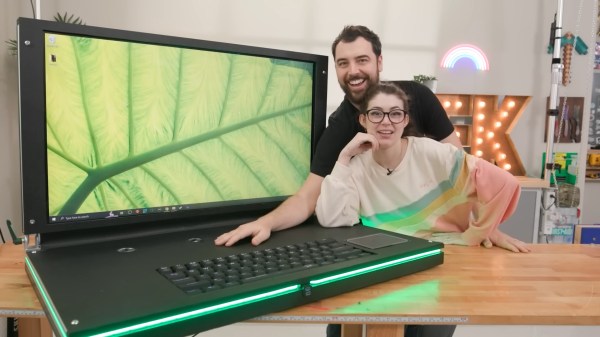
Sometimes a project needs to go big, and [Evan and Katelyn] threw portability to the wind to build the “world’s biggest” laptop.
Stretching the believability of “bigger is better,” this laptop features a 43″ screen, an enormous un-ergonomic keyboard, and a trackpad that might be bigger than your hand. Not to be outdone by other gaming laptops, it also features RGB lighting and a logo that really pops with neon resin.
The pair started the build with an aluminum extrusion frame joined by hinges. Plywood forms the top lid and bottom of the device, and the interior was covered with a mix of vinyl and ABS to keep everything tidy. A nice detail is the windows cut in the area above the keyboard to keep an eye on the charge of the two battery packs powering the laptop. Weighing more than 100 pounds, we suspect that this won’t be the next revolution in computing.
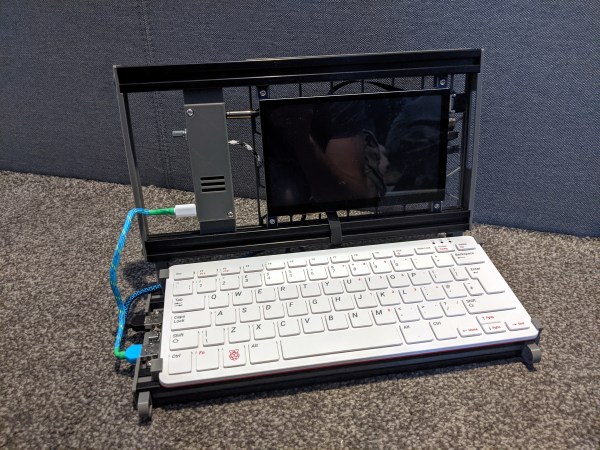
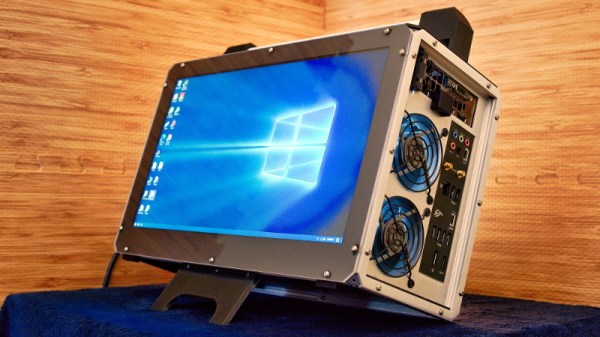
When we came up with the cyberdeck contest, we figured we would see all kinds of builds, and so far, y’all haven’t disappointed us. Take for instance this tidy but post-apocalyptic build by [facelessloser]. It has that “I used what I could find among the rubble” appeal, yet it looks so clean. Now why is that?
It must be partially because of the frame, which is 2020 aluminium extrusion. Now as you can see, this cyberdeck is based on the Raspberry Pi 400, which combines the power of a Pi 4 with a chiclet keyboard and the retro feel of the all-in-one computers of yore.
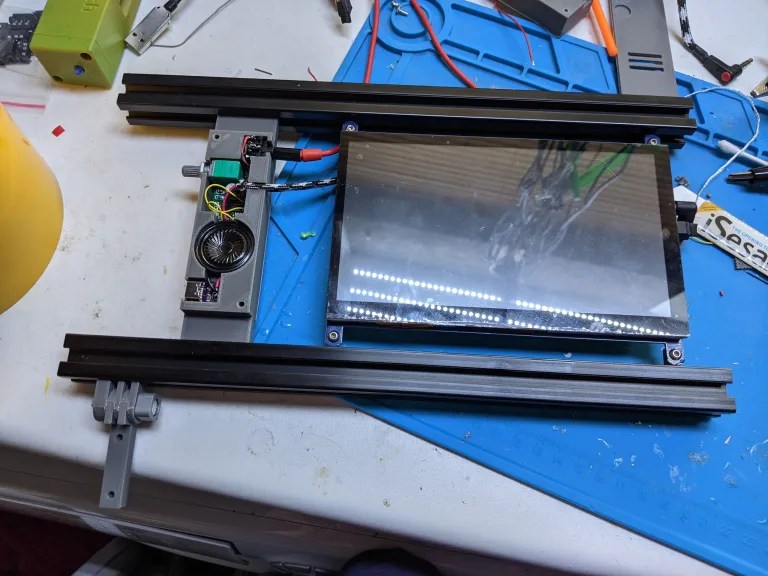
But this cyberdeck build really began because [facelessloser] had a 7″ HDMI screen kicking around for a while and finally settled on this design. The screen connects to the extrusion rail with a pair of custom-printed brackets, and is prevented from sliding back and forth with more plastic, including a nice enclosure that holds the speaker, amp board, headphone jack, and USB-C port.
Since the screen has no sound of its own, [facelessloser] added a 3 W amplifier board and a speaker for playing chiptunes and other kinds of electronic noise that provide just the right ambiance. We absolutely love the printed mesh cover on the back made of hexagons — not only does it look nice, it’s a functional, minimal, breathable solution to corralling the cabling while simultaneously showing off the internals. You can find a bit more detail and some extra build pictures over on the blog post, and be sure to check out the video after the break to see how [facelessloser] has implemented this cyberdeck into their bench, and stick around for a tour of the build.
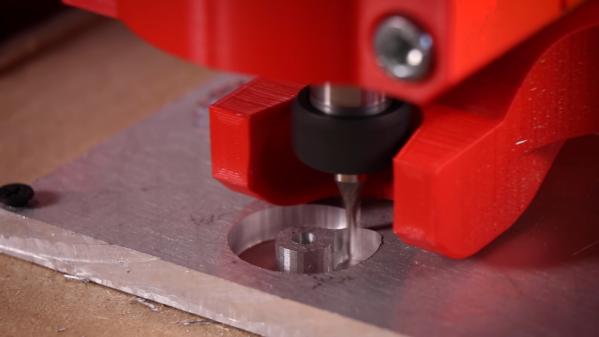
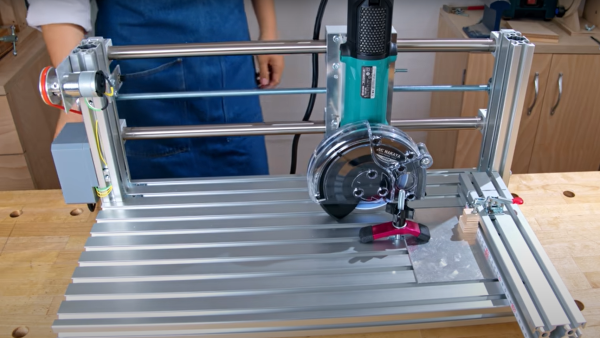
We’re no strangers to [Ivan]’s work and this time he’s building a relatively small CNC machine using extrusion, 3D printed parts, and a Makita router. The plans are available at a small cost, but just watching the accelerated build is fascinating.
You might think you could just attach something to an existing 3D printer frame that cuts like a Dremel tool. You can do that, but for most purposes, you need something stiffer than most desktop printers. You can see how solid this build is with multiple extrusions forming the base and very rigid axes.
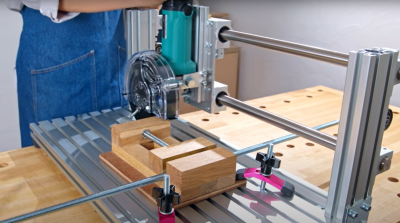
Judging from the video, the machine made short work of some aluminum plate. Of course, some of that is in the choice of tool, but it appears the machine is stable enough to hold the workpiece and the tool stable to allow this sort of service. [Ivan] says the machine cost him about 600 Euro ($670 USD) and you need a printer that can create parts as large as 180 x 180 mm.
There are quite a few similar mostly 3D printed machines on Thingiverse, including some that have been through multiple versions. If you have an old 3D printer sitting around for parts, you may have nearly everything you need if you add some printed parts, presumably from your new printer.
[JSK-koubou] is no stranger to making tools to improve their work, and this latest video is yet another in a long list of such builds, just checkout their YT channel to see the many other examples. The tool being highlighted this time is a semi-automatic grinder (Video, embedded below) which could be very handy in many situations.
Many of us struggle a little to get straight cuts with an angle grinder, especially with softer materials, as it is sometimes hard to get a good ‘feel’ of how the cut is proceeding. Once the cut is started, thin blades will tend to ‘track’ in the slot, so if it starts off a little bit, the whole cut will be off. Most annoying. Anything to help keep things straight and square would help a lot, with the extra feature of a motorized drive enabling a constant cut rate, and presumably giving an increase in the cut quality.
Using the part completed rig to cut its own leadscrew
Since operation is hands-off, you could set it up, and leave it to do its thing, whilst you step aside, away from flying sparks, noise and the remote possibility of getting a splintered blade in your face, should the unthinkable happen. All good things.
The detailed build video shows what looks like a pretty solid construction, there are plans available on the accompanying website, but they do request a small donation of ¥1000 (less than $10 USD) to download them. Given the usefulness of the tool, this seems like a small price to pay. We quite liked some sections of the build video, where the tool is used to cut its own components, as it is built-up sequentially. Clever stuff! Another interesting technique to see was the use of a flame-heated (Stanley) knife blade as a drive belt end-jointer. Somewhat tough on the blade, but it’s a consumable item and gets the job done, so that’s good enough for us!
Parts wise, there’s nothing special at all here, with most easily sourced via the usual mechanical suppliers, but we reckon you’d be able to find most of it on eBay as well. We think this is exactly the sort of build that would work well in your local Makerspace, so perhaps give that a thought?
Bored with manually cutting off? Need an overkill solution for a mundane job? How about an Automatic Cut-Off Saw? If you need some defense against the mighty angle grinder, then perhaps Proteus is just the ticket?
Back before the industry agreed on the now ubiquitous clamshell form factor of portable computers, there were a class of not-quite-desktop computers that the community affectionately refers to as “luggable” PCs. These machines, from companies like Kaypro and Osborne, were only portable in the sense that their integrated design made it relatively easy to move them. Things we take for granted today, like the ability to run on battery power or being light enough to actually place in your lap, wouldn’t come until later.
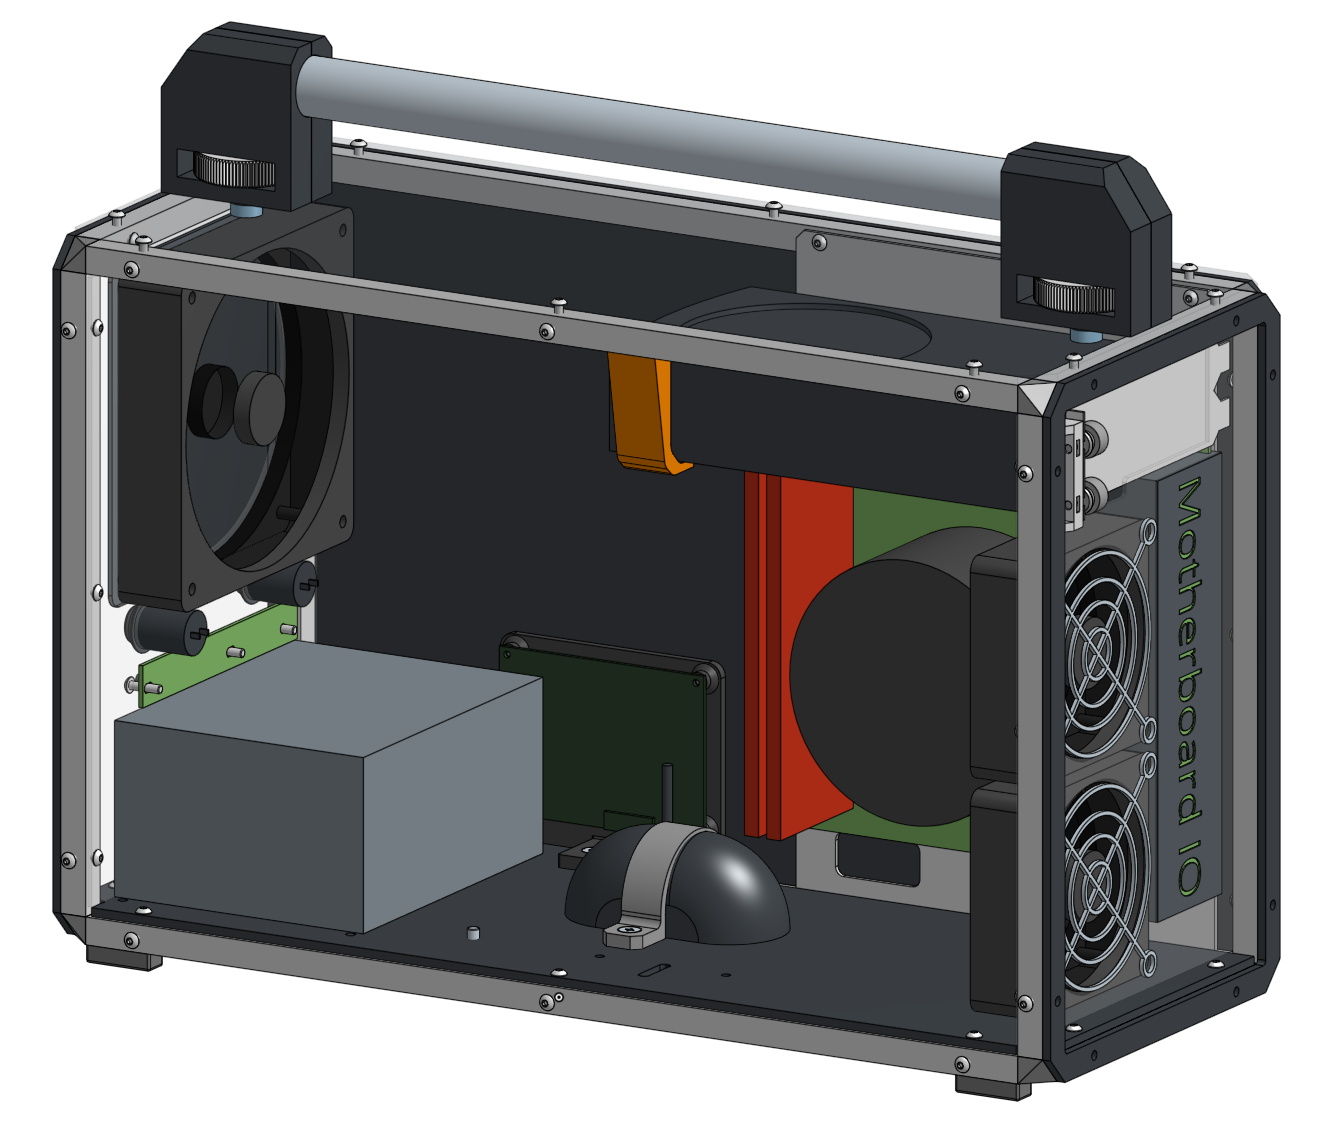
For a contemporary take on this decades old concept, take a look at this fantastic build by [Ragnar84]. It packs a modern desktop computer and a 15.6 inch laptop display into a custom designed case, but like so many other projects, the devil is truly in the details for this one. Little touches such as the kickstand on the bottom, the removable handle on the top, and the right angle adapter that takes the HDMI output from the GeForce GTX 1060 video card and redirects it back into the case really add up to create a surprisingly practical computer that’s more than the sum of its parts.
While the case might look like your standard gamer fare, [Ragnar84] built the whole thing out of miniature T-Slot extrusion and custom-cut aluminum and acrylic panels. But not before modelling the whole thing in 3D to make sure all of his selected components would fit. For the most part the internals aren’t unlike a standard Mini-ITX build, though he did need to make a few special additions like a shelf to mount the driver board for the N156H LCD panel, and a clever clamp to hold down the rounded USB speakers.
T-slot extrusions used to be somewhat mysterious, but today they are quite common thanks to their use in many 3D printers. However, it is one thing to assemble a kit with some extrusions and another thing to design your own creations with the material. If you ever had a Play-Doh Fun Factory as a kid, then you know about extrusions. You push some material out through a die to make a shape. Of course, aluminum extrusions aren’t made from modeling clay, but usually 6105-T5 aluminum. Oddly, there doesn’t seem to be an official standard, but it is so common that there’s usually not much variation between different vendors.
We use extrusions to create frames for 3D printers, laser cutters, and CNC machines. But you can use it anywhere you need a sturdy and versatile frame. There seems to be a lot of people using them, for example, to build custom fixtures inside vans. If you need a custom workbench, a light fixture, or even a picture frame, you can build anything you like using extrusions. Continue reading “Getting Started With Aluminum Extrusions”→
Whether we’re talking about Gibson’s Sprawl or our increasingly dystopian reality, one of the defining characteristics of a cyberdeck is that it can be easily customized and upgraded over time. While a few of the builds we’ve covered over the last couple of years have focused more on style than substance, we really appreciate the designs that embrace the concept of modularity to make sure the system can evolve to meet the changing demands of hacking on the go.
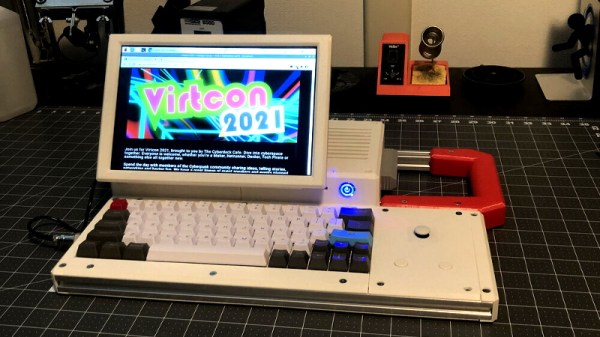
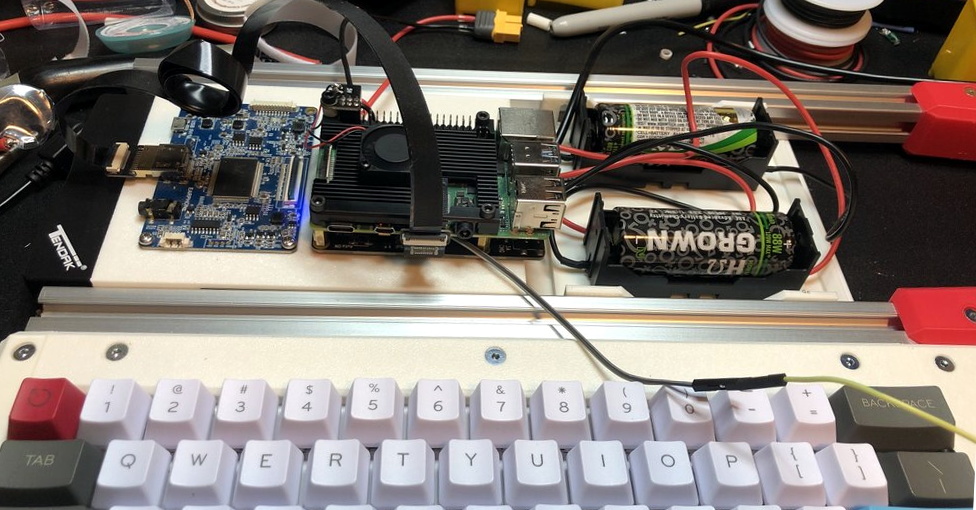
To that end, the M3TAL from [BlastoSupreme] is a perfect example of what a cyberdeck should be. Naturally it’s got the cyberpunk aesthetics we’ve come to expect, but more importantly, it’s designed so modifications and repairs are as quick and painless as possible. The trick is the use of a 2020 aluminum extrusion frame, which allows external panels and components to be attached anywhere along the length of the deck using T-Nuts. Similarly, by mounting internal components to “sleds” that ride between the pieces of extrusion, the electronics can easily be removed or swapped out as complete modules.
The M3TAL is currently outfitted with a Raspberry Pi 4 and a pair of 26650 batteries.
Furthering the idea of expandability, [BlastoSupreme] included an authentic 3.5 floppy drive on the M3TAL that allows him to pack an incredible 1.44 MB onto each rugged and portable disk. OK, so maybe the floppy drive isn’t terribly impressive compared to 2021 tech, but it does seem oddly appropriate for a cyberdeck. On the opposite side of the deck there’s a RetroCART slot, which cloaks modern USB devices in clunky faux cartridges. This provides a unified physical format for everything from removable storage to microcontrollers and software defined radio receivers.