Jupiter’s Moon Io Could Play Host To Life

It was many years ago now when David Bowie asked if there was life on Mars. Since then, we’ve concluded there isn’t, much to everyone’s disappointment. That left scientists the world over to start looking elsewhere for new lifeforms for us to talk to, conquer, or play bridge with. Or perhaps more likely, look at under a microscope.

The latest candidate for hosting nearby life is Jupiter’s moon, Io. Let’s take a look at what makes Io special, and what we might hope to find there.

Continue reading “Jupiter’s Moon Io Could Play Host To Life”

Mini MIDI Synth Uses Minimum Number Of Parts

The 80s were the golden age of synthesizers in pop music. Hugely complicated setups that spared no expense were the norm, with synths capable of recreating anything from pianos and guitars to percussion, strings, and brass. These types of setups aren’t strictly necessary if you’re looking to make music, though, especially in the modern age of accessible microcontrollers. This synthesizer from [Folkert] with MIDI capabilities, for example, creates catchy tunes with only a handful of parts.

This tiny synth is built around an ESP32 and works by generating PWM signals normally meant for LEDs. In this case, the PWM signals are sent through a rudimentary amplifier and then on to an audio output device.  That could be a small speaker, an audio jack to another amplifier, or a capture device.

The synth’s eight channels use up most of the ESP32’s I/O and provide a sound that’s reminiscent of the eight-bit video game era. The total parts count for this build is shockingly small with only a handful of resistors, the ESP, an optocoupler, and a few jacks.

For those wishing to experiment with synthesizers, a build like this is attractive because it’s likely that all the parts needed are already sitting around in a drawer somewhere with possibly the exception of the 5 pin DIN jacks needed for MIDI capabilities. Either way, [Folkert] has made all of the schematics available on the project page along with some sample mp3 files. For those looking to use parts from old video game systems sitting in their parts drawer, though, take a look at this synthesizer built out of a Sega Genesis.

A briefcase sized electronic machine with many indicator lamps and switches

Restoring A Vintage IBM I/O Tester

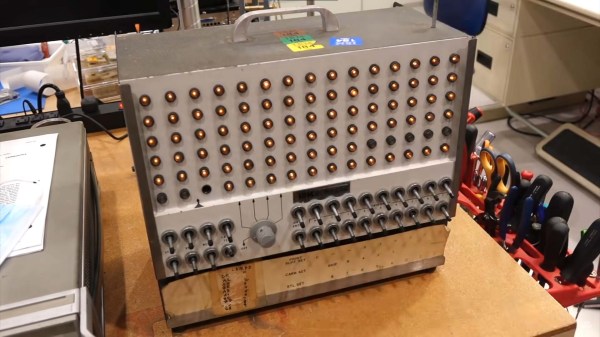
By now, [CuriousMarc] and his team of volunteers are well versed in 1960s hardware restoration. So when a vintage IBM I/O Tester came into their possession, a full machine makeover was all but inevitable.

The I/O Tester dates from around 1965, which roughly coincides with the introduction of IBM’s lauded System/360 computer mainframe. In addition to the computer itself, business customers could order a variety of peripherals with their computing system. These included storage devices, printers, additional operator consoles, and so on. Since these peripherals shared the same I/O design, a portable hardware testing rig was a sensible design choice. One portable low-voltage tester could be paired with any number of IBM peripherals, doing away with the need to have unique debugging panels on every piece of computing hardware.

Fast forward to the present day, and the IBM I/O Tester looks positively antique with its blinkenlight lamp panel and switches. To use the tester, simply connect up one (or both) of its chunky 104-pin connectors to your IBM peripheral of choice, insert the accompanying paper overlay, and voilà. Operators could then observe the status of the many lamps to evaluate the inner digital workings of the connected peripheral. Depending on the connected hardware, the tester could reveal the contents of data registers, printing status, disk and tape transfer status, and probably much more. The purpose of the tester’s ninety indicator lights is completely dependent on the attached peripheral, and the paired paper overlays are essential to comprehend their meaning.

After [Ken Shirriff] deciphered the documentation, it wasn’t long before the tester could be powered up using 24 VAC (normally supplied by the equipment being tested). Several burned out lamps were noted for replacement. The lamp assemblies required minor surgery due to a dubious design choice, and at least one of the toggle switches needed a new guide and a heavy dose of contact cleaner before it came back to life.

For the moment, [CuriousMarc] is using the blinkenlights panel as a surprisingly striking retro clock. With a literal truckload of vintage IBM hardware sitting in his storage, it’ll be exciting to see whether this restored tester will be pulled back into operational service someday. Readers should also check out our coverage of his previous major project, restoring an Apollo Guidance Computer.

Continue reading “Restoring A Vintage IBM I/O Tester”

Schematic-o-matic

Tricked-Out Breadboard Automatically Draws Schematics Of Whatever You Build

When it comes to electronic design, breadboarding a circuit is the fun part — the creative juices flow, parts come and go, jumpers build into a tangled mess, but it’s all worth it when the circuit finally comes to life. Then comes the “What have I done?” phase, where you’ve got to backtrack through the circuit to document exactly how you built it. If only there was a better way.

Thanks to [Nick Bild], there is, in the form of the “Schematic-o-matic”, which aims to automate the breadboard documentation process. The trick is using a breadboard where each bus bar is connected to an IO pin on an Arduino Due. A program runs through each point on the breadboard, running a continuity test to see if there’s a jumper connecting them. A Python program then uses the connection list, along with some basic information about where components are plugged into the board, to generate a KiCad schematic.

[Nick] admits the schematics are crude at this point, and that it’s a bit inconvenient to remove some components, like ICs, from the breadboard first to prevent false readings. But this seems like one of those things where getting 80% of the work done automatically and worrying about the rest later is a big win. Plus, we can see a path forward to automatic IC probing, and even measurement of passive components too. But even as it is, it’s a great tool.

Continue reading “Tricked-Out Breadboard Automatically Draws Schematics Of Whatever You Build”

A Super-Brain For An E-bike

There’s no better way of improving a project than logging data to make informed decisions on future improvements. When it came to [Brian]’s latest project, an electric bike, he wanted to get as much data as he could from the time he turned it on until the time he was finished riding. He turned to a custom pyBoard-based device (and wrote it up on Hackaday.io), but made it stackable in order to get as much information from his bike as possible.

This isn’t so much an ebike project as it is about a microcontroller platform that can be used as a general purpose device. All of the bike’s controls flow through this device as a logic layer, so everything that can possibly be logged is logged, including the status of the motor and battery at any given moment. This could be used for virtually any project, and the modular nature means that you could scale it up or down based on your specific needs. The device is based on an ARM microcontroller so it has plenty of power, too.

While the microcontroller part is exceptionally useful ([Brian] talks about some of its other uses here and gives us even more data on his personal webpage), we shouldn’t miss the incredible bike that [Brian] built either. It has a 3 kW rear hub motor and can reach speeds of around 60 mph. While we let the commenters below hash out the classic argument of “bicycle vs. motorcyle” we’ll be checking out some electric vehicles that are neither.

Yo Dawg, I Heard You Like FPGAs

When the only tool you have is a hammer, all problems look like nails. And if your goal is to emulate the behavior of an FPGA but your only tools are FPGAs, then your nail-and-hammer issue starts getting a little bit interesting. That’s at least what a group of students at Cornell recently found when learning about the Xilinx FPGA used by a researcher in the 1990s by programming its functionality into another FPGA.

Using outdated hardware to recreate a technical paper from decades ago might be possible, but an easier solution was simply to emulate the Xilinx in a more modern FPGA, the Cyclone V FPGA from Terasic. This allows much easier manipulation of I/O as well as reducing the hassle required to reprogram the device. Once all of that was set up, it was much simpler to perform the desired task originally set up in that 90s paper: using evolutionary algorithms to discriminate between different inputs.

While we will leave the investigation into the algorithms and the I/O used in this project as an academic exercise for the reader, this does serve as a good reminder that we don’t always have to have the exact hardware on hand to get the job done. Old computers can be duplicated on less expensive, more modern equipment, and of course video games from days of yore are a snap to play on other hardware now too.

Thanks to [Bruce Land] for the tip!

Sinclair I/O Board Completed Over 30 Years Later

In the early 1980s when the 8-bit microcomputer boom was well under way, [Alan Faulds] was a student, and an owner of a Sinclair ZX81. He had ambitions to use it, in his words, “to control the world“, but since the Sinclair lacked an I/O port he was thwarted. He bought an expander board and a couple of I/O card PCBs from the British electronic supplier Maplin in the days when they were a mail order parts stockist rather than a chain of stores chasing Radio Shack’s vacated retail position.

Sadly for [Alan], he didn’t have the cash to buy all the parts to populate the boards, then the pressures of a final year at university intervened, and he never built those Maplin kits. They sat forgotten in their padded envelope for over three decades until a chance conversation with a friend reminded him of his unfinished student project. He sought it out, and set about recreating the board.

zx-io-thumbnail
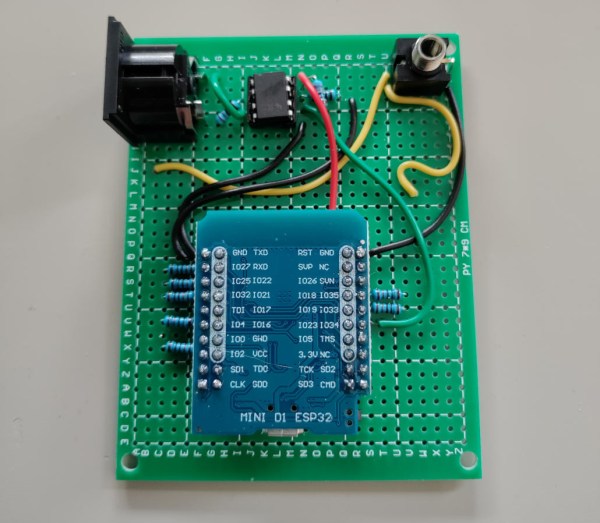
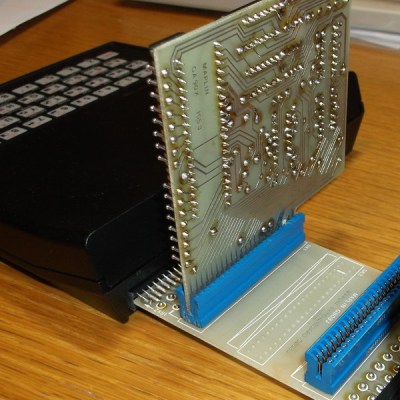
The ZX81 had a single port: a PCB edge connector at its rear that exposed all the Z80 processor’s lines. It was notorious for unreliability, as the tiniest vibration when a peripheral was connected would crash the machine. Maplin’s expansion system featured a backplane with a series of edge connector sockets, and cards with bare PCB edge connectors. Back in the 1980s it was easy to find edge connectors of the right size with the appropriate key installed, but not these days. [Alan] had to make one himself for his build.

The I/O card with its 8255 and brace of 74 series chips was a double-sided affair with vias made through the use of little snap-off hand-soldered pins. [Alan] put his ICs in sockets, a sensible choice given that when he powered it up he found he’d put a couple of the 74 chips in the wrong positions. With that error rectified the board worked exactly as it should, giving the little ZX three I/O ports, albeit with one of them a buffered output.

We haven’t featured the little Sinclair micro as often as we should have here at Hackaday, it seems to have been overshadowed by its ZX Spectrum successor. We did show you a VGA ZX81 emulated on an mbed though, and a rather neat color video hack for its Brazilian cousin.