Highly Configurable Open Source Microscope Cooked Up In FreeCAD

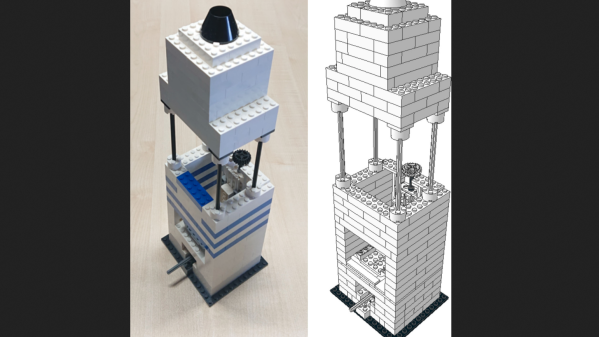
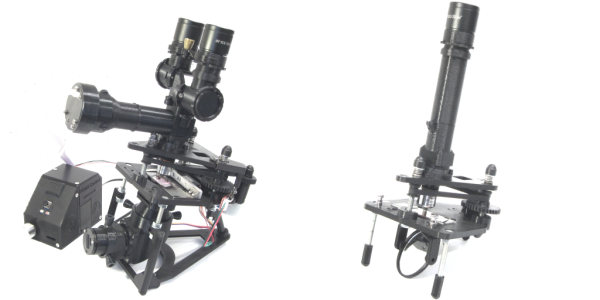
What do you get when you cross a day job as a Medical Histopathologist with an interest in 3D printing and programming? You get a fully-baked Open Source microscope, specifically the Portable Upgradeable Modular Affordable (or PUMA), that’s what. And this is no toy microscope. By combining a sprinkle of off-the-shelf electronics available from pretty much anywhere, a pound or two of filament, and a dash of high quality optical parts, PUMA cooks up quite possibly one of the best open source microscopy experiences we’ve ever tasted.

GitHub user [TadPath] works as a medical pathologist and clearly knows a thing or two about what makes a great instrument, so it is a genuine joy for us to see this tasty project laid out in such a complete fashion. Many a time we’ve looked into an high-profile project, only to find a pile of STL files and some hard to source special parts. But not here. This is deliberately designed to be buildable by practically anyone with access to a 3D printer and an eBay account.

The project is not currently certified for medical diagnostics use, but that is likely only a matter of money and time. The value for education and research (especially in developing nations) cannot really be overstated.

A small selection of the fixed and active aperture choices

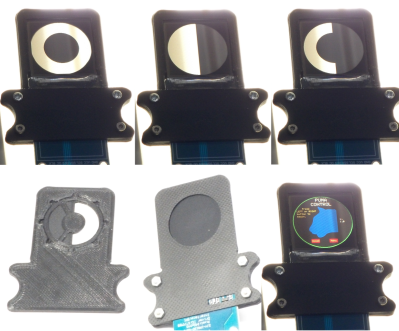
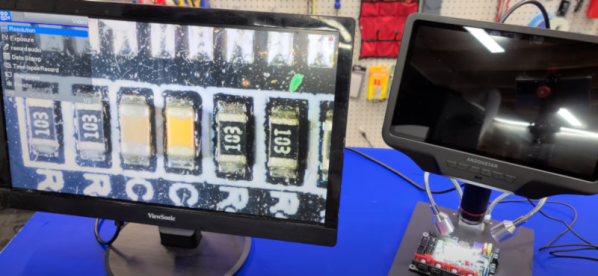
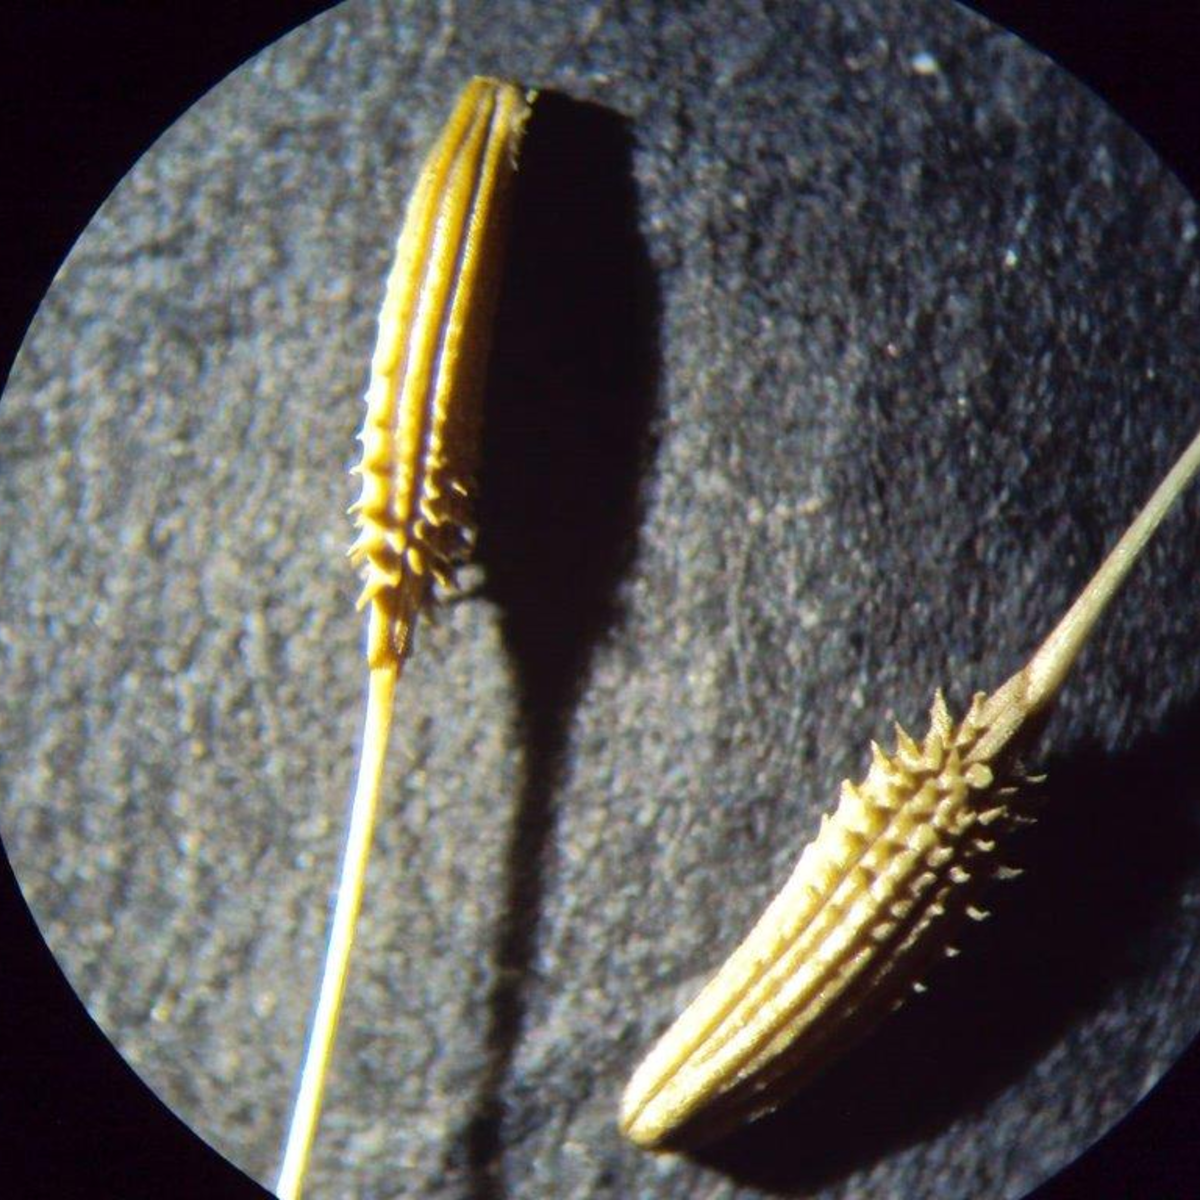
The modularity allows a wide range of configurations from simple ambient light illumination, with a single objective, great for using out in the field without electricity, right up to a trinocular setup with TFT-based spatial light modulator enabling advanced methods such as Schlieren phase contrast (which allows visualisation of fluid flow inside a live cell, for example) and a heads-up display for making measurements from the sample. Add into the mix that PUMA is specifically designed to be quickly and easily broken down in the field, that helps busy researchers on the go, out in the sticks.

The GitHub repo has all the details you could need to build your own configuration and appropriate add-ons, everything from CAD files (FreeCAD source, so you can remix it to your heart’s content) and a detailed Bill-of-Materials for sourcing parts.

We covered fluorescence microscopy before, as well as many many other microscope related stories over the years, because quite simply, microscopes are a very important topic. Heck, this humble scribe has a binocular and a trinocular microscope on the bench next to him, and doesn’t even consider that unusual. If you’re hungry for an easily hackable, extendable and cost-effective scope, then this may be just the dish you were looking for.

Continue reading “Highly Configurable Open Source Microscope Cooked Up In FreeCAD”

Lego Microscope Aims To Discover Future Scientists

When it comes to inspiring a lifelong appreciation of science, few experiences are as powerful as that first glimpse of the world swimming in a drop of pond water as seen through a decent microscope. But sadly, access to a microscope is hardly universal, denying that life-changing view of the world to far too many people.

There have been plenty of attempts to fix this problem before, but we’re intrigued to see Legos used to build a usable microscope, primarily for STEM outreach. It’s the subject of a scholarly paper (preprint) by [Bart E. Vos], [Emil Betz Blesa], and [Timo Betz]. The build almost exclusively uses Lego parts — pretty common ones at that — and there’s a complete list of the parts needed, which can either be sourced from online suppliers, who will kit up the parts for you, or by digging through the old Lego bin. Even the illuminator is a stock part, although you’ll likely want to replace the orange LED buried within with a white one. The only major non-Lego parts are the lenses, which can either be sourced online or, for the high-power objective, pulled from an old iPhone camera. The really slick part is the build instructions (PDF), which are formatted exactly like the manual from any Lego kit, making the build process easily accessible to anyone who has built Lego before.

As for results, they’re really not bad. Images of typical samples, like salt crystal, red onion cells, and water fleas are remarkably clear and detailed. It might no be a lab-grade Lego microscope, but it looks like it’s more than up to its intended use.

Thanks for the heads up on this, [Jef].

AD409 Microscope Review

It wasn’t that long ago that if you had an optical microscope in your electronics shop, you had a very well-supplied shop indeed. Today, though, a microscope is almost a necessity since parts have shrunk to flyspeck-size. [Maker Mashup] recently picked up an AD409 and posted a video review of the device that you can see below.

The microscope in question has a 10-inch screen so it is a step up from the usual cheap microscope we’ve seen on a lot of benches. Of course, that size comes at a price. The going rate for a new on is about $400.

Continue reading “AD409 Microscope Review”

How Did I Live Without A Microscope?

Get yourself a decent stereo inspection microscope, preferably optical. Something that can magnify from maybe 4x to 40x is fine, anything outside this range is icing on the cake. Some people claim they’re fine with a minimum of 10x, but if you go there, you’re going to need a reducing lens eventually. Either way, get one, and you’ll thank me.

How do I know this? I finally caved in and bought one about two years ago now, and while it’s not something I use daily, it’s something that I use at least once a month and for which there is simply no substitute.

This is Hackaday, so a lot of you will be thinking “inspection scope = fine-pitch soldering” and you’re not wrong. With clearance of 10 cm or more, and a slab of sacrificial optical glass (“neutral density filter”) to protect the optics from tarry flux fumes, a stereo scope at 4x makes even the fiddliest solder joints possible. Good lighting, and sharp tweezers are also a must, of course. That’s what got me in the door.

But that’s the half of it, or less. When my scope was new to me — it hasn’t been “new” since the late 1980s — we spent a whole rainy Sunday afternoon microscoping whatever would fit under the lens. Grains of salt, blades of grass, all manner of bugs living and otherwise, shells, skin, textiles. Everything is cooler under the microscope.

The event that triggered this article wasn’t my son’s school project this week to photograph dandelion seeds. Nope, today my wife found a bug in the basement; to the microscope! And with a very quick and unfortunately very positive identification, we now know that we have to strain all of our flour for bread beetles and pitch whichever bags they came in with. Hooray!

The inspection scope was intended for the soldering bench, but has found general use as an irreplaceable household tool. While I admittedly also intended to use it to lure my son into science, the real fight over scope time has been with my wife. And that’s why you want an optical scope instead of one that’s tethered to a monitor — as a general-purpose tool, portability is paramount. No menu diving, no power source, and anyone can just grab it and go.

Convinced? Ready to pull out your wallet? Microscopes are like cars. You can spend as much as you’d like on one, the cheapest will cause you nothing but pain and suffering, and the difference between the mid-range and high-end is full of diminishing returns. Buying used, especially if you can kick the metaphorical tires, can be a great bargain, and a high-end used scope will hold its value a lot better than a new budget model. Just around $200 is a sweet spot new and $300-$400 will get you the top of the line from yesteryear if you shop around. That’s not cheap, but if you’re the microscope type, it’s easily worth it. Trust me.

Microscopy Hack Chat With Zachary Tong

Join us on Wednesday, June 23 at noon Pacific for the Microscopy Hack Chat with Zachary Tong!

There was a time when electronics was very much a hobby that existed in the macroscopic world. Vacuum tubes, wire-wound resistors, and big capacitors were all mounted on terminal strips and mounted in a heavy chassis or enclosure, and interfacing with everything from components to tools was more an exercise in gross motor skills than fine. Even as we started to shrink components down to silicon chips, the packages we put them in were still large enough to handle and see easily. It’s only comparatively recently that everything has started to push the ludicrous end of the scale, with components and processes suitable only for microscopic manipulation, but that’s pretty much where we are now, and things are only likely to get smaller as time goes on.

The microscopic world is a fascinating one, and the tools and techniques to explore it are often complex. That doesn’t mean microscopy is out of the wheelhouse of the average hacker, though. Zachary Tong, proprietor of the delightfully eclectic Breaking Taps channel on YouTube, has been working in the microscopic realm a lot lately. We’ve featured his laser scanning confocal microscope recently, as well as his latest foray into atomic force microscopy. In the past he has also made DIY acrylic lenses, and he has even tried his hand at micromachining glass with lasers.

Zach is pretty comfortable working in and around the microscopic realm, and he’ll stop by the Hack Chat to share what he’s been up to down there. We’ll talk about all the cool stuff going on in Zach’s lab, and see what else he has in store for us.

join-hack-chatOur Hack Chats are live community events in the Hackaday.io Hack Chat group messaging. This week we’ll be sitting down on Wednesday, June 23 at 12:00 PM Pacific time. If time zones have you tied up, we have a handy time zone converter.
Click that speech bubble to the right, and you’ll be taken directly to the Hack Chat group on Hackaday.io. You don’t have to wait until Wednesday; join whenever you want and you can see what the community is talking about.

Macro Model Makes Atomic Force Microscopy Easier To Understand

For anyone that’s fiddled around with a magnifying glass, it’s pretty easy to understand how optical microscopes work. And as microscopes are just an elaboration on a simple hand lens, so too are electron microscopes an elaboration on the optical kind, with electrons and magnets standing in for light and lenses. But atomic force microscopes? Now those take a little effort to wrap your brain around.

Luckily for us, [Zachary Tong] over at the Breaking Taps YouTube channel recently got his hands on a remarkably compact atomic force microscope, which led to this video about how AFM works. Before diving into the commercial unit — but not before sharing some eye-candy shots of what it can do — [Zach] helpfully goes through AFM basics with what amounts to a macro version of the instrument.

His macro-AFM uses an old 3D-printer as an X-Y-Z gantry, with a probe head added to the printer’s extruder. The probe is simply a sharp stylus on the end of a springy armature, which is excited into up-and-down oscillation by a voice coil and a magnet. The probe rasters over a sample — he looked at his 3D-printed lattices — while bouncing up and down over the surface features. A current induced in the voice coil by the armature produces a signal that’s proportional to how far the probe traveled to reach the surface, allowing him to map the sample’s features.

The actual AFM does basically the same thing, albeit at a much finer scale. The probe is a MEMS device attached to — and dwarfed by — a piece of PCB. [Zach] used the device to image a range of samples, all of which revealed fascinating details about the nanoscale realm. The scans are beautiful, to be sure, but we really appreciated the clear and accessible explanation of AFM.

Continue reading “Macro Model Makes Atomic Force Microscopy Easier To Understand”

Optical Microscope Resolves Down To 40 Nanometers

Optical microscopes depend on light, of course, but they are also limited by that same light. Typically, anything under 200 nanometers just blurs together because of the wavelength of the light being used to observe it. However, engineers at the University of California San Diego have published their results using a hyperbolic metamaterial composed of silver and silica to drive optical microscopy down to below 40 nanometers. You can find the original paper online, also.

The technique also requires image processing. Light passing through the metamaterial breaks into speckles that produce low-resolution images that can combine to form high-resolution images. This so-called structured illumination technique isn’t exactly new, but previous techniques allowed about 100-nanometer resolution, much less than what the researchers were able to find using this material.

Continue reading “Optical Microscope Resolves Down To 40 Nanometers”