History Of Digital Equipment Corp And Bonus PDP-11 Replica Build

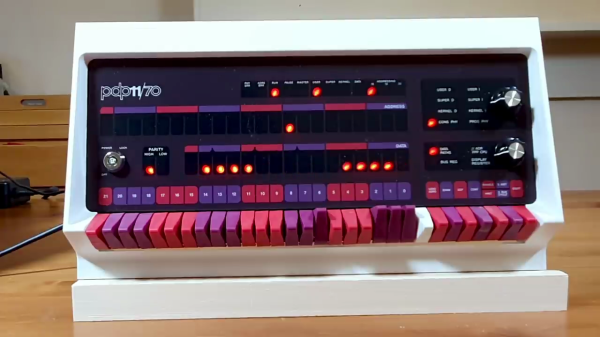
[RetroBytes] takes us on a whirlwind tour of the history of the Digital Equipment Corporation (DEC), its founder Ken Olsen, and during intermission builds up a working replica of the PDP-11 from a kit. DEC was a major player in the early computer industry, cranking out a number of models that were both industrial workhorses and used in computer laboratories to develop many of the operating systems and tools whose descendants we still use today. On top of that, DEC’s innovative, employee-friendly, and lightweight company structure was generally well-liked by its employees and a welcomed departure from the typical behemoths of the day.

This video takes us from the beginnings of DEC and its roots in MIT up to the PIP-11 era, highlighting major architectures and events along the way such as the PDP-1, PDP-8, and PDP-11. [RetroBytes] says he has a DEC Alpha sitting on the sidelines, so there may be a few follow-up videos in the future — perhaps one on the VAX as well.

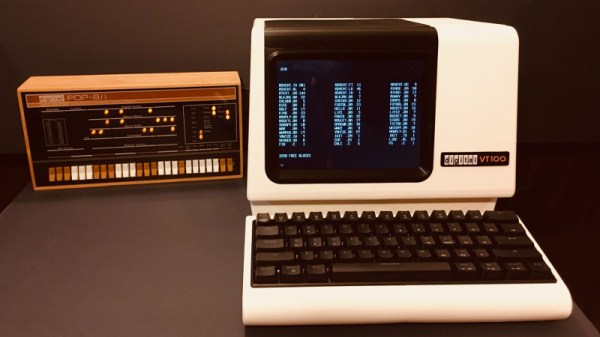
We’ve covered this particular PDP-11 replica last year, and if these replica kits are your cup of tea, check out our coverage of kit designer [Oscar Vermeulen]’s presentation. Have you ever used real PDP or VAX computers? Let us know your war stories in the comments below.

Continue reading “History Of Digital Equipment Corp And Bonus PDP-11 Replica Build”

Improving An Already Phenomenal Star Trek Prop

When Star Trek: Voyager was in the development phase, concept art was created for a new style of tricorder to be used by the crew of the titular starship. But as it often the case with a younger sibling, the show ended up having to largely make do with the hand-me-down props from Star Trek: The Next Generation, which had recently finished its TV run.

Trek aficionado [Mangy_Dog] completed a jaw-dropping recreation of this unused tricorder design back in 2019, but unable to leave well enough alone, he’s recently completed a second version that truly raises the bar for fan replicas. It’s not hyperbole to say that the prop he’s created is of a far higher quality and fidelity than anything they would have had during the actual filming of the show.

Now you might be thinking that building the second version of the tricorder was easier than the first, and indeed, [Mangy_Dog] learned some important lessons from the earlier build. But that’s not to say that construction of this new replica, which was actually done on commission, went off without a hitch. In fact, he almost immediately ran into a serious problem. When he attempted to order a new display from Nextion, he found the quality had dropped significantly from the ones he’d used previously. The viewing angles and color reproduction were abysmal, so he was forced to go back to the drawing board and not only find a new display, but a completely new graphics chip to talk to it. Continue reading “Improving An Already Phenomenal Star Trek Prop”

Miniature Space Invaders game

Arduino And An OLED Make This Space Invaders Cabinet Tiny

For as simple as it appears now, Space Invaders was one machine from the Golden Age of video games that always seemed to have a long line waiting for a chance to lose a couple of quarters. And by way of celebrating the seminal game’s influence, [Nick Cranch] has executed what might just be the world’s smallest Space Invaders replica.

It appears that this started mainly as an exercise in what’s possible with what’s on hand, which included a couple of quite small OLED displays. For the build photos it looks like there’s an Arduino Nano running the show; [Nick] relates that the chosen hardware proved challenging, and that he had to hack the driver library to make it work. Once he got a working game, [Nick] didn’t rest on his laurels. Rather, he went the extra mile and built a miniature cabinet to house everything in.

The video quality below may be poor, but it’s more than enough to see how much work he put into detailing the cabinet. The graphics of the original US release of the game cabinet are accurately represented, right down to the art on the front glass. The cabinet itself is made from 1.5 mm plywood which he cut by hand. It even looks like he recreated the original scheme of cellophane overlays on the monochrome screen to add a little color to the game. Nice touch!

We really appreciate the attention to detail here, with our only quibble being no schematics or code being posted. Hopefully, we’ll see those later, but for now, this looks like a fun project and a nice trip down memory lane. But if you think it’s too small, no worries — we’ve got a much, much bigger version of the game too.

Continue reading “Arduino And An OLED Make This Space Invaders Cabinet Tiny”

All Hail Your New Giant 555 Timer Overlord

You asked for it, and now you’ve got it. It’s taken more than a decade of accumulated complaining, but this gigantic 555 timer IC has finally gathered enough psychokinetic energy to take corporeal form and demand fealty from the readers of Hackaday.

Or not. The less exciting explanation is that creator [Rudraksha Vegad] was looking for a way to combine his interests in discrete electronic components and woodworking. The result is an incredible build that’s more than just a conversation starter; this desktop-sized version of the iconic integrated timer circuit is fully functional. You can even hook it up to a breadboard, assuming you’ve got some alligator clips handy.

Lifting the lid on this wooden “chip” uncovers an intricate hand-wired array of discrete components that stand in for the microscopic goings on inside the real thing. He’s even gone through the trouble of recreating the symbols for the comparators and flip-flops that you’d see in a diagram of a 555 using wooden shapes to elevate their respective components. It might not fit the classical definition, but surely this must count as some form of circuit sculpture.

[Rudraksha] credits several other projects for not just inspiring him to create his own mega 555, but for helping him wrap his head around the internal workings of everyone’s favorite IC. Using components he salvaged from old hardware, he says the project ended up being very educational for him. These days, when most makers are more likely to reach for a microcontroller than a logic chip, spending some quality time with transistors and passives can be quite illuminating.

Continue reading “All Hail Your New Giant 555 Timer Overlord”

Should Have Used A Vacuum Tube 555

“You should have used a 555” has become a bit of a meme around these parts lately, and for good reason. There seems to be little that these ubiquitous chips can’t be used for, and in a world where code often substitutes for hardware, it’s easy to point to instances where one could have just used a simple timer chip instead.

Definitely not in the meme category, though, is this overkill vacuum tube 555 timer. It comes to us via [David Lovett], aka [Usagi Electric], who has lately caught the “hollow state” electronics bug and has been experimenting with all sorts of vacuum tube recreations of circuits we’re far more used to seeing rendered in silicon than glass. The urge to replicate the venerable 555 in nothing but vacuum tubes is understandable, as it uses little more than a pair of comparators and a flip-flop, circuits [David] has already built vacuum tube versions of. The only part left was the discharge transistor; a pentode was enlisted to stand in for that vital function, making the circuit complete.

To physically implement the design, [David] built a large PCB to hold the 18 vacuum tubes and the handful of resistors and capacitors needed. Mounted on eight outsized leads made from sheet steel, the circuit pays homage to the original 8-pin DIP form of the 555. The video below shows the design and build process as well as testing of all the common modes of operation for the timer chip.

You can check out more of our coverage of [David]’s vacuum tube adventures, which started with his reverse-engineering of an old IBM logic module. And while he did a great job explaining the inner workings of the 555, you might want to take a deeper dive into how the venerable chip came to be.

Continue reading “Should Have Used A Vacuum Tube 555”

2:3 Scale VT100 Is A Perfect Pairing For PDP-8/I Replica

When he went shopping for a vintage serial terminal to go along with his reproduction PDP-8/I computer, [Michael Gardi] came down with a bad case of sticker shock. But rather than be discouraged, he reasoned that if his “retro” computer could stand to have modern components at its heart, so could the terminal he used to talk to it. Leaning on his considerable experience in designing 3D printed replica hardware, he’s built an absolutely gorgeous scaled down DEC VT100 terminal that any classic computer aficionado would be happy to have on their desk.

Now to be clear, [Michael] hasn’t created a true serial terminal. Since the faux PDP-8/I is running on a Raspberry Pi, all he needed to do was come up with something that could connect to its HDMI and USB ports. Put simply, he’s essentially just made a 3D printed enclosure for the Pi’s monitor and keyboard. Oh, but what a gorgeous enclosure it is.

Recreating the VT100 in CAD was made more difficult by the fact that [Michael] couldn’t get his hands on the authentic hardware. But of course, that’s never stopped him before. It turns out DEC provided some very detailed dimensions for the terminal in their original documentation, and while comparing them to photographs of the actual terminal did uncover a few key differences, the overall look is spot on. Once the design was done, he reports it took two rolls of filament and more than 200 hours to print out all the parts for the enclosure.

To help sell the authentic look [Michael] tracked down a 4:3 LCD of the appropriate size, and the use of an off-the-shelf portable mechanical keyboard should make text entry a pleasure. For a little fun, he even came up with a themed arcade controller for the VT100 that can be used with RetroPie. The printed logo plate is an especially nice touch, and we’re more than willing to forgive the fact that he had to print it at a larger scale than the rest of the terminal to get all the detail in with his printer’s 0.4 mm nozzle.

On a technical level, this is perhaps the most straightforward replica we’ve ever seen from [Michael]. But even on a relatively simple project like this, his signature attention to detail and craftsmanship is on full display. It’s always a good day when he’s got a new build to show off with, and we’re eager to see what he comes up with next.

Tiny Raspberry Pi Mac Nails The Apple Aesthetic

We know that some in the audience will take issue with calling a Raspberry Pi in a 3D-printed case the “World’s Smallest iMac”, but you’ve got to admit, [Michael Pick] has certainly done a good job recreating the sleek look of the real hardware. While there might not be any Cupertino wizardry under all that PLA, it does have a properly themed user interface and the general aversion to external ports and wires that you’d expect to see on an Apple desktop machine.

The clean lines of this build are made possible in large part by the LCD itself. Designed specifically for the Raspberry Pi, it offers mounting stand-offs on the rear, integrated speakers, a dedicated 5 V power connection, and a FFC in place of the traditional HDMI cable. All that allows the Pi to sit neatly on the back of the panel without the normal assortment of awkward cables and adapters going in every direction. Even if you’re not in the market for a miniature Macintosh, you may want to keep this display in mind for your future Pi hacking needs.

Well, that’s one way to do it.

Despite this clean installation, the diminutive Raspberry Pi was still a bit too thick to fit inside the 3D-printed shell [Michael] designed. So he slimmed it down in a somewhat unconventional, but admittedly expedient, way. With a rotary tool and a steady hand, he simply cut the double stacked USB ports in half. With no need for Ethernet in this build, he bisected the RJ-45 connector as well. We expect some groans in the comments about this one, but it’s hard to argue that this isn’t a hack in both the literal and figurative sense.

We really appreciate the small details on this build, from the relocated USB connectors to the vent holes that double as access to the LCDs controls. [Michael] went all out, even going so far as to print a little insert for the iconic Macintosh logo on the front of the machine. Though given the impressive work he put into his miniature “gaming PC” a couple months back, it should come as no surprise; clearly this is a man who takes his tiny computers very seriously.

Continue reading “Tiny Raspberry Pi Mac Nails The Apple Aesthetic”