Origami Busts A Move With Dancing Paper

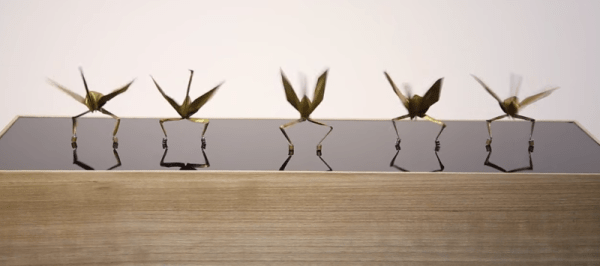
Origami cranes are cool, but do you know what’s cooler? Origami cranes dancing to the beat. That’s the challenge [Basami Sentaku] took on when he created Dancing Paper (YouTube link). You might remember [Basami] from his 8 bit harmonica hack. In Dancing Paper, paper cranes seem to dance all on their own – even performing some crazy spinning moves. Of course, the “magic” is due to some carefully written code, and magnets, lots of magnets.

Using magnets to move objects from below isn’t a new concept. Many of us have seen the “ice skating pond” Christmas decoration which uses the same effect. Unlike the skating pond,Dancing Paper has moving parts (other than the cranes themselves). Under the plastic surface are a series of individually controlled electromagnets. Each of the supporting dancers has a line of four magnets, while the featured dancer in the center has a 5×5 matrix. The 41 electromagnets were wound around bolts with the help of a Tamiya motor and gearbox.

The actual dance moves are controlled by C code which appears to be running on an Atmel microcontroller. Of course a microcontroller wouldn’t be able to drive those big coils, so some beefy TO-220 case transistors were employed to switch the loads. The cranes themselves needed a bit of modification as well. Thin pieces of wire travel from the neodymium magnets on their feet up to the body of the crane. The wire provides just enough support to keep the paper from collapsing, while still being flexible enough to boogie down.

Click past the break to see Dancing Paper in action!

Continue reading “Origami Busts A Move With Dancing Paper”

BeagleSNES For Game Boy, Game Boy Advance, NES, And – Yes – SNES

By far the most common use for the Raspberry Pi is shoving a few dozen emulators on an SD card and calling it a day. Everybody’s got to start somewhere, right? There are other tiny, credit card-sized Linux boards out there, and [Andrew] is bringing the same functionality of the Raspi to the BeagleBone Black and BeagleBoard with BeagleSNES, an emulator for all the sane pre-N64 consoles.

BeagleSNES started as a class project in embedded system design, but the performance of simply porting SNES9X wasn’t very good by default. [Andrew] ended up hacking the bootloader and kernel, profiling the emulator, and slowly over the course of three years of development making this the best emulator possible.

After a few months of development, [Andrew] recently released a new version of BeagleSNES that includes OpenGL ES, native gamepad support through the BeagleBone’s PRU, and support for all the older Nintendo consoles and portables. Video demos below.

Continue reading “BeagleSNES For Game Boy, Game Boy Advance, NES, And – Yes – SNES”

Fix A Broken DS By Removing A Screen

There are apparently a lot of broken Nintendo DS Lites out and about on eBay, and [Fede] has gotten his hands on one. His idea was to essentially turn one of these DS Lites into a SS (single screen?) (.es, Google translate) by modding the case, and he’s done it with pretty spectacular results.

If you’re going to do a case mod, you should go all out. To that end, [Fede] started by taking everything out of the DS and tossing the original 1000 mAh battery in favor of a 4000 mAh battery. From there he is able to shoehorn the two PCBs into the case with the speaker in between, which he notes doesn’t sound as nice as the original but works well enough.

After reshaping the plastic case in a few subtle ways and putting a few layers of paint on it, [Fede] now has a single-screen Nintendo DS for €2 plus parts and paint. While we’ve seen similar mods before, we’d be interested to see this one in action; some DS games don’t utilize the second screen as much as others, so perhaps this wouldn’t play every DS game perfectly, but for the price it can’t be beat.

The Hard Drive MIDI Controller

[shantea] builds MIDI controllers, and after a successful first endeavor with a matrix of buttons and knobs, he decided to branch out to something a little bit cooler. It’s called Ceylon, and it’s effectively a turntable controller built from an old hard drive.

As a contrast to the first MIDI controller, this would be a stripped-down build, with just three faders, LEDs for eye candy, a pair of pots for gain control, and a hard disk surrounded by six anti-vandal buttons. The hard disk is the star of the show, acting as a rotary encoder.

When manually spun, the hard disk generates a few phases of sinusoidal waves. The faster you spin it, the higher the amplitude and frequency. These signals are far too weak to be sampled directly by a microcontroller, and for digital control – as in, MIDI – you don’t need to read the analog signals anyway. These signals were turned digital with the help of an LM339 quad comparator. With two of these comparators and signals out of the hard disk that are 90 degrees out of phase, quadrature encoding is pretty easy.

The software for this MIDI controller is based on the OpenDeck Platform, a neat system that allows anyone to create their own MIDI controllers and devices.  It’s also a great looking board that seems to perform well. Video below.

Continue reading “The Hard Drive MIDI Controller”

RetroPie Turned Game Gear

Running vintage console emulators on a Raspberry Pi seems to be the thing all the cool kids are doing. The coolest RetroPie builds take a vintage console – usually of the Nintendo genus – stuff a Raspi in there somehow, and Bob’s your uncle. [Phil Herlihy] over at Adafruit is throwing his hat into the ring with a similar build. For this one, though, he’s using Sega’s oft-maligned Game Gear. He might actually get more than a few hours out of the battery with this one, and the battery is rechargeable, too. You can’t beat that.

The build begins with tearing down an old Game Gear, chopping up the PCB to save the button contact, and starting to fit all the components in there. The display is completely replaced with a 3.5″ composite display, a bit larger than the 3.2″ display found in a stock Game Gear. That’s not a problem, there’s a surprising amount of space behind the bezel, and if you’re good enough with an xacto blade and a file, it will look stock.

The rest of the components include an amplifier board, battery charge regulator, a 2500mAh LiPo, and a Teensy to read the buttons. There are a few modifications required for the Pi, but the finished device presents a USB port to the outside world; keep a keyboard by your side, and this is a portable Pi in every respect.

Building A Transcutaneous Electrical Nerve Stimulation Device In A Weekend

Transcutaneous electrical nerve stimulation (TENS) is a technique that applies electrical current to nerves and muscles for the relief of pain. Before you ask, yes, some of these devices are FDA approved for various ailments. [Eric], [Conor], [Jacob], [lnr0626] and [rdrdrdrd] were down at HackDFW this weekend and built a TENS device from parts in their scrap bin.

A semi-decent TENS machine can cost somewhere between $70 and $200, but the team here have reduced the cost tremendously simply by separating the futzing analog/contact pad part from the signal generation part of the project. The signal generation actually happens on an Android phone, with settings to ‘relieve pain’, ‘relax’, ‘pulse’, and ‘random’. These signals are generated as audio and sent out over the headphone port. From there, the signal is amplified and sent to the neat skin-contact pads.

After prototyping their circuit, the team actually etched a circuit board for the final phase of the hackathon. Demo video below.

Continue reading “Building A Transcutaneous Electrical Nerve Stimulation Device In A Weekend”

Using The Red Pitaya As An SDR

The Red Pitaya is a credit-card sized board that runs Linux, has Ethernet, and a good bit of RAM. This sounds a lot like a Raspberry Pi and BeagleBone Black, but the similarities end there. The Red Pitaya also has two RF inputs, two RF outputs, and a load of digital IOs, all connected to an Xilinx SoC that includes an FPGA. [Pavel] realized the Pitaya had all the components of a software-defined radio, and built an implementation to prove it.

The input for the SDR taps directly into one of the high impedance inputs with a simple loop antenna made out of telephone cable. The actual software-defined part of this radio borrows heavily from an Xilinx application note, while everything is controlled by either SDR# or HDSDR.

[Pavel] included a pre-built SD card image with all his software, so cloning this project is simply a matter of copying an SD card and building an antenna. The full source is also available, interesting if you would like to muck about with FPGAs and SDRs.