Audio Algorithm Detects When Your Team Scores

[François] lives in Canada, and as you might expect, he loves hockey. Since his local team (the Habs) is in the playoffs, he decided to make an awesome setup for his living room that puts on a light show whenever his team scores a goal. This would be simple if there was a nice API to notify him whenever a goal is scored, but he couldn’t find anything of the sort. Instead, he designed a machine-learning algorithm that detects when his home team scores by listening to his TV’s audio feed.

goal[François] started off by listening to the audio of some recorded games. Whenever a goal is scored, the commentator yells out and the goal horn is sounded. This makes it pretty obvious to the listener that a goal has been scored, but detecting it with a computer is a bit harder. [François] also wanted to detect when his home team scored a goal, but not when the opposing team scored, making the problem even more complicated!

Since the commentator’s yell and the goal horn don’t sound exactly the same for each goal, [François] decided to write an algorithm that identifies and learns from patterns in the audio. If a home team goal is detected, he sends commands to some Phillips Hue bulbs that flash his team’s colors. His algorithm tries its best to avoid false positives when the opposing team scores, and in practice it successfully identified 75% of home team goals with 0 false positives—not bad! Be sure to check out the setup in action after the break.

Continue reading “Audio Algorithm Detects When Your Team Scores”

Mapillary For The Raspberry Pi

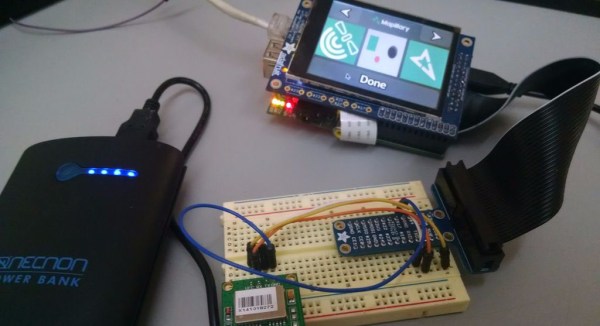
If you live out in the boondocks, out of reach from the Google Maps car, you might have noticed there aren’t too many pictures of your area on the Internet. Mapillary is hoping to change that with crowdsourced photos of the entire planet, with mobile apps that snap a pic and upload it to the web. [sabas1080] is bringing this capability to the most popular ARM dev board out there, the Raspberry Pi.

The Raspberry Pi is not a phone, the usual way to upload pics to Mapillary. There’s no GPS, so geotagging is out of the question. The Pi doesn’t have a camera or a screen, and if you’re taking pictures of remote locations, a battery would be a good idea.

All these pieces are available for the Pi, though; [sabas1080] sourced a display from Adafruit, the camera is a standard Raspi affair, and the GPS is a GY-NEO6MV2 module from the one of the numerous Chinese retailers. Add a big power bank battery, and all the hardware is there.

The software is where this build gets tricky. Mapillary has a nice set of free tools written in Python, no less, but this is only part of the build. [sabas1080] needed to connect the camera, set up the display, and figure out how to make everything work with the Mapillary tools. In the end, [sabas] was able to get the entire setup working as a programmable, mobile photo booth.

Extreme Vectrex Multicart Plays Bad Apple

[Sprite_TM] had a Vectrex console that he wanted to play with. Alas, his makeshift multicart had fallen into disrepair. Rolling up his hacking sleeves, he set about making a new one, a better one. His PCB design included his microcontroller of choice: the ST STM32F411, a 32-bit 100Mhz ARM Cortex M4, along with a 16MB SPI flash chip. [Sprite_TM] wanted to make programming games onto the multicart simple. Using the libopencm3 firmware library for the STM in conjunction with Elm-Chans FatFS, the multicart could be plugged into a computer’s USB port and have any game data dragged and dropped onto it like a USB stick. The PCB then connects directly into the Vectrex’s cartridge port. The first cartridge file is a basic menu that lists all of the game ROMs stored in the flash memory. When the user selects the game the STM loads that ROM file which the menu software then boots.

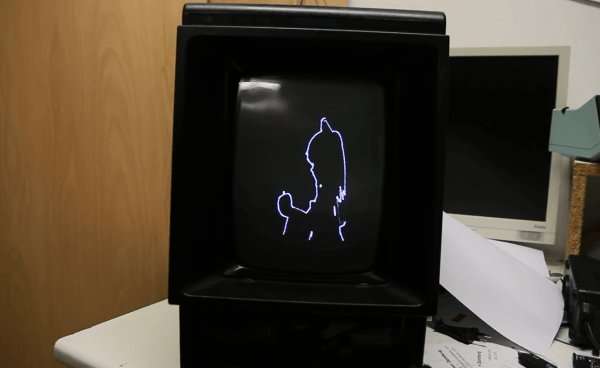
After loading his entire Vectrex ROM library onto the multicart, [Sprite_TM] realized he had far too much space left over – so he decided to add some extras. His first choice was Bad Apple (YouTube link), a music video made by fans of the Touhou Project game series. The video features black and white silhouettes of the many game characters in a shadow art style. Since its debut, Bad Apple has been ported from everything from the Sega Genesis (YouTube link) to laser scanners (YouTube link). It was time for the Vectrex to join the list.

After ripping the video from YouTube, [Sprite_TM] used MPlayer to save each frame as a PNG along with a wave file of the music. Next, he ran Potrace on the PNG files to get vector versions. Using a custom PHP script, the resulting JSON file was post-processed into relative vectors the Vectrex uses. Digital audio was possible by having the Vectrex’s 8-bit DA-converter perform double duty both for the video circuit and the audio. However, the volume must be turned to the max in order to hear the music. Incidentally, the DAC can only output audio in this scenario when vectors are not being drawn, so the event timing needed to be adjusted. The video and audio data was re-parsed after a modified version of VecX was used to get the timing events synchronized before transferring Bad Apple onto the multicart.

You can see the Vectrex version of Bad Apple after the break, along with a 3D-engine based on Doom levels. The engine is written in C and makes use of the Z-buffer, creating the effect of solid 3D-objects in front of each other.  There are no weapons or enemies to dispatch here, but the effect is impressive nonetheless.

Continue reading “Extreme Vectrex Multicart Plays Bad Apple”

Review: Transistor Tester

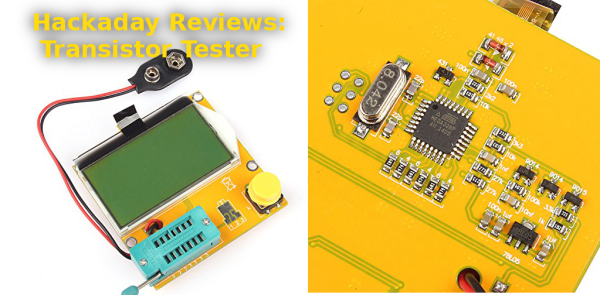
Amazon has been getting creepier and creepier lately with their recommendations.  Every time I log in, I’m presented with a list of new Blinky LEDs, Raspberry Pi accessories, Arduino shields, and the like. It’s as if they know me. Their customer database paid off when it recommended a $22 transistor / component tester. I’ve been seeing those testers around quite a bit lately. Curiosity got the better of me and my mouse found its way to the “Buy it now with one click” button. Two days later I had a “SainSmart Mega328 Transistor Tester Diode Triode Capacitance ESR Meter MOS/PNP/NPN L/C/R” in my hands.

I’m going to get the obvious out of the way. This thing is built cheap – as cheap as the factories can make it. My particular unit arrived with the LCD flapping in the breeze, hanging on by its flex cable. Fitting the LCD back into the acrylic backlight frame revealed a slightly worrisome twist in that same flex. Thankfully nothing was actually damaged, though I do want to give the flex cable some protection in the future. More on that later. The circuitry was open for all the world to see on the bottom of the tester. The heart of the unit is an ATmega328. Supporting it are a few transistors and a handful of passives.

I didn’t have huge expectations for the tester, but I hoped it would at least power up.  Hooking up a 9 volt battery and pressing the magic button brought the tester to life. Since I didn’t have anything in the socket, it quickly lit up and displayed its maker information – “91make.taobao.com”, and “By Efan & HaoQixin”, then it informed me that I had “No, unknown, or damaged part”.

I had a few resistors lying around the bench (doesn’t everyone?) so I put one in. The tester read it as 9881 ohms. Sure enough, it was a 10K 5% resistor.  Capacitors – ceramic disc, electrolytic, and surface mount all worked as well. The tester even provided ESR values. The real test would be a transistor. I pulled an old  2N2222 in a TO-18 metal can, and popped it in the tester. The damn thing worked – it showed the schematic symbol for an NPN transistor with Collector, Base, and Emitter connected to Pins 1,2,and 3 respectively. Flipping the pins around and re-testing worked as well. The tester showed hFe as 216, and forward voltage as 692 mV, both reasonable numbers for a 2N2222.
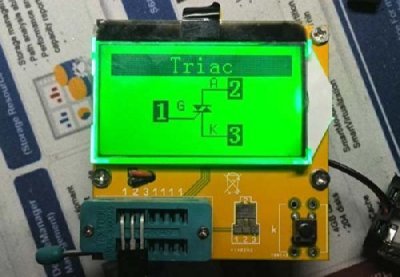
triacThe tester worked surprisingly well – it was able to correctly identify BJTs, FETs, even esoteric parts. The only thing it balked on was a linear voltage regulator, which showed up as two diodes. Regulators are a bit more than a simple device though, so I can’t blame the tester there.  The values returned were all reasonable as well. While I don’t have a calibrated lab to check against, the numbers lined up with my Fluke meter.

So what exactly is driving this little tester? There are about 20 versions of it on the market, all of them from China. 91make is a seller on taobao.com, often referred to as “China’s ebay.” 91make’s front page features no less than 7 versions of the transistor tester, with various cases and LCDs. Some digging turned up the history on this device. It turns out the transistor tester is an open source hardware project (translated) originally created by [Markus Frejek], and built upon by [Karl-Heinz Kubbeler] and a number of others. The Subversion repository  for the project shows it is quite active, with the most recent check-in only a few hours ago. The project is also well documented. The English PDF is 103 pages, explaining theory of operation, the circuit itself, and the software. The document even explains some of the shortcomings of the Chinese versions of the tester, including using a zener diode where the original schematic calls for a precision 2.5V reference. Yes, it will work, but it won’t be as accurate as the original.

The devs also don’t officially support the clones which I can understand, considering the quality and changes in design each manufacturer is baking in to their own version. There is  a huge thread on the EEVblog forum covering these testers. Some can be modified to be closer to the official version. In fact, with an ISP tool the intrepid hacker can update the firmware to the current rev from [Karl-Heinz’s] repository.

So the final verdict on this tester is that it is a thumbs up with a small caveat. These testers are built down to a cost (and that cost is as close to zero as possible). They’re great for sorting parts, but they’re no substitute for a higher quality measuring device. I’d also love to see a version that supports the original developers.

$50k In Play: Thirty Projects Will Win Custom PCBs This Week

This week we’re giving away $1500 in OSH Park codes to thirty different projects. Submit your project to the 2015 Hackaday Prize now!

$50,000 over the next 17 weeks!

official-submission-flagFor each of the last four weeks we’ve awarded prize packages to three projects just for submitting ideas. Now it’s time to crank up the rewards. Over the next 17 weeks we will give away $50,000 in prizes. We’re kicking off the week by giving $50 OSH Park codes to 30 different projects.

Of course this is just the tip of the iceberg. This year’s prizes total half a million dollars, with a trip into space for the Grand Prize winner and $100,000 for the Best Product prize. Sitting this one out would be a huge mistake!

You need to post your project on Hackaday.io and officially submit it to the 2015 Hackaday Prize, which means clicking the “Submit-To” button on the left sidebar of your entry (shown below). You can confirm that you’re in the running by looking for the 2015 Hackaday Prize logo on your project gallery picture. Here you can see [castvee8] has submitted the Binary fuel tank, do you think it’s ready for a custom PCB?

Make it OfficialTo give yourself the best chance at winning, publish a new project log this week that outlines the PCB work your want to do for the entry. We’ll be looking for those as we judge the prizes that are most ready to begin (or advance) their hardware build.

OSH Park offers double-layer boards for $5 per square-inch and you get 3 copies of the board with shipping included. This $50 prize will land you quite a bit of board space. Get started now, you need to have your projects submitted by the morning of Wednesday, April 29th.


The 2015 Hackaday Prize is sponsored by:

Logic Noise: Sequencing In Silicon

In this session of Logic Noise, we’ll combine a bunch of the modules we’ve made so far into an autonomous machine noise box. OK, at least we’ll start to sequence some of these sounds.

A sequencer is at the heart of any drum box and the centerpiece of any “serious” modular synthesizer. Why? Because you just can’t tweak all those knobs and play notes and dance around at the same time. Or at least we can’t. So you gotta automate. Previously we did it with switches. This time we do it with logic pulses.

Continue reading “Logic Noise: Sequencing In Silicon”

Hackaday Visits Toronto, Canada

Canada! Just in time for Spring to hit. I went to Toronto to speak at FITC, an arts and technology conference, co-host a Hackaday meetup with HackLab TO, visit the DigiPlaySpace at TIFF, and to check out Globacore’s new digs.

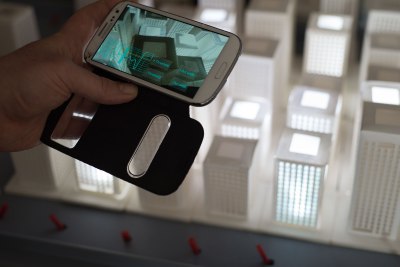
FITC is a conference which celebrates the creativity in technology. Pictured above is Diorama Rama designed by [Christopher Lewis] and [Creative Technologists of Toronto] and built over 4 days by participants at FITC. The buildings are laser cut paper, and participants create a simple circuit using an ATtiny. A message is coded into the chip in ASCII and the buildings blink an individual message back in Morse code, each building blinking a different message. It’s pretty interesting to use a Morse –> ASCII phone app (Morse Tools) to read the messages.

dioramaRama_MorseTools_02
Looking at Diorama Rama with Morse Tools

Hackaday Prize judge [Micah Elizabeth Scott] gave a talk about her work. [Jessica Rosenkrantz] of Nervous System spoke about her company’s process when designing mathematically based objects. She spoke about her 3D printed dress pictured below and how it was made. Amazing! I also got to show off my newly minted Breathe project at FITC.

Kinematics by Nervous System

After FITC ended, HackLab co-hosted a meetup with us. A team from HackLab was a 2014 Hackaday Prize Semifinalist and won $1000 in components with their Retro Populator, a Pick and Place machine retrofit onto a 3D printer. We had beer as well as almond-cream flavored non-alcoholic drinks from the Luma Droid, a drink mixing robot. HackLab is a good-sized hackerspace, with a huge room for a meetup, a full kitchen and vegan dinner served frequently, plus a shop tools room all by itself.

Among the lightning talks, [Pearl Chen] brought her Intel Edison-powered alarm clock that has but one function — to tell her when she is running late. [Johannes van der Horst] brought a USB current monitor that had many of us fascinated for about an hour at the end of the evening, plugging in a phone or a battery just to see the numbers climb. [Eric Boyd] talked about the DIY Bio projects that are going on at HackLab. They are testing meat using PCR to see if it is indeed, beef. Ew.

[Andrew Kilpatrick] of Kilpatrick Audio showed us an older version of his synthesizer before showing us his newest revision, Phenol, which looks pretty slick.

[Hugh Elliot] spoke about a light-photography project. [Leif Bloomquist] spoke about a gaming glove project that Hackaday had previously covered. Leif had a Commodore 64 with him and all the games on it fit into 1 GB! [Nadine Lessio] discussed how many programs claim that you can become an expert in a few hours, but in fact, things are not easy. [Jay Vaidya] showed us an IFTTT hack which controls heaters and AC. [Andy Forest] showed us an impressive interactive model of Ontario’s power system that kids at Steam Labs created.

That was a super fun meetup! Thanks HackLab for hosting. We’ve got a bunch of upcoming meetups and larger events in LA, NYC, Bangalore, San Francisco and Shenzhen. Check our events page for what, where, and when, We’d love to see you.

I stopped by TIFF’s Bell Lightbox to see the DigiPlaySpace exhibit. [Micah Scott] did a collaboration with Ryerson University’s RTA School of Media which welcomes you as you walk in. Note: all photos are lifted directly from TIFF.net’s website.

My final stop on this tour was to visit Globacore’s new offices. We spent a day or so hacking on a VR controller for their newest game called Power Cube. Power Cube is an Oculus Rift experience with a custom game controller holding an accelerometer, a gyroscope and magnetometer that links into the game directly.

See ya Toronto, I can’t wait to come back!