Creating New Nintendo 3DS Hardware

For the last five years or so, Nintendo has been selling the 3DS, the latest in a long line of handheld consoles. Around two years ago, Nintendo announced the New Nintendo 3DS, with a faster processor and a few other refinements. The new 3DS comes in two sizes: normal and XL. You can buy the XL version anywhere in the world, but Nintendo fans in North America cannot buy the normal version.

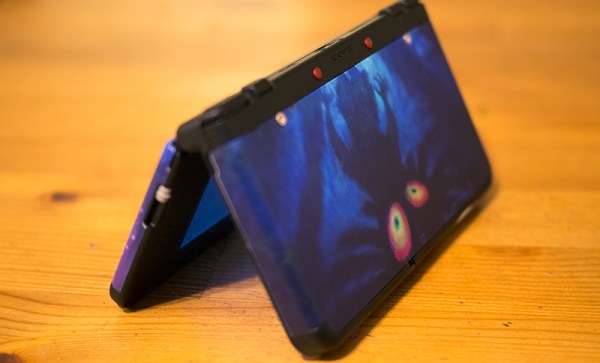
[Stephen] didn’t want the jumbo-sized New 3DS XL, both because it’s too large for his pockets, and because there are no fancy cases for the XL. His solution? Creating a US non-XL 3DS with god-like soldering skills.

In manufacturing the XL and non-XL versions of the 3DS, Nintendo didn’t change much on the PCBs. Sure, the enclosure is different, but electronically there are really only two changes: the eMMC storage and the Nintendo processor. 3DS are region-locked, so simply swapping out the boards from a normal 3DS to an XL 3DS wouldn’t work; [Stephen] would also like to play US games on his modded console. That leaves only one option: desoldering two chips from a US XL and placing them on the board from a Japanese 3DS.

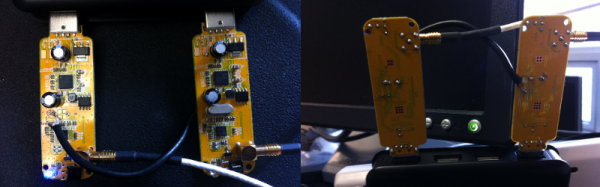
With a board preheater and heat gun, [Stephen] was able to desolder the eMMC chip off both boards. Of course this meant the BGA balls were completely destroyed in the process, which means reballing the package with solder bits only 0.3mm in diameter. With the US eMMC transplanted to the Japanese board, [Stephen] ended up with an error message that suggested the processor was reading the memory. Progress, at least.

[Stephen] then moved on to the processor. This was a nightmare of a 512 pin BGA package, with 512 pins that needed a tiny dot of solder placed on them. Here, sanity gave way and [Stephen] called up a local board and assembly house. They agreed to solder the chip onto the board and do an x-ray inspection. With the professional rework done, [Stephen] assembled his new US non-XL 3DS, and everything worked. It’s the only one in the world, and given the effort required to make these mods, we’re expecting it to remain the only one for a very long time.

Hacklet 50 – Hydroponic Projects

Growing plants without soil has been has been amazing people for centuries. First written about in the 1600’s, hydroponics has become an industry with numerous techniques for germinating and sustaining both plant and animal life. It comes as no surprise then that hackers, makers, engineers, and scientists have been working with and improving hydroponic systems for centuries. Hydroponic plant growth is a project you can really sink your teeth into, as there’s nothing sweeter than eating the fruits and vegetables of your labor. This week’s Hacklet is all about the best hydroponic projects on Hackaday.io!

hydropwnWe start with HydroPWNics, [Adam Vadala-Roth’s] entry in The 2015 Hackaday Prize. [Adam] is creating a universal system with will work with both hydroponic and soil based grow systems. The hydroponic setup will consist of plants in a PVC gutter system. Water will be pumped to the top gutter, and flow down via gravity through the plant roots and back to the reservoir. The system will be monitored and controlled by a DyIO controller. Props to [mad.hephaestus] for creating DyIO, a project seeing reuse in the Hackaday.io community!


hydro2Next up is [Justin] with AAGriculture, an Automated Aquaponic Garden. AAGriculture is aquaponic system, which means it uses a symbiotic relationship between plants and fish to make more food for humans to eat. The fish in this case are bluegill and bullhead. A Raspberry Pi controls the system, while A Teensy-LC is used to help out with some of the real-time duties, like monitoring a PH probe. [Justin] is even using CO2 tanks to keep dissolved gasses in check. He must be doing something right, as his tomatoes are now over 23″ tall!


homer[Em] brings us 5g Aquaponics. 5g aquaponics isn’t a next generation cellular system, nor a 5.8 GHz WiFi setup, it’s an aquaponic system in a 5 Gallon bucket. Anyone from the US  will recognize the orange “Homer Bucket” from Home Depot. 5g Aquaponics includes a window, allowing the underwater workings to be monitored. Speaking of monitoring, 5g aquaponics is a manual affair – [Em] hasn’t used any electronics here. The idea is to create a system that is easy to get up and running for those who are new to Hydro/Aquaponic setups. [Em] is using a dual zone root system. The plant grows in dirt within a burlap fabric. The fabric then sits in a water bath which also houses the fish. Air pumped through an airstone keeps everything circulating. [Em’s] initial version of the project worked a bit too well. The tomato plant grew so large that the roots strangled the fish! Hopefully both flora and fauna are happy with this new rev 2.0!


smartAquaFinally we have [Kijani grows] with Smart Aquaponics, which was [Kijani’s] entry in The 2014 Hackaday Prize. One wouldn’t expect fish, plants and Linux to mix, but that is exactly what is going on here. Linux runs on the popular Wr703n router, while a custom ATmega328 Arduino compatible board keeps track of the sensors.  The second version of the system will run on an ATmega2560 and an AR9331 module, all housed on one board. The system does work, and it’s been expanded from a single fish tank to a large flood/drain table complete with grow lights, all kept at [Kijani’s] office. The biggest problems [Kijani] has run into are little things like misplaced resistors masquerading as kernel bugs.

Still haven’t eaten your veggies? Want to see more hydroponic projects? Check out our new hydroponic projects list! That’s it for this week’s Hacklet, As always, see you next week. Same hack time, same hack channel, bringing you the best of Hackaday.io!

Hackaday Prize Entry: Python Powered Scientific Instrumentation

A common theme in The Hackaday Prize and Hackaday.io in general is tools to make more tools. There are a lot of people out there trying to make the next Bus Pirate, and simply measuring things is the first step towards automating a house or creating the next great blinkey invention.

In what is probably the most capable measurement system in the running for this year’s Hackaday Prize, [jithin] is working on a Python Powered Scientific Instrumentation Tool. It’s a microcontroller-powered box containing just about every imaginable benchtop electronics tool, from constant current supplies, LCR meters, waveform generators, frequency counters, and a logic analyzer.

This project is stuffed to the gills with just about every electronic tool imaginable; there are programmable gain amplifiers, voltage references, DACs and constant current sources, opamps and comparators, all connected to a bunch of banana jacks. All of these components are tied up in a nifty Python framework, allowing a bunch of measurements to be taken by a single box.

If that’s not enough, [jithin] is also working on wireless extension nodes for this box to get data from multiple acquisition points where wires would be unfeasible. This feature uses a NRF24L01+ radio module; it’s more than enough bandwidth for a lot of sensors, and there’s enough space all the wireless sensors you would ever need.


The 2015 Hackaday Prize is sponsored by:

Galactic Dimension – A Supersized DIY Pinball Machine

If you are from the 1960’s or 1970’s we know you would have enjoyed furiously punching the buttons of a pin ball machine back in the day. Installation artist [Niklas Roy] recently revisited this old classic game and built Galactic Dimension – a supersized pinball machine for Phæno – an amazing science center in the German city of Wolfsburg. The science centre was planning a big exhibition featuring thirty beautiful, classic pinball machines loaned from the Pacific Pinball Museum in Alameda, California.

The game machine was built on a steep ramp and has a gigantic play field measuring 3m x 6m (10’x20′). It features Sci-Fi game elements in the play field which blend perfectly with the futuristic building where it is housed. The game elements are built from repurposed everyday items like hair dryers and fans, giving visitors the motivation to build some of their own such contraptions.

The players operate the machine via a control desk, and a giant calculator is used to display the game score. The steep ramp had an incline of almost 30° which meant that he had to use a light ball to be able to propel it around the play field. The main user controls are the two flippers, and building giant ones was a big challenge. Solenoids or coils would not cut the ice, and he settled for pneumatic cylinders – easy to control, powerful, not too loud, and the museum already had a compressed air supply readily available. But it still took him three iterations before he could get it right. The plunger, which initially propels the ball, was built from PVC pipes and a hair dryer. Each play field element was built as a separate module to make assembly and maintenance easier. All featured a 220V AC supply, a sensor (either an IR distance sensor or a light barrier) to detect the ball, and an Arduino. Actuators were built from hair dryers and portable fans. Each of them have their own sound effects too – either a hacked toy or a speaker controlled by the Arduino. After everything was built, taken apart, transported, and reassembled at the site, the Galactic Dimension worked without a glitch, and without releasing any magic smoke. To top it off, Andreas Harre, who’s been the German pinball champion for several years in a row, also played the machine when he visited Phæno – and was totally excited about it!

So if you are in that part of Germany anytime until September, do drop in and try to ring up a big score. For photos of his build log, check out the photo album. There’s also a fairly big block diagram (German) and the Arduino sketches (.zip file), if you’d like to take a stab at building an even bigger pinball machine. Check the video to see the machine in action. And if the name [Niklas] sounds familiar, it is because he loves building installations such as the Forbidden Fruit Machine, the Ball Sucking Machine, and another Ball Sucking Machine.

Continue reading “Galactic Dimension – A Supersized DIY Pinball Machine”

Smile For The Raspberry Pi Powered Photo Booth

[Roo] was tasked with finding a better way to take corporate employee photos. The standard method was for a human resources employee to use a point and shoot camera to take a photo of the new recruits. The problem with this method is many people feel awkward trying to force a smile in front of other people. Plus, if the photo turns out poorly many people won’t ask to have it retaken so as not to feel vain or inconvenience the photographer. [Roo’s] Raspberry Pi powered photo booth solves this problem in a novel way.

The new system has the employee use their own mobile phone to connect to a website running on the Pi. When the employee tells the Pi to snap a photo, the system uses the Raspberry Pi camera module to capture an image. [Roo] actually 3D printed a custom adapter allowing him to replace the standard camera lens if desired. The photo can be displayed on an LCD screen so the user can re-take the photo if they wish.

The system is built into a custom case made from both 3D printed and laser cut parts. The front plate is a frosted white color. [Roo] placed bright white lights behind the front panel in order to act as a flash. The frosted plastic diffuses the light just enough to provide a soft white light for each photo taken. Once the photo is selected, it can then be uploaded to the company database for use with emails, badges, or whatever else.

[Roo] also mentions that the system can easily be changed to send photos via Twitter or other web applications. With that in mind, this system could be a great addition to any hackerspace or event. The code for an older version of the project can be found on the project’s github page.

Continue reading “Smile For The Raspberry Pi Powered Photo Booth”

Embed With Elliot: Multiplexing SPI Uses Few Pins

[Ralph Doncaster], aka Nerdralph, seems to be absolutely driven to see how few resources he can use on a microcontroller to get the job done. In this post on his blog, [Ralph] writes some custom bit-banged SPI code to cut the number of SPI lines necessary to drive an nRF24L01+ radio module from four down to two. That really helps if you’re using a micro with only six free pins, like an ATtiny85.

If you’re going to say, “why don’t you just buy a bigger microcontroller?”, you’re missing the point. This exercise strikes us as optimization for optimization’s sake and a dirty hack, both of which are points in its favor.  There are also a couple of techniques here for your mental toolbox. We thought it was interesting enough to look at in depth.

Continue reading “Embed With Elliot: Multiplexing SPI Uses Few Pins”

Building Your Own SDR-based Passive Radar On A Shoestring

Let’s start off with proof. Below is an animation of a measurement of airplanes and meteors I made using a radar system that I built with a few simple easily available pieces of hardware: two $8 RTL software defined radio dongles that I bought on eBay, and two log-periodic antennas. And get this, the radar system you’re going to build works by listening for existing transmissions that bounce off the targets being measured!

I wrote about this in a very brief blog posting a few years ago. It was mainly intended as a zany little side story for our radio telescope blog, but it ended up raising a lot of interest. Because this has been a topic that keeps attracting inquiries, I’m going to explain how I did the experiment in more detail.

It will take a few posts to show how to build a radar capable of performing these types of measurements. This first part is the overview. In later postings I will go through more detailed block diagrams of the different parts of a passive radar system, provide example data, and give some Python scripts that can be used to perform passive radar signal processing. I’ll also go through strategies to determine that everything is working as expected. All of this may sound like a lot of effort, but don’t worry, making a passive radar isn’t too complicated.

Let’s get started!

Continue reading “Building Your Own SDR-based Passive Radar On A Shoestring”