Move Over Gucci; Laser Cut Handbags Are A Thing

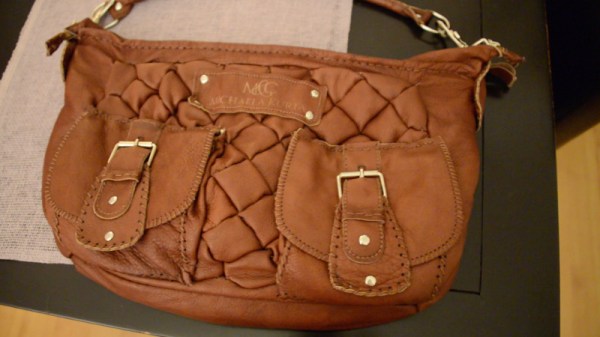
What happens when you want to make a custom handbag with some handy tech features, and have access to a nice laser cutter? You end up doing what [Christian] did: design a assemble a Woman’s Handbag made of Laser-Cut Leather with iPhone charger and LED Light.

The design of the bag was made in Adobe Illustrator and sent off to a Epilog Legend 36EXT laser cutter located in the hackerspace located near [Christian] in Vienna. Once the parts were precision cut, traditional leather sewing methods were used to assemble the handbag (with a little help from a shoe cobbler).

The interior of the bag was lined with old blue jeans and a white LED, which is wired and held into place with conductive thread. Powered by a coin cell and controlled by your choice of a button, or a slide switch, the light helps locating items in the deep bag.

Slide a standard USB battery pack in one of the pockets of the old jeans and you are ready for a night out on the town. Join us after the break for a video showing the design, construction and features of this practical project.

Continue reading “Move Over Gucci; Laser Cut Handbags Are A Thing”

Safe Cracking With Signal Analysis

[Dave Jones] over at EEVblog got his hands on a small safe with an electronic lock and decided to try his hand at safe cracking. But rather than breaking out the thermal drill or shaped charge, he hooked up his Rigol scope and attempted a safe cracking via signal analysis (YouTube link).

We have to say that safes Down Under seem much stouter than most of the inexpensive lock boxes we’ve seen in the US, at least in terms of the quality (and quantity) of the steel in the body of the safe. Even though [Dave] was looking for a way in through the electronics, he still needed to deal with all that steel to get himself out of a face-palm moment that resulted in a lockout. Once that was out of the way, he proceeded to capture usable signals from the internal microcontroller using the only two available contacts – the 9 volt battery connections. While he did get signals, he couldn’t find any signatures that would help determine the six digits in the PIN, and as he points out, even if he did, brute-forcing through the one million permutations to find the right code would take too long, given the wrong-code lockout feature of the lock.

Even though he failed to hack into this particular safe, there’s still plenty to be learned from his methods. And who’s to say that other similar locks aren’t a little more chatty about their internals? Maybe you could even manage to EMP your way past the lock.

Vintage Electronics Magazines Predicted Our Current Future

Do you remember the magazine Popular Electronics? What about Radio Electronics? These magazines were often the first exposure we had to the world of hacking. In December we learned that Americanradiohistory.com has gone to the trouble of scanning nearly every copy of both, and continues to add many many others — posting them online for us to enjoy once more. Since then we’ve been pouring through the archive pulling out some of the best in terms of nostalgia, entertainment, and fascinating engineering.

Yes much of this material is very dated; CB Radios, all-mighty computers, phasors, stun guns, levitating machines, overly complex circuits for simple tasks, and aviator eyeglasses. But found among all of this, many innovative mixed-signal circuits and other interesting ideas that have been developed into our tech-centric world. Many of those modern inventions you’ve welcomed into your life actually started long-long ago in the forward-thinking hacks shown off in these publications. The Google Glass precursor seen above is but one example. Keep reading to see the early roots of the tech we tend to think of as “new”.

Continue reading “Vintage Electronics Magazines Predicted Our Current Future”

drill battery retrofit

Frankensteined Cordless Drill Lives Again

With tools, especially cordless tools, you’re going to pay now or pay later. On one hand, you can spend a bunch of money up front and get a quality tool that will last a long time. The other option is purchasing a cheap cordless tool that won’t last long, having to replace it later and thus spending more money. With cheap cordless tools it is common for the battery to fail before the physical tool making that tool completely unusable. Sure, another battery could be purchased but sometimes they cost just as much as the tool and battery combo originally did. So what’s a cordless tool user to do?

[EngergySaver] had a set of DeWalt cordless tools with a bunch of working batteries. He also had a cheap drill where the battery had died. His bundle of tools included two flashlights, one of which the case physically broke in half, probably from a clumsy drop. Instead of tossing the broken flashlight pieces in the garbage, [EngergySaver] kept them around for a while. Then one day he had the idea of combining the base of the broken DeWalt flashlight with the top of the old battery-less drill. He had the parts so why not?

The battery pack was 18 volt and the cheap drill expected 16.8 volts. [EngergySaver] figured the voltages were close enough and decided not to worry about the difference during his hack. He started by disassembling both the drill and flashlight down to the bare plastic housings. He marked an appropriate place to splice the handles and made some cuts. After the wiring was spliced together and the tool casings reassembled, a piece of sheet metal was cut and bent around the handle at the joint between flashlight and drill. Hose clamps hold the sheet metal tight around the handles, keeping the new hybrid tool together. And although we’re not crazy about the sheet metal and hose clamp method, it seems to be working just fine. With a little work and ingenuity [EngergySaver] resurrected an old tool for our favorite price; $0.

New Part Day: The ESP8266 Killer

Around this time last year we first heard of the ESP8266 WiFi module. It’s still a great little module, providing WiFi connectivity for all those Internet of Things things at a price point of just $5. It’s an attractive price for a great module with a huge community pumping out a lot of projects for the platform.

Now there’s a new kid on the block. It’s called the EMW3165, and like the ESP it provides WiFi connectivity for a bunch of wireless projects. It’s much, much more capable with an STM32F4 ARM Coretex M4 microcontroller, a ‘self hosted’ networking library, more RAM, more Flash, and more GPIOs. How much, you’re probably asking yourself. It’s a dollar more than the ESP8266.

The datasheet for the module goes over all the gritty details. While this chip has 3.6V I/Os, there are some 5V tolerant pins – a boon for the Arduino crowd. It’s also surprisingly low power for something that connects to an 802.11n network. The real bonus here is the STM32F4 core – that’s a very, very powerful microcontroller, and if you want a 2-component WiFi webcam build, this is the part you should use. There will be a lot of interesting builds using this part. It’s also passed FCC certification. Very cool.

Homemade Camera Stabilizer

We’ve featured quite a few camera gimbals and steady cams here, but this one stands out. For one, [Daniel Rhyoo] was in his sophomore year when he built it. His 2-axis camera gimbal uses brushless DC motors, and is made out of carbon fiber.

[Daniel] machined the carbon fiber parts on a CNC desktop mill and some hand tools. And he also had to teach himself Solid Works to design it. In his slick DIY guide, he starts off by listing the parts and where to source them from, along with the tools needed. Most gimbals use servos for axis movements, which limits the range and do not provide very smooth motion. Brushless motors overcome these limitations allowing a nice, smooth moving gimbal to be built with a wide range of movement. When [Aleksey Moskalenko] introduced the AlexMos brushless motor controller, [Daniel] ordered it out, and then waited until he could get his hands on the right kind of motors. CAD files for all of the machined parts are available for download (.zip file).

He then goes on to blog his build progress, with ample photos to describe the machining and assembly. He does a couple of nice design choices along the way – like using press-nuts to make assembly and dis-assembly easy, and dismantling one of the motors and replacing its shaft with a custom, longer one instead of using a coupler to extend it. At the end, the result is not only a nice looking, light weight rig, but one that works very well thanks to the motors and controller that he used. Check out the video below to see it in action.

Continue reading “Homemade Camera Stabilizer”

Hackaday Prize Entry: 3D Printed Modular Keyboard

There is a big community of people creating all kinds of synthesizers, but until now no one has attempted to make a keyboard controller like the one [Tim] created. Not only has he created the keyboard synthesizer, but he’s developed one that is modular and 3D printed so you can just expand on the synth you have rather than go out and buy or build a new one.

The design has a lot useful features. Since the design is modular, you can 3D print extra octaves of keys if you need, and simply build off of the existing keyboard. The interior has mounts that allow circuit boards to be screwed down, and the exterior has plenty of available places to put knobs or sliders. Anything that could possibly be built into a synthesizer is possible with this system, and if you decide you want to start small, that’s possible too!

All of the design files are available from Pinshape if you want to get started. The great thing about this controller is that you could use a 555-based synth in this keyboard controller, or a SID synth, or any other synth you could think of!

The 2015 Hackaday Prize is sponsored by: