8-bit Computer Made Solely From NAND Gates

As an electronics rookie, one of the first things they tell you when they teach you about logic gates is, “You can make everything from a combination of NAND gates”. There usually follows a demonstration of simple AND, OR, and XOR gates made from NAND gates, and maybe a flip-flop or two. Then you move on, when you want a logic function you use the relevant device that contains it, and the nugget of information about NAND gates recedes to become just another part of your electronics general knowledge.

Not [Alexander Shabarshin] though. He’s set himself the task of creating an entire CPU solely from NAND gates, and he’s using 74F00 chips to give a hoped-for 1MIPS performance.  His design has an 8-bit data bus but a 4-bit ALU, and an impressive 2-stage pipeline and RISC instruction set which sets it apart from the computers most of us had when 74-series logic was a much more recent innovation. So far he has completed PCBs for a D-type flip-flop and a one-bit ALU, four of which will work in parallel in the final machine

Unsurprisingly, we have maintained a keen interest in TTL computers here at Hackaday for a very long time. You might say that we have featured so many for the subject to deserve a review article of its own. There is the ASAP-3, the Magic-1, the Duo Basic, the Apollo181, the unnamed CPU made by [Donn Stewart], the BMOW, and a clone of the Apollo Guidance Computer. But what sets [Alexander’s] project aside from all these fine machines is his bare-metal NAND-only design. The other 74-series CPU designers have had the full range of devices such as the 74181 ALU at their disposal. By studying the building blocks at this most fundamental level a deeper understanding can be gained of the inner workings of parts normally represented just as black boxes.

One of the briefs for writing a Hackaday article is that if the subject makes the writer stop and read rather than skim over it then it is likely to do so for the reader too. This project may not yet have delivered a working CPU, but its progress so far is interesting enough for an in-depth read. Definitely one to watch.

When Are 8 Bits More Than 32?

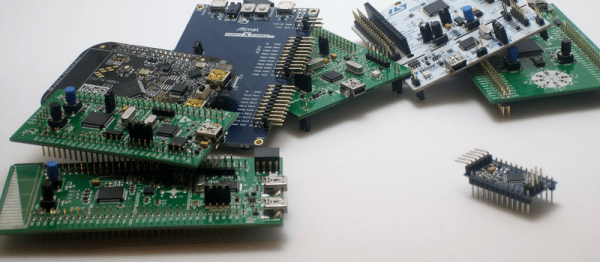
Whenever we write up a feature on a microcontroller or microcontroller project here on Hackaday, we inevitably get two diametrically opposed opinions in the comments. If the article featured an 8-bit microcontroller, an army of ARMies post that they would do it better, faster, stronger, and using less power on a 32-bit platform. They’re usually right. On the other hand, if the article involved a 32-bit processor or a single-board computer, the 8-bitters come out of the woodwork telling you that they could get the job done with an overclocked ATtiny85 running cycle-counted assembly. And some of you probably can. (We love you all!)

redblue_pillWhen beginners walk into this briar-patch by asking where to get started, it can be a little bewildering. The Arduino recommendation is pretty easy to make, because there’s a tremendous amount of newbie-friendly material available. And Arduino doesn’t necessarily mean AVR, but when it does, that’s not a bad choice due to the relatively flexible current sourcing and sinking of the part. You’re not going to lose your job by recommending Arduino, and it’s pretty hard to get the smoke out of one.

But these days when someone new to microcontrollers asks what path they should take, I’ve started to answer back with a question: how interested are you in learning about microcontrollers themselves versus learning about making projects that happen to use them? It’s like “blue pill or red pill”: the answer to this question sets a path, and I wouldn’t recommend the same thing to people who answered differently.

For people who just want to get stuff done, a library of easy-to-use firmware and a bunch of examples to crib learn from are paramount. My guess is that people who answer “get stuff done” are the 90%. And for these folks, I wouldn’t hesitate at all to recommend an Arduino variant — because the community support is excellent, and someone has written an add-on library for nearly every gizmo you’d want to attach. This is well-trodden ground, and it’s very often plug-and-play.

Continue reading “When Are 8 Bits More Than 32?”

The Ultimate 1:1 BB-8 Build Guide

BB-8 is not only a cute little droid but also presents dandy of a challenge for hackers ’round the globe to try and recreate in the garage. Nonfunctional models are a dime a dozen and the novelty has long worn off the Sphero toy. This brings us to a legit full-scale BB-8, seen in action in the video after the break.

Lucky for us, [Ed Zarick] has written up a blog post that’s as impressive as the build itself. [Ed] has drawn some inspiration and shared knowledge from several online groups focused around recreating the BB-8. He also provides some thorough Solidworks assemblies that look painfully detailed.

Continue reading “The Ultimate 1:1 BB-8 Build Guide”

Upgrading And Desoldering A Fake CPU

[quarterturn] had an old Apple Powerbook 520c sitting around in his junk bin. For the time, it was a great computer but in a more modern light, it could use an upgrade. It can’t run BSD, either: you need an FPU for that, and the 520 used the low-cost, FPU-less version of the 68040 as its main processor. You can buy versions of the 68040 with FPUs direct from China, which means turning this old Powerbook into a BSD powerhouse is just a matter of desoldering and upgrading the CPU. That’s exactly what [quarterturn] did, with an unexpected but not surprising setback.

The motherboard for the Powerbook 500 series was cleverly designed, with daughter cards for the CPU itself and RAM upgrades. After pulling the CPU daughter card from his laptop, [quarterturn] faced his nemesis: a 180-pin QFP 68LC040. Removing the CPU was handled relatively easily by liberal application of ChipQuik. A few quick hits with solder braid and some flux cleaned everything up, and the daughter card was ready for a new CPU.

The new FPU-equipped CPU arrived from China, and after some very careful inspection, soldering, and testing, [quarterturn] had a new CPU for his Powerbook. Once the Powerbook was back up and running, there was a slight problem. The chip was fake. Even though the new CPU was labeled as a 68040, it didn’t have an FPU. People will counterfeit anything, including processors from the early 90s. This means no FPU, no BSD, and [quarterturn] is effectively back to square one.

That doesn’t mean this exercise was a complete loss. [quarterturn] did learn a few things from this experience. You can, in fact, desolder a dense QFP with ChipQuik, and you can solder the same chip with a regular soldering iron. Networking across 20 years of the Macintosh operating system is a mess, and caveat emptor doesn’t translate into Mandarin.

Icestudio: An Open Source Graphical FPGA Tool

If you’ve ever worked with FPGAs, you’ve dealt with the massive IDEs provided by the vendors. Xilinx’s ISE takes about 6 gigabytes, and Altera’s Quartus clocks in at over 10 gigs. That’s a lot of downloading proprietary software just to make an LED blink.

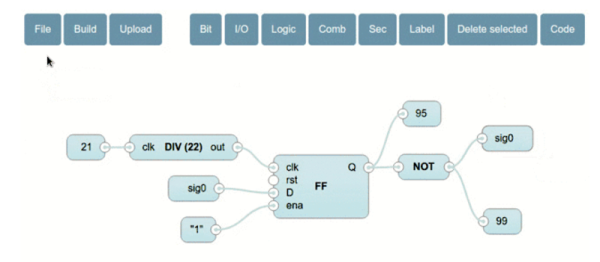
[Jesús Arroyo]’s Icestudio is a new, graphical tool that lets you generate Verilog code from block diagrams and run it on the Lattice Semi iCEstick development board. A drag and drop interface lets you connect IOs, logic gates, dividers, and other elements. Once your block diagram is ready, a single button press downloads the code to the iCEstick.

Under the hood, Icestudio uses IceStorm, which we’ve discussed on HaD in the past, including this great talk by [Clifford], Icestorm’s lead. For the GUI, Icestudio uses nw.js, which spits out JSON based on the block diagram. This JSON is converted into a Verilog file and a PCF file. The Verilog is used to create the logic on the FPGA, and the PCF is used to define the pin configuration for the device. Clicking on selected modules reveals the generated Verilog if you want to know what’s actually going on.

It’s experimental, but this looks like a neat way to get started on FPGAs without learning a new language or downloading many gigs of toolchains. We’re hoping Icestudio continues to grow into a useful tool for education and FPGA development. A demo follows after the break.

[Thanks to Nils for the tip!]

Continue reading “Icestudio: An Open Source Graphical FPGA Tool”

ARM Unveils New, High Efficency CPU

ARM has announced their latest IP core the Cortex A32. This 32-bit chip brings the benefits of the ARMv8-A architecture to low-power devices, ostensibly ones that will be the backbone of the Internet of Things.

For the last few years, the state of ARM CPUs has been firmly planted in the world of ARMv7 instructions. These chips, the Cortex A5, A7, A9, A15, and A17 are divided into ‘good, better, best’ segments, with the A7 pulling its weight as the processor in the Raspberry Pi 2, and a dual-core A15 finding its way into the latest BeagleBoard. While these CPUs are very capable, they don’t support the latest ARM architecture, ARMv8. For the last few years, the only ARM processors with the v8 architecture fell into the ‘better’ and ‘best’ segments. Although the A53, A57, and A72 chips are very capable, there hasn’t been a low power ARMv8 chip until this announcement.

So what does this announcement mean for the next generation of the Internet of Things, single board computers, and the wearable electronics of tomorrow? Absolutely nothing. Only the processor IP was released, and it will take at least a year for this core to make it into a chip. It will be 18 to 24 months until you can find this core in a consumer device. On the other hand, when these devices do appear, they will be significantly faster than current devices with a Cortex A5 and A7.

Anti-Cogging Algorithm Brings Out The Best In Your Hobby Brushless Motors

Cheap, brushless motors may be the workhorses behind our RC planes and quadcopters these days, but we’ve never seen them  in any application that requires low-speed precision. Why? Sadly, cheap brushless motors simply aren’t mechanically well-constructed enough to offer precise position control because they exhibit cogging torque, an unexpected motor characteristic that causes slight variations in the output torque that depend rotor position. Undaunted, [Matthew Piccoli] and the folks at UPenn’s ModLab have developed two approaches to compensate and minimize torque-ripple, essentially giving a cheap BLDC Motor comparable performance to it’s pricier cousins. What’s more, they’ve proven their algorithm works in hardware by building a doodling direct-drive robotic arm from brushless motors that can trace trajectories.

Cogging torque is a function of position. [Matthew’s] algorithm works by measuring the applied voltage (or current) needed to servo the rotor to each measurable encoder position in a full revolution. Cogging torque is directional, so this “motor fingerprint” needs to be taken in both directions. With these measured voltages (or currents) logged for all measurable positions, compensating for the cogging torque is just a matter of subtracting off that measured value at any given position while driving the motor. [Matthew] has graciously taken the trouble of detailing the subtleties in his paper (PDF), where he’s actually developed an additional acceleration-based method.

Hobby BLDC motors abound these days, and you might even have a few spares tucked away on the shelf. This algorithm, when applied on the motor controller electronics, can give us the chance to revisit those projects that mandate precise motor control with high torque–something we could only dream about if we could afford a few Maxon motors. If you’re new to BLDC Motor Control theory, check out a few projects of the past to get yourself up-and-running.

Continue reading “Anti-Cogging Algorithm Brings Out The Best In Your Hobby Brushless Motors”