Beautiful Raspberry Pi Laptop Inspired By Psion

In the four years since the first Raspberry Pi appeared, there have been many takes on a portable computer based on it. The choice of components is fairly straightforward, there is now a wide selection of suitable keyboards, displays, and battery packs to choose from. You might therefore think that there could be nothing new in the world of the portable Pi, indeed another one might be as mundane as just another PC build.

News reaches us from Japan this morning of [nokton35mm]’s “RasPSION” Pi laptop build (machine translation) inspired by the Psion portable computers of the late 1990s.
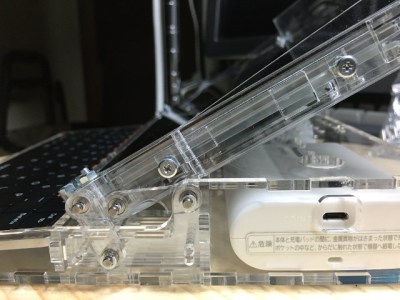
That hinge, in close-up

The RasPSION features the Raspberry Pi 7″ display as well as a Bluetooth keyboard, 5V battery pack and the Pi camera. What makes it special is its laser cut case, and in particular its pivoting hinge mechanism. This is the part that takes its inspiration from the Psion machines, and its operation can be seen in the video below the break.

He claims the finished laptop gives him about two hours of battery life, which is no mean feat given that it lacks the sophisticated power management you’ll find in a commercial laptop. We hope that in time we’ll see him posting the details of the build somewhere other than Twitter, as this is a laptop we’d love to know more about.

Continue reading “Beautiful Raspberry Pi Laptop Inspired By Psion”

Ask Hackaday: How Hard Is It To Make A Bad Solder Joint?

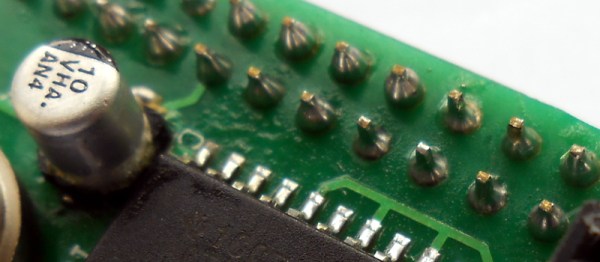
When you learn to solder, you are warned about the pitfalls of creating a solder joint. Too much solder, too little solder, cold joints, dry joints, failing to “wet” the joint properly, a plethora of terms are explained  if you read one of the many online guides to soldering.

Unsurprisingly it can all seem rather daunting to a novice, especially if they are not used to the dexterity required to manipulate a tool on a very small-scale at a distance. And since the soldering iron likely to be in the hands of a beginner will not be one of the more accomplished models with fine temperature control and a good tip, it’s likely that they will experience most of those pitfalls early on in their soldering career.

As your soldering skills increase, you get the knack of making a good joint. Applying just the right amount of heat and supplying just enough solder becomes second nature, and though you still mess up from time to time you learn to spot your errors and how to rework and fix them. Your progression through the art becomes a series of plateaux, as you achieve each new task whose tiny size or complexity you previously thought rendered it impossible. Did you too recoil in horror before your first 0.1″ DIP IC, only to find it had been surprisingly easy once you’d completed it?

A few weeks ago we posted a Hackaday Fail of the Week, revolving around a soldering iron failure and confirmation bias leading to a lengthy reworking session when the real culprit was a missing set of jumpers. Mildly embarrassing and something over which a veil is best drawn, but its comments raised some interesting questions about bad solder joints. In the FoTW case I was worried I’d overheated the joints causing them to go bad, evaporating the flux and oxidising the solder. This was disputed by some commenters, but left me with some curiosity over bad solder joints. We all know roughly how solder joints go wrong, but how much of what we know is heresay? Perhaps it is time for a thorough investigation of what makes a good solder joint, and the best way to understand that would surely be to look at what makes a bad one.

Continue reading “Ask Hackaday: How Hard Is It To Make A Bad Solder Joint?”

Smallest BASIC Computer?

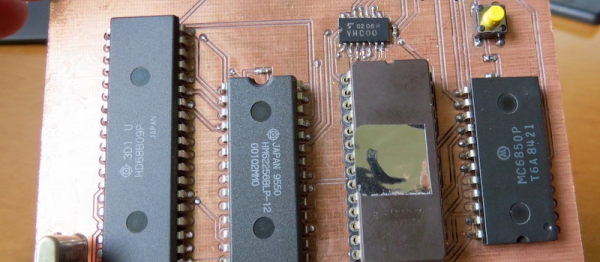
This may be the most minimal computer that we’ve ever seen running BASIC. Hackaday.io user [Kodera2t] has been working through the history of computing, so after his 4-bit CPU, he stepped up his game to eight bits. It’s amazing how much can be done with so little. It’s basically a Z80 on a single PCB.

[Kodera2t] is careful to give credit where credit is due: the design of this computer is by [Grant Searle]. It’s amazing what you can do with an old CPU (6809), some SRAM, a controller-interface chip, and an EPROM for your BASIC. Check out the GitHub for the computer’s PCB files if you want to make your own — it’s a very hobbyist-friendly two-layer board with fat traces. Or you could put it all together on a breadboard. It’s that non-critical.

9767261466906678330

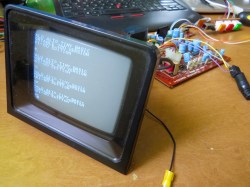
The other sweet touch is this monochrome CRT build that pairs up with the tiny computer.

[Kodera2t] is doing some really clever retro and minimalistic hacks, and putting them all up on Hackaday.io. You should really give his whole portfolio a look. We recently wrote up his experimentations with the Atmel ATtiny10 if you’re in the mood for something more modern.

Cute USART Trick Brings PWM To IR LEDs

We love little tricks like this. Suppose that you want to generate an IR remote’s signal. It’s easy, because most of the codes are known. But it can be slightly harder because most IR remotes and receivers modulate the on pulses with a square wave at roughly 38 kHz for background lighting immunity.

With a competent PWM generator on a microcontroller, you can create this carrier modulation easily enough yourself. Set the PWM frequency to 38 kHz and the duty cycle somewhere in the 33%-50% range, and you’re set. But what if you don’t have a competent PWM generator? Such was the case that prompted [AnalysIR Blog] to fake it, with USART.

Here’s the trick. You set up the serial port to communicate at ten times the desired carrier frequency, and then transmit “special” data. (The number ten comes from eight bits of data plus a start and a stop bit.) If you want a 50% duty cycle, you simply send 0b11110000, as fast as the microcontroller will allow, for a mark and nothing for a space.

There’s some extra detail with inverting the signal if, as most do, your USART idles high. But that’s really it. It’s a cute trick for when you’re desperate enough to need it. And if you’d like to brush up some more on your asynchronous serial skills, check out our guide on troubleshooting USART, and the great comments that ensued.

Hackaday Prize Entry: Shakelet

A person who is deaf can’t hear sound, but that doesn’t mean they can’t feel vibrations. For his Hackaday Prize entry, [Alex Hunt] is developing the Shakelet, a vibrating wristband for that notifies hearing impaired people about telephones, doorbells, and other sound alerts.

To tackle the difficulty of discriminating between the different sounds from different sources, [Alex’s] wants to attach little sound sensors directly to the sound emitting devices. The sensors wirelessly communicate with the wristband. If the wristband receives a trigger signal from one of the sensors, it alerts the wearer by vibrating. It also shows which device triggered the alert by flashing an RGB LED in a certain color. A first breadboard prototype of his idea confirmed the feasibility of the concept.

After solving a few minor problems with the sensitivity of the sensors, [Alex] now has a working prototype. The wristband features a pager motor and is controlled by an ATMEGA168. Two NRF24L01+ 2.4 GHz wireless transceiver modules take care of the communication. The sound sensors run on the smaller ATTiny85 and use a piezo disc as microphone. Check out the video below, where Alex demonstrates his build:

Continue reading “Hackaday Prize Entry: Shakelet”

Tissue-Engineered Soft Robot Swims Like A Stingray

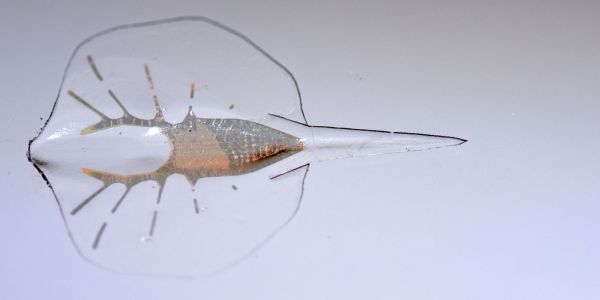
We’re about to enter a new age in robotics. Forget the servos, the microcontrollers, the H-bridges and the steppers. Start thinking in terms of optogenetically engineered myocytes, microfabricated gold endoskeletons, and hydrodynamically optimized elastomeric skins, because all of these have now come together in a tissue-engineered swimming robotic stingray that pushes the boundary between machine and life.

In a paper in Science, [Kevin Kit Parker] and his team at the fantastically named Wyss Institute for Biologically Inspired Engineering describe the achievement. It turns out that the batoid fishes like skates and rays have a pretty good handle on how to propel themselves in water with minimal musculoskeletal and neurological requirements, and so they’re great model organisms for a tissue engineered robot.

The body is a laminate of silicone rubber and a collection of 200,000 rat heart muscle cells. The cardiomyocytes provide the contractile force, and the pattern in which they are applied to the 1/2″ (1.25cm) body allows for the familiar undulating motion of a stingray’s wings. A gold endoskeleton with enough stiffness to act as a spring is used to counter the contraction of the muscle fibers and reset the system for another wave. Very clever stuff, but perhaps the coolest bit is that the muscle cells are genetically engineered to be photosensitive, making the robofish controllable with pulses of light. Check out the video below to see the robot swimming through an obstacle course.

This is obviously far from a finished product, but the possibilities are limitless with this level of engineering, especially with a system that draws energy from its environment like this one does. Just think about what could be accomplished if a microcontroller could be included in that gold skeleton.

Continue reading “Tissue-Engineered Soft Robot Swims Like A Stingray”

Triple Monitor Travel Battlestation

[AbyssalUnderlord’s] schedule has him packing up and moving between school, home, and internships every three months. Not an easy task when your computer is a triple monitor CAD and gaming powerhouse. To make his moves easier, he built this portable computer / monitor frame.

The design started with a CAD model. The basic materials for the build are aluminum angle and steel-slotted angle stock. There was no welding involved in this build. Pop rivets, nuts, and bolts hold just about everything together. An angle grinder was used for all of the cutting. [AbyssalUnderlord] used drawer slides to move his monitors from stored to deployed position. The small red extensions at the end of the drawer slides allow the monitors to be positioned in a standard 3 wide triple monitor setup. It’s a clever design.

This schedule isn’t going to last forever so [AbyssalUnderlord] didn’t want to make any permanent mods to his tower or monitors. Blue camping foam acts as a cushion between the hardware and the new case.

We’ll admit that this isn’t the prettiest of builds, but it looks plenty rugged and it gets the job done. As mentioned in the Reddit thread, a few coats of spray paint would go a long way toward improving the aesthetics. Just don’t spend too much time playing Overwatch, [AbyssalUnderlord].

If you like DIY portable setups, check this Transformers-themed portable workbench, or our Hacklet all about portable work stations and toolboxes.