LEGO Looper Makes Modular Music

This LEGO synth made by [Rare Beasts] had us grinning from ear to ear.

It combines elements from LEGO Mindstorms with regular blocks in order to make music with color. A different music sample is assigned to each of five colors: red, blue, green, yellow, and white. The blocks are attached to spokes coming off of a wheel made with NXT an EV3. As the wheel turns, the blocks pass in front of a fixed color sensor that reads the color and plays the corresponding sample. The samples are different lengths, so changing the speed of the wheel makes for some interesting musical effects.

As you’ll see in the short video after the break, [Rare Beasts] starts the wheel moving slowly to demonstrate the system. Since the whole thing is made of LEGO, the blocks are totally modular. Removing a few of them here and there inserts rests into the music, which makes the result that much more complex.

LEGO is quite versatile, and that extends beyond playtime. It can be used to automate laboratory tasks, braid rope, or even simulate a nuclear reactor. What amazing creations have you made with it? Let us know in the comments.

Continue reading “LEGO Looper Makes Modular Music”

MakerBot Releases Their 6th Generation Of 3D Printers

Just in time for the back to school and holiday season, Makerbot has released their latest line of printers. The latest additions to the lineup include the new Makerbot Replicator+ and the Makerbot Replicator Mini+.

The release of these new printers marks MakerBot’s first major product release since the disastrous introduction of the 5th generation of MakerBots in early 2014. The 5th generation of MakerBots included the Replicator Mini, priced at $1300, the Replicator, priced at $2500, and the Replicator Z18, priced at $6500. Comparing the build volume of these printers with the rest of the 3D printer market, these printers were overpriced. The capabilities of these printers didn’t move many units, either (for instance, the printers could only print in PLA). Makerbot was at least wise enough to continue building the 4th generation Replicator 2X, a printer that was capable of dual extrusion and printing more demanding filaments.

The release of the Makerbot Replicator+ and the Makerbot Replicator Mini+ is the sixth generation of MakerBot printers and the first generation of MakerBot’s manufactured overseas. This new generation is a hardware improvement on several fronts and included a complete redesign of the Makerbot Replicator and the Replicator Mini. The Replicator Mini+ features a 28% larger build volume than the original MakerBot Replicator Mini and an easily removable Grip Build Surface that can be flexed to remove a printed part. The Replicator+ features a 22% larger build volume than the MakerBot Replicator and a new Grip Build Surface. The Replicator Mini+ is $1000 ($300 cheaper than its predecessor), and the Replicator+ is $2000 ($500 less expensive). Both new printers, and the old Replicator Z18, now ship with the improved Smart Extruder+.

While the release of two new MakerBots does mean new hardware will make it into the wild, this is not the largest part of MakerBot’s latest press release. The big news is improved software. Makerbot Print is a slicer that allows Windows users to directly import 3D design files from SolidWorks, IGES, and STEP file formats. Only .STL files may be imported into the OS X version of the Makerbot Print software. MakerBot Mobile, an app available through the Apple Store and Google Play, allows users to monitor their printer from a smartphone.

Earlier this year, we wrote the Makerbot Obituary. From the heady days of The Colbert Report and an era where 3D printing would solve everything, MakerBot has fallen a long way. In the first four months of 2016, MakerBot only sold an average of about fifteen per day, well below the production estimated from the serial numbers of the first and second generation Makerbots, the Cupcake and Thing-O-Matic.

While this latest hardware release is improving the MakerBot brand by making the machines more affordable and giving the software some features which aren’t in the usual Open Source slicers, it remains to be seen if these efforts are enough. Time, or more specifically, the Stratasys financial reports, will tell.

Expose Your Raspberry Pi On Any Network

Everyone’s talking about the Internet of Things (IoT) these days. If you are a long-time Hackaday reader, I’d imagine you are like me and thinking: “so what?” We’ve been building network-connected embedded systems for years. Back in 2003, I wrote a book called Embedded Internet Design — save your money, it is way out of date now and the hardware it describes is all obsolete. But my point is, the Internet of Things isn’t a child of this decade. Only the name is.

The big news — if you can call it that — is that the network is virtually everywhere. That means you can connect things you never would have before. It also means you get a lot of data you have to find a reason to use. Back in 2003, it wasn’t always easy to get a board on the Internet. The TINI boards I used (later named MxTNI) had an Ethernet port. But your toaster or washing machine probably didn’t have a cable next to it in those days.

Today boards like the Raspberry Pi, the Beagle Bone, and their many imitators make it easy to get a small functioning computer on the network — wired or wireless. And wireless is everywhere. If it isn’t, you can do 3G or 4G. If you are out in the sticks, you can consider satellite. All of these options are cheaper than ever before.

The Problem

There’s still one problem. Sure, the network is everywhere. But that network is decidedly slanted at letting you get to the outside world. Want to read CNN or watch Netflix? Sure. But turning your computer into a server is a little different. Most low-cost network options are asymmetrical. They download faster than they upload. You can’t do much about that except throw more money at your network provider. But also, most inexpensive options expose one IP address to the world and then do Network Address Translation (NAT) to distribute service to local devices like PCs, phones, and tablets. What’s worse is, you share that public address with others, so your IP address is subject to change on a whim.

What do you do if you want to put a Raspberry Pi, for example, on a network and expose it? If you control the whole network, it isn’t that hard. You usually use some kind of dynamic DNS service that lets the Pi (or any computer) tell a well-known server its current IP address (see figure below).

Continue reading “Expose Your Raspberry Pi On Any Network”

RC Drag Racing Christmas Tree And Speed Trap

In the drag racing world, a Christmas tree is the post at the start line that sequentially lights up a set of yellow lights followed shortly after by a green light to tell the drivers to go, the lights obviously giving it its seasonal name. Included at the base of the tree are lasers to detect the presence of the cars.

[Mike] not only made his own Christmas tree for his RC cars, but he even made an end-of-track circuit with LED displays telling the cars how long they took. Both start and finish hardware are controlled by Pololu Wixel boards which has TI CC2511F32 microcontrollers with built-in 2.4 GHz radios for wireless communications.

In addition to the LEDs, the Christmas tree has a laser beam using a 650nm red laser diode for each car at the start line that’s aimed at a TEPT5600 phototransistor. If a car crosses its beam before the green light then a red light signals the car’s disqualification.

The end-of-track circuit has 7-segment displays for each car’s time. [Mike] designed the system so that the Christmas tree’s microcontroller tells the end-of-track circuit’s microcontroller when to reset the times, start the times, and clear the times should there be a disqualification. The finish line controller has lasers and phototransistors just like the starting line to stop the timers.

Oh, and did we mention that he also included 1980’s car racing game sounds? To see and hear it all in action check out the video after the break. If the cars seem a little drunk it’s because pushing left or right on the controller turns the wheel’s fully left or right.

Continue reading “RC Drag Racing Christmas Tree And Speed Trap”

Ask Hackaday: Help Me Choose A ‘Scope

If there is one instrument that makes an electronic engineer’s bench, it is the oscilloscope. The ability to track voltages in the time domain and measure their period and amplitude is one akin to a light in the darkness, it turns a mere tinkerer with circuits into one in command of them. Straightforward add-on circuits can transform a basic oscilloscope into a curve tracer, frequency response display, and much more, and modern oscilloscopes offer a dizzying array of useful measurement features unimaginable to engineers only a few years ago. And I need your help to pick a new one.

Continue reading “Ask Hackaday: Help Me Choose A ‘Scope”

Absolute 3D Tracking With EM Fields

[Chris Gunawardena] is still holding his breath on Valve and Facebook surprising everyone by open sourcing their top secret VR prototypes. They have some really clever ways to track the exact location and orientation of the big black box they want people to strap to their faces. Until then, though, he decided to take his own stab at the 3D tracking problems they had to solve. 

While they used light to perform the localization, he wanted to experiment with using electromagnetic fields to perform the same function. Every phone these days has a magnetometer built in. It’s used to figure out which way is up, but it can also measure the local strength of magnetic fields.

Unfortunately to get really good range on a magnetic field there’s a pesky problem involving inverse square laws. Some 9V batteries in series solved the high current DC voltage source problem and left him with magnetic field powerful enough to be detected almost ten centimeters away by his iPhone’s magnetometer.

As small as this range seems, it ended up being enough for his purposes. Using the existing math and a small iOS app he was able to perform rudimentary localization using EM fields. Pretty cool. He’s not done yet and hopes that a more sensitive magnetometer and a higher voltage power supply with let him achieve greater distances and accuracy in a future iteration.

An ESP8266 In Every Light Switch And Outlet

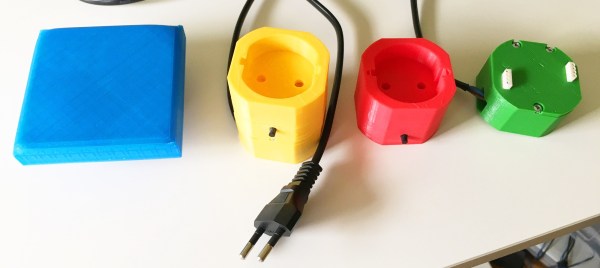
[Hristo Borisov] shows us his clever home automation project, a nicely packaged WiFi switchable wall socket. The ESP8266 has continuously proven itself to be a home automation panacea. Since the ESP8266 is practically a given at this point, the bragging rights have switched over to the skill with which the solution is implemented. By that metric, [Hristo]’s solution is pretty dang nice.

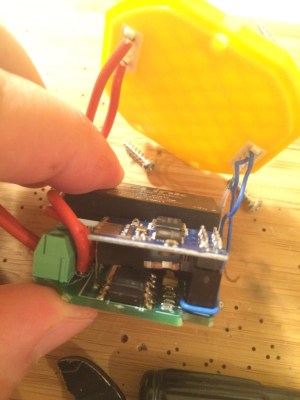
esp8266-smart-lightswitchIt’s all based around a simple board. An encapsulated power supply converts the 220V offered by the Bulgarian power authorities into two rails of 3.3V and 5V respectively. The 3.3V is used for an ESP8266 whose primary concern is the control of a triac and an RGB LED. The 5V is optional if the user decides to add a shield that needs it. That’s right, your light switches will now have their own shields that decide the complexity of the device.

The core module seen to the right contains the actual board. All it needs is AC on one side and something to switch or control on the other The enclosure is not shown (only the lid with the shield connectors is seen) but can be printed in a form factor that includes a cord to plug into an outlet, or with a metal flange to attach to an electrical box in the wall. The modules that mate with the core are also nicely packaged in a 3D printed shield. For example, to convert a lamp to wireless control, you use a shield with a power socket on it. To convert a light switch, use the control module that has a box flange and then any number of custom switch and display shields can be hot swapped on it.

It’s all controllable from command line, webpage, and even an iOS app; all of it is available on his GitHub. We’d love to hear your take on safety, modularity, and overall system design. We think [Hristo] has built a better light switch!