New Part Day: Wireless BeagleBones On A Chip

The BeagleBone is a very popular single board computer, best applied to real-time applications where you need to blink LEDs really, really fast. Over the years, the BeagleBone has been used for stand-alone CNC controllers, the brains behind very large LED installations, and on rare occasions has been used to drive CRTs. If you just want a small Linux board, get a Pi. If you want to do something interesting with hardware, get a BeagleBone.

The BeagleBone ecosystem has grown a lot in the last year, from the wireless and Grove connector equipped BeagleBone Green, the robotics-focused BeagleBone Blue, the Zoolander-inspired Blue Steel. Now there’s a new BeagleBone, built around a very interesting System on Module introduced earlier this year.

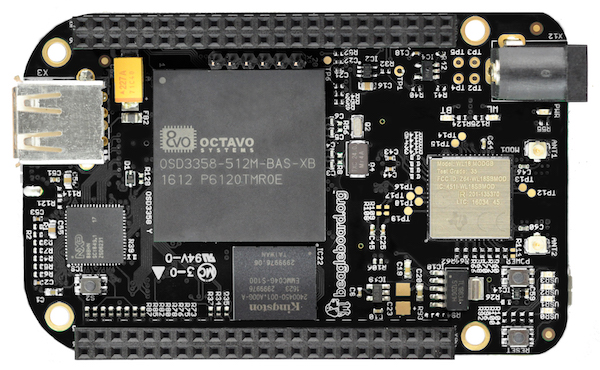
The new board is called the BeagleBone Black Wireless, and it brings to the table all you know and love about the BeagleBone. There’s a 1GHz ARM355x with two 32-bit 200MHz PRUs for the real-time pin toggling. RAM is set at 512MB, with 4GB of eMMC Flash and Debian pre-installed, and a microSD card for larger storage options. The new feature is wireless connectivity: a TI WiFi and Bluetooth module with provisions for 802.11s replaces the old Ethernet connector.

Taken at face value, the new BeagleBone Black Wireless deserves a mention — it’s a BeagleBone with wireless — but isn’t particularly noteworthy. But when you get to the gigantic brick of resin dropped squarely in the middle of the board does the latest device in the BeagleBone family become very, very interesting. The System on Module for this version of the BeagleBone is the BeagleBone On A Chip released a few months ago. The Octavo Systems OSD335x is, quite literally, a BeagleBone on a chip. It’s a BGA with big balls, making it solderable with hand-applied solder paste and a toaster oven reflow conversion. In fact, the BeagleBone Wireless was designed by [Jason Kridner] in Eagle as a 6-layer board. It’s still a bit beyond the standard capabilities of OSHPark, but the design can still be cut down, and shows how this BeagleBone on a Chip can be applied to other Open Hardware projects.

Smart Sutures

Researchers at Tufts University are experimenting with smart thread sutures that could provide electronic feedback to recovering patients. The paper, entitled “A toolkit of thread-based microfluidics, sensors, and electronics for 3D tissue embedding for medical diagnosis”, is fairly academic, but does describe how threads can work as pH sensors, strain gauges, blood sugar monitors, temperature monitors, and more.

Conductive thread is nothing new but usually thought of as part of a smart garment. In this case, the threads close up wounds and are thus directly in the patient’s body. In many cases, the threads talked to an XBee LilyPad or a Bluetooth Low Energy module so that an ordinary cell phone can collect the data.

Continue reading “Smart Sutures”

Retrotechtacular: Power Driven Articulated Dummy

If any of you have ever made a piece of clothing, you’ll know some of the challenges involved. Ensuring a decent and comfortable fit for the wearer, because few real people conform exactly to commercial sizes. It’s as much a matter of style as it is of practicality, because while ill-fitting clothing might be a sartorial fail, it’s hardly serious.

When the piece of clothing is a space suit though, it is a different matter. You are not so much making a piece of clothing as a habitat, and one that will operate in an environment in which a quick change to slip into something more comfortable is not possible. If you get it wrong at best your astronaut will be uncomfortable and at worst their life could be threatened.

Continue reading “Retrotechtacular: Power Driven Articulated Dummy”

3D Printed Acoustic Holograms: Totally Cool, Not Totally Useless

If you wave your hand under the water’s surface, you get a pattern of ripples on the surface shortly thereafter. Now imagine working that backwards: you want to produce particular ripples on the surface, so how do you wiggle around the water molecules underneath?

That’s the project that a crew from the University of Navarre in Spain Max Planck Institute for Intelligent Systems undertook. Working backwards from the desired surface waves to the excitation underwater is “just” a matter of math and physics. The question is then how to produce the right, incredibly irregular, wavefront. The researchers’ answer was 3D printing.

The idea is that, by creating the desired ripples on the water’s surface, the researchers will be able to move things around. We’ve actually seen this done before in air by [mikeselectricstuff], and a more sophisticated version from the University of Navarre in Spain uses multiple ultrasonic transducers and enables researchers to move tiny objects around in mid-air.

What’s cool about the work done underwater by the Navarre Max Planck Institute group is that all they’re doing is printing out a 3D surface and wiggling it up and down to make the waves. The resulting surface wave patterns are limited in comparison to the active systems, but the apparatus is so much simpler that it ought to be useful for hackers with 3D printers. Let the era of novelty pond hacking begin!

Automatic Resistance: Resistors Controlled By The Environment

Resistors are one of the fundamental components used in electronic circuits. They do one thing: resist the flow of electrical current. There is more than one way to skin a cat, and there is more than one way for a resistor to work. In previous articles I talked about fixed value resistors as well as variable resistors.

There is one other major group of variable resistors which I didn’t get into: resistors which change value without human intervention. These change by environmental means: temperature, voltage, light, magnetic fields and physical strain. They’re commonly used for automation and without them our lives would be very different.

Continue reading “Automatic Resistance: Resistors Controlled By The Environment”

Ghetto Ribbon Connector

[Marcel] was trying to shoehorn a few new parts into his trusty Nexus 5 phone. If you’ve ever opened one of these little marvels up, you know that there’s not much room under the hood to work with. Pulling out some unnecessary parts (like the headphone jack) buys some space, but then how to wire it all up?

[Marcel] needed a multi-wire connector that’s as thin as possible, but he wasn’t going to go the order-Kapton-flex route. Oh no! He built one himself from masking tape and the strands from a stranded wire. Watch the video how-to if that alone isn’t enough instruction.

Continue reading “Ghetto Ribbon Connector”

Putting Sand, Water, And Metal Into A 3D Print

[Adam] over at Makefast Workshop writes about some of the tests they’ve been running on their 3D printer. They experimented with pausing a 3D print midway and inserting various materials into the print. In this case, sand, water, and metal BBs.

The first experiment was a mixture of salt and water used to make a can chiller for soda or beer (the blue thing in the upper right). It took some experimentation to get a print that didn’t leak and was strong. For example, if the water was too cold the print could come off the plate or delaminate. If there was too much water it would splash up while the printer was running and cause bad layer adhesion.

They used what they learned to build on their next experiment, which was filling the print with sand to give it more heft. This is actually a common manufacturing process — for instance, hollow-handled cutlery often has clay, sand, or cement for heft. They eventually found that they had to preheat the sand to get the results they wanted and managed to produce a fairly passable maraca.

The final experiment was a variation on the popular ball bearing prints. Rather than printing plastic balls they designed the print to be paused midway and then placed warmed copper BBs in the print. The printer finished its work and then they spun the BB. It worked pretty well! All in all an interesting read.