Crappy Robots World Championship Announced

[Daiju Ishikawa] wrote us to announce that the world championship Hebocon is taking place this August in Tokyo, and the registration has just opened. When you get a mail in the tip line that reads “From all over the world, crappy robots with low technological ability will gather and fight to determine the worst made robot in the world.” you know it’s Hackaday!

“Heboi” is Japanese for clumsy or crappy. If your idea of fun is poorly made, but hilarious, robots trying to shove each other out of a sumo ring, then a local Hebocon might be for you. And if you think you’ve got what it takes to be a world champion, start looking into tickets to Japan. (It’s not coincidentally on the same day as Maker Faire Tokyo.)

Either way, you should check out the video, embedded below, which is a great introduction to the sport/pastime/whatever. It’s a fun introduction to the gentle art of robotry, for people who are more creative than technical. We think that’s awesome.

Continue reading “Crappy Robots World Championship Announced”

Hacklet 113 – New Robots

I start each day checking out the new and updated projects over on Hackaday.io. Each day one can find all manner of projects – from satellites to machine vision to rockets. One type of project which is always present are robots- robot arms, educational ‘bots, autonomous robots, and mobile robots. This week’s Hackaday.io had a few great robot projects show up on the “new and updated” page, so I’m using the Hacklet to take a closer look.

bot1We start with [Jack Qiao] and Autonomous home robot that does things. [Jack] is building a robot that can navigate his home. He’s learned that just creating a robot that can get itself from point A to point B in the average home is a daunting task. To make this happen, he’s using the Simultaneous Localization and Mapping (SLAM) algorithm. He’s implementing SLAM with the help of Robotic Operating System (ROS).  The robot started out as a test mule tethered to a laptop. It’s evolved to a wooden base with a mini ITX motherboard. Mapping data comes in through a Kinect V2, which will soon be upgraded to a Neato XV-11 LIDAR system.


tyrobotNext up is [Tyler Spadgenske] with TyroBot. TyroBot is a walking robot with some lofty goals, including walking a mile in a straight line without falling down. [Tyler’s] inspiration comes from robots such as Bob the Biped and Zowi. So far, TyroBot consists of legs and feet printed in PLA. [Tyler] is going to use a 32 bit processor for [TyroBot’s] brain, and wants to avoid the Arduino IDE at any cost (including writing his own IDE from scratch). This project is just getting started, so head on over to the project page and watch TyroBot’s progress!


friendbotNext is [Mike Rigsby] with Little Friend. Little Friend is a companion robot. [Mike] found that robots spend more time charging batteries than interacting. This wouldn’t do for a companion robot. His solution was to do away with batteries all together. Little Friend is powered by super capacitors. An 8 minute charge will keep this little bot going for 75 minutes. An Arduino with a motor shield controls Little Friend’s DC drive motors, as well as two animated eyes. If you can’t tell, [Mike] used a tomato as his inspiration. This keeps Little Friend in the cute zone, far away from the uncanny valley.


logi-botFinally we have the walking robot king, [Radomir Dopieralski], with Logicoma-kun. For the uninitiated, a Logicoma is a robot tank (or “logistics robot”) from the Ghost in the Shell series. [Radomir] decided to bring these cartoon tanks to life – at least in miniature. The bulk of Logicoma-kun is built carefully cut and sculpted acrylic sheet. Movement is via popular 9 gram servos found all over the internet. [Radomir] recently wrote an update outlining his new brain for Logicoma-kun. An Arduino Pro Mini will handle servo control. The main computer will be an ESP8266 running Micropython. I can’t wait to see this little ‘bot take its first steps.

If you want more robotic goodness, check out our brand new mobile robot list! Did I miss your project? Don’t be shy, just drop me a message on Hackaday.io. That’s it for this week’s Hacklet, As always, see you next week. Same hack time, same hack channel, bringing you the best of Hackaday.io!

Crowdfunding: A Wireless Oscilloscope

One of the most ingenious developments in test and measuring tools over the last few years is the Mooshimeter. That’s a wireless, two-channel multimeter that can measure voltage and current simultaneously. If you’ve ever wanted to look at the voltage drop and power output on a souped up electrified go-kart, the Mooshimeter is the tool for you.

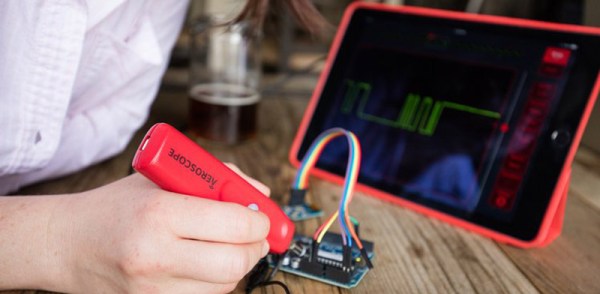
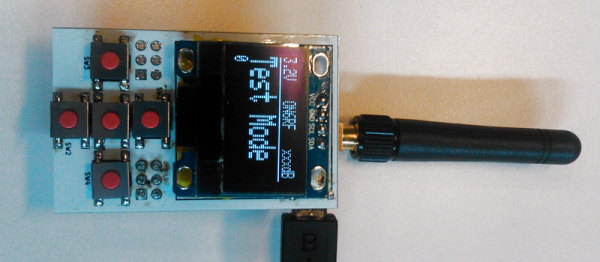
A cheap, wireless multimeter was only the fevered dream of a madman a decade ago. We didn’t have smartphones with Bluetooth back then, so any remote display would cost much more than the multimeter itself. Now this test and measurement over Bluetooth is bleeding over into the rest of the electronics workbench with the Aeroscope,  a wireless Bluetooth oscilloscope.

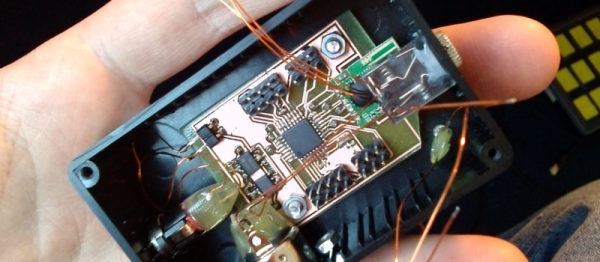
[Alexander] and [Jonathan], the devs for the Aeroscope got the idea for this device while debugging a mobile robot. The robot would work on the bench, but in the field the problem would reappear. The idea for a wireless troubleshooting tool was born out of necessity.

The specs for the Aeroscope are about equal to the quite capable ‘My First Oscilloscope’ Rigol DS1052E. Analog bandwidth is 100MHz, sample rate is 500 Msamples/second, and the memory depth is 10k points. Resolution per division is 20mV to 10V, and the Aeroscope “Deluxe Package” that includes a few leads, tip, clip, USB cable, and case is about the same price as the Rigol 1052E. The difference, of course, is that the Aeroscope is a single channel, and wireless. That’s fairly impressive for two guys who aren’t a team of Rigol engineers.

As is the case with all Bluetooth test and measurement devices, the proof is in the app. Right now, the Aeroscope only supports iOS 9 devices, but according to the crowdfunding campaign, Android support is coming. Since the device is Open Source, you can always bang something out in Python if you really need to.

While this is a crowdfunding campaign, it’s hosted on Crowd Supply. Crowd Supply isn’t Indiegogo or Kickstarter; there are people at Crowd Supply vetting projects. The campaign still has a month to go, but the first few pledges are putting the Aeroscope right on track to a successful campaign.

Easy Bubble Watch Oozes Retro Charm

[Rafael] made a sweet little retro watch that’s a fantastic introduction to hardware DIY. If you’ve programmed an Arduino before, but you’ve never had a board made, and you are up for some SMD soldering, this might be for you. It’s got some small components, so ease off the coffee before soldering, but it’s nothing that you won’t be able to do. In the end, you’ll have something awesome.

Aesthetically, the centerpiece is the bubble display, which reminds us of the old HP calculator that our parents kept in the junk drawer, long after it had ceased to be relevant. It would return 3.9999999 for the square-root of 16, but we loved to play with it anyway. This watch will let you vicariously reclaim our childhood.

But that’s not all! It’s also an Arduino and RTC clock. Functions that are already implemented include clock, calendar, stopwatch, and “temperature”. (Temperature is from the AVR’s internal thermometer, which isn’t super-accurate and is probably just going to tell you how hot your wrist is anyway…) It’s got buttons, and tons of free flash space left over. It’s begging to be customized. You know what to do.

It’s not a smart watch, but it’s a great project. “The nostalgic retro bubble display is certain to flatter any hacker’s outfit.” Or something. OK, but we want one.

[via OSHpark’s Hackaday.io feed]

Reverse Engineering The McDonald’s French Fry

McDonald’s is serious about their fries. When they were forced by shifting public opinion (drunkenly swaggering around as it always does) to switch from their beef tallow and cottonseed oil mixture to a vegetable oil mixture; they spent millions to find a solution that retained the taste. How they make the fries is not the worlds most closely guarded secret, but they do have a unique flavor, texture, and appearance which is a product of lots of large scale industrial processes. [J. Kenji López-Alt] decided to reverse engineer the process.

His first problem was of procurement. He could easily buy cooked fries, but he needed the frozen fries from McDonald’s to begin his reverse engineering. McDonald’s refused to sell him uncooked fries, “They just don’t do that,” one employee informed him. He reached out to his audience, and one of them had access to a charlatan. The mountebank made quick work of the McDonald’s employees and soon [J. Kenji] had a few bags of the frozen potato slivers to work with.

What follows next was both entertaining and informative. At one point he actually brought out a Starrett dial caliper to measure the fries; they were 0.25in squares in cross section. Lots of research and experimentation was done to get that texture. For example, McDonald’s fries aren’t just frozen raw potatoes. They are, in fact; blanched, flash fried, frozen and then fried again. Getting this process right was a challenge, but he arrived at similar fries by employing his sous vide cooker.

He then wanted to see if he could come up with a french fry recipe that not only allowed the home chef to make their own McDonald’s fries, but improve on them as well. It gets into some food chemistry here. For example he found that the same effect as blanching could be produced by boiling the fries; if you added vinegar to keep the cell walls from disintegrating.

The article certainly shows how knowledge of the chemistry behind cooking can improve the results.

Touchpad Remote MIDI/Analog Controller Rocks

[acidbourbon] had some cool parts on hand, and a musician friend in need of a radio-controlled, touch-sensitive MIDI (and analog) controller. This being Hackaday, you can guess what happened next.

The remote expression controller is a sweet little hack. It starts with a touchpad bought from a German surplus shop, and some code that [acidbourbon] found on the biggest German embedded forum. A couple nicely home-etched circuit boards later, and he was writing code.

It’s all available here on his GitHub if you want to have a look. The transmission protocol is simplicity itself. It sends a two-byte header to detect the start of the message, and then it sends three bytes of data. The receiver turns this into MIDI and control-voltage output. Simple and useful.

We also admire the non-overkill (as well as the enviable battery life) of using straightforward radio transmitters rather than giving in and using WiFi.

We’ve covered some of Michael/[acidbourbon]’s hacks before, and the one that we think of the most, when we’re down in the basement drilling out holes in a PCB, is his semi-automatic drill press hack. Keep on hacking!

Hackaday Prize Entry: A 400MHz Modem

The Internet of Things has been presented as the future of consumer electronics for the better part of a decade now. Billions have been invested, despite no one actually knowing what the Internet of Things will do. Those billions need to go somewhere, and in the case of Texas Instruments, it’s gone straight into the next generation of microcontrollers with integrated sub-GHz radios. [M.daSilva]’s entry to the 2016 Hackaday Prize turns these small, cheap, radios into a portable communicator.

This ‘modem for the 400 MHz band’ consists simply of an ATmega microcontroller, TI’s CC1101 sub-GHz transceiver, an OLED display, and a UHF power amplifier. As far as radios radios go, this is as bare bones as it gets, but with the addition of a USB to serial chip and a small program this radio can send messages to anyone or anything in range. It’s a DIY pager with a couple chips and some firmware, and already the system works.

[M.daSilva] has two use cases in mind for this device. The first is an amateur radio paging system, where a base station with a big power amp transmits messages to many small modules. The second use is a flexible mdoule that links PCs together, using Ham radio’s data modes. With so many possibilities, this is one of the best radio builds we’ve seen in this year’s Hackaday Prize.

The HackadayPrize2016 is Sponsored by: