Coca-Cola's 3D sign

Coca-Cola’s New 3D Times Square Sign Invokes Inceptionism

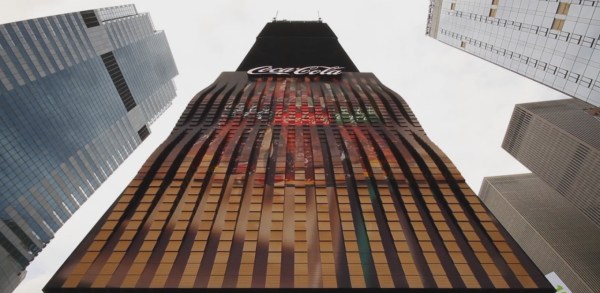
Coca-Cola has updated their sign in Times Square, and this one has a mesmerizing 3D aspect to it, giving the spooky feeling you get from watching buildings curl up into the sky in the movie, Inception. That 3D is created by breaking the sign up into a 68’x42′ matrix of 1760 LED screens that can be independently extended out toward the viewer and retracted again. Of course, we went hunting for implementation details.

Moving Cube Module
Moving Cube Module

On Coca-Cola’s webpage listing the partners involved in putting it together, Radius Displays is listed as responsible for sign design, fabrication, testing and installation support. Combing through their website was the first step. Sadly we found no detailed design documents or behind-the-scenes videos there. We did find one CAD drawing of a Moving Cube Module with a 28×28 matrix of LEDs. Assuming that’s accurate then overall there are 1,379,840 LEDs — try ordering that many off of eBay. EDIT: One behind-the-scenes video of the modules being tested was found and added below.

So the patent hunting came next, and that’s where we hit the jackpot. Read on to see the results and view the videos of the sign in action below.

Continue reading “Coca-Cola’s New 3D Times Square Sign Invokes Inceptionism”

Nerf Gun Ammo Counter And Range Finder

The proliferation of breakout boards that the DIY electronics movement has allowed has been staggering. Buy a few different boards, wire them together to a microcontroller or credit-card computer (both on their own breakout board) and write a bit of code, and you can create some really interesting things. Take Reddit user [Lord_of_Bone]’s Nerf Gun ammo counter and range finder, for example, a great example of having a great idea and looking around for the ways to implement it.

For the range finder, [Lord_of_Bone] looked to an ultrasonic rangefinder. For the ammo counter, [Lord_of_Bone] chose a proximity sensor. To run everything, the Raspberry Pi Zero was used and the visuals were supplied by a Rainbow Hat. The range finder is self-explanatory. The proximity sensor is located at the end of the gun’s muzzle and when it detects a Nerf dart passing by it reduces the ammo count by one. Blu-tack is used to hold everything in place, but [Lord_of_Bone] plans to use Sugru when he’s past the prototype stage.

The one problem [Lord_of_Bone] has with the build is that there’s no way to tell how many Nerf bullets are in the magazine. Currently the wielder must push a button when reloading to reset the count to a preset amount. We’re sure that [Lord_of_Bone] would appreciate any suggestions the Hack-A-Day crowd could offer.

[Lord_of_Bone] gives a full bill of materials, Python code, a lot of pictures and step-by-step instructions so that you, too, can determine how far away your target is, and whether or not you have enough ammo to hit them. We have quite a few Nerf mods on the site, and [Lord_of_Bone] could take a look at this article about how to keep track of your Nerf ammo, and here’s a different method of determining if a Nerf dart has been fired (and measuring its speed.)

[via Reddit] Continue reading “Nerf Gun Ammo Counter And Range Finder”

A BluePill For Arduino Dependence

Arduinos are helpful but some applications require more than what Arduinos can provide. However, it’s not always easy to make the switch from a developed ecosystem into the abyss that is hardware engineering. [Vadim] noticed this, which prompted him to write a guide to shepherd people on their quest for an Arduino-free environment, one BluePill at a time.

With an extended metaphor comparing Arduino use and physical addiction, [Vadim’s] writing is a joy to read. He chose to focus on the BluePill (aka the next Arduino Killer™) which is a $1.75 ARM board with the form factor of an Arduino Nano. After describing where to get the board and it’s an accompanying programmer, [Vadim] introduces PlatformIO, an alternative to the Arduino IDE. But wait! Before the Arduino die-hards leave, take note that PlatformIO can use all of the “Arduino Language,” so your digitalWrites and analogReads are safe (for now). Like any getting started guide, [Vadim] includes the obligatory blinking an LED program. And, in the end, [Vadim] sets his readers up to be comfortable in the middle ground between Arduino Land and the Wild West.

The debate for/against Arduino has been simmering for quite some time, but most agree that Arduino is a good place to start: it’s simpler and easier than jumping head first. However, at some point, many want to remove their “crippling Arduino dependency” (in the words of [Vadim]) and move on to bigger and better things. If you’re at this point, or still cling to your Uno, swing on over and give Vadim’s post a read. If you’re already in the trenches, head on over and read our posts about the BluePill and PlatformIO which are great complements for [Vadim’s].

Fight Mold And Mildew With An IoT Bathroom Fan

Delicious sheets of wallboard coated with yummy latex paints, all kept warm and moist by a daily deluge of showers and habitually forgetting to turn on the bathroom exhaust fan. You want mildew? Because that’s how you get mildew.

Fed up with the fuzzy little black spots on the ceiling, [Innovative Tom] decided to make bathroom ventilation a bit easier with this humidity-sensing IoT control for his bathroom exhaust fan. Truthfully, his build accomplishes little more than a $15 timer switch for the fan would, with one critical difference — it turns the fan on automatically when the DHT11 sensor tells the WeMos board that the relative humidity has gone over 60%. A relay shield kicks the fan on until the humidity falls below a set point. A Blynk app lets him monitor conditions in the bathroom and override the automatic fan, which is handy for when you need it for white noise generation more than exhaust. The best part of the project is the ample documentation and complete BOM in the description of the video below, making this an excellent beginner’s project.

No bathroom fan? Not a problem — this standalone humidity-sensing fan can help. Or perhaps you have other bathroom ventilation needs that this methane-sensing fan could help with?

Continue reading “Fight Mold And Mildew With An IoT Bathroom Fan”

Dumb STB Gets Smart

[Vincent Deconinck] gave a fresh lease of life to an old set top box by adding a few Euro’s worth of hardware and some software smarts. The device in question is an old VOOcorder – a Cisco set-top box provided by VOO, his cable service provider in Belgium.

The VOOcorder doesn’t have any WiFi hardware or browser / app based interfaces. It’s a simple device controlled either via an IR remote or front panel buttons. [Vincent] added an ESP8266 and hooked it up to the IR receiver on the set-top box. He also set it up as an SPI slave to the front panel VFD display controller and connected it to the debug serial interface of the VOOcorder as well. The software, on the other hand, required a lot more work consisting of code running on the ESP itself, several HTML pages and JavaScript code for the browser front end, and a few scripts running in the background.

The result was bidirectional interactivity from within a browser, allowing him to send commands and receive status information as well as providing a user-friendly search interface. Further, his browser interface was integrated with information from the service providers website letting him do scheduling and recording of programs. The stuff that interested us is how he sniffed out the IR signals, figured out the SPI protocol used by the front panel controller, and implemented SPI-slave mode for the ESP8266. [Vincent] was surprised that such a cheap device could handle three distinct web servers while parsing two message streams without a hitch.

It’s a great hack showing us how to use super cheap electronics to upgrade and modernize old hardware. Check out the two videos after the break – showing a demo of the hack in action, and a walk through of the hardware modifications.

Continue reading “Dumb STB Gets Smart”

Linux Graphics Programming

There was a time when embedded system developers didn’t need to worry about graphics. When you have a PIC processor and two-line LCD, there isn’t much to learn. But if you are deploying Linux-based systems today, graphics are a real possibility. There are many options for doing Linux graphics including Wayland, X11, and frame buffers. Confused? This tutorial can help. The sections on Wayland and Mir are under construction, but that’s probably not what you are going to be using on a typical hacker project for the foreseeable future, anyway.

Of course, even inside those broad categories, you have multiple choices. If you are doing X11, for example, you can go low-level or pick any of a number of high-level libraries.

Continue reading “Linux Graphics Programming”

New Part Day: Pluggable ESP Modules

Almost exactly four years ago, we came across a really neat module for sale on SeeedStudios. It was a $5 WiFi chip, able to connect your microcontroller project to the Internet with just a handful of wires and a few AT commands. This was the ESP8266, and it has since spawned an entire ecosystem of connected devices.

Now, there’s a new version of the ESP8266 that simply showed up on the Seeed website. Officially, it’s called the, ‘ESP8285 01M Wi-Fi SoC Module’, but you might as well start calling it ‘the Pluggable ESP module’. It’s the smallest ESP8266 module yet at 18mm square, and this one is designed to be plugged into a card-edge connector. It’s eighteen pins of wonder and 1MB of Flash, all ready to be stuffed into the next Internet of Things Thing.

The documentation for this module is sparse, and there isn’t even a mention of it on the AI Thinker website. That said, we can make some reasonable assumptions about what’s going on in this chip and what it can do. This module appears to be based on the ESP8285 SoC. Basically, it’s an ESP8266 with built-in 1MB SPI Flash. There are a handful of GPIOs available, and you should be able to build anything with this module that you could with other ESP8266 modules.

The highlight here is, of course, the card-edge connector. This is a module designed to be dropped into an existing product. You can program the module before hand, and assembly is a snap. The problem, though, is sourcing the relevant connector. It doesn’t look like Seeed has bothered to put a link to the right connector in the product description, although sourcing it shouldn’t be that much of a problem. The only question is if the card edge connectors on this module are hard gold (for multiple mating cycles) or just ENIG. Either way, if you’re plugging these modules into connectors dozens of times, you’re probably doing something wrong.