Automated Parts Counter Helps Build A Small Business

We love to see projects undertaken for the pure joy of building something new, but to be honest those builds are a dime a dozen around here. So when we see a great build that also aims to enhance productivity and push an entrepreneurial effort along, like this automated small parts counter, we sit up and take notice.

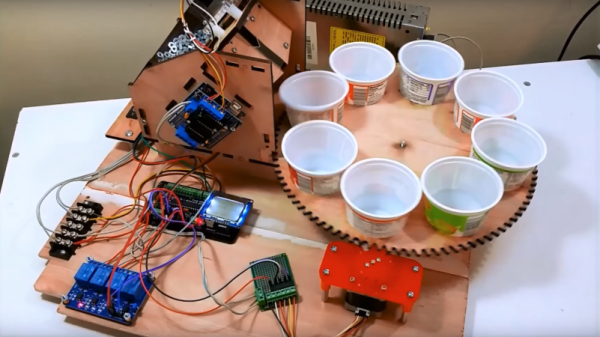
The necessity that birthed this invention is [Ryan Bates’] business of building DIY arcade game kits. The mini consoles seen in the video below are pretty slick, but kitting the nuts, bolts, spacers, and other bits together to ship out orders was an exercise in tedium. Sure, parts counting scales are a thing, but that’s hardly a walk-away solution. So with the help of some laser-cut gears and a couple of steppers, [Ryan] built a pretty capable little parts counter.

The interchangeable feed gears have holes sized to move specific parts up from a hopper to a chute. A photointerrupter counts the parts as they fall into plastic cups on an 8-position carousel, ready for bagging. [Ryan] also has a manual counter for wire crimp connectors that’s just begging to be automated, and we can see plenty of ways to leverage both solutions as he builds out his kitting system.

While we’ve seen more than a few candy sorting machines lately, it’s great to see someone building hardware to streamline the move from hobby to business like this. We’re looking forward to seeing where [Ryan] takes this from here.

Continue reading “Automated Parts Counter Helps Build A Small Business”

IoT Security Is Hard: Here’s What You Need To Know

Security for anything you connect to the internet is important. Think of these devices as doorways. They either allow access to services or provides services for someone else. Doorways need to be secure — you wouldn’t leave your door unlocked if you lived in the bad part of a busy city, would you? Every internet connection is the bad part of a busy city. The thing is, building hardware that is connected to the internet is the new hotness these days. So let’s walk through the basics you need to know to start thinking security with your projects.

If you have ever run a server and checked your logs you have probably noticed that there is a lot of automated traffic trying to gain access to your server on a nearly constant basis. An insecure device on a network doesn’t just compromise itself, it presents a risk to all other networked devices too.

The easiest way to secure a device is to turn it off, but lets presume you want it on. There are many things you can do to protect your IoT device. It may seem daunting to begin with but as you start becoming more security conscious things begin to click together a bit like a jigsaw and it becomes a lot easier.

Continue reading “IoT Security Is Hard: Here’s What You Need To Know”

Simple Scanner Finds The Best WiFi Signal

Want to know which way to point your WiFi antenna to get the best signal? It’s a guessing game for most of us, but a quick build of a scanning WiFi antenna using mostly off-the-shelf components could point you in the right direction.

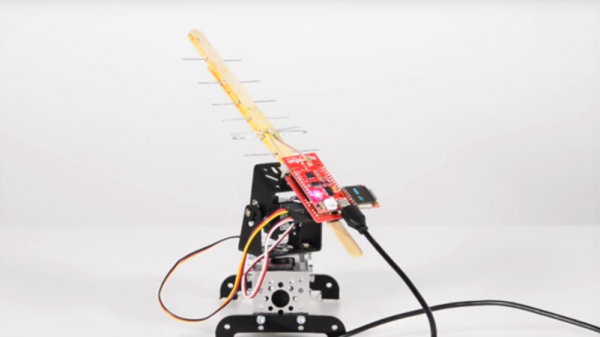
With saturation WiFi coverage in most places these days, optimizing your signal might seem like a pointless exercise. And indeed it seems [shawnhymel] built this more for fun than for practical reasons. Still, we can see applications where a scanning Yagi-Uda antenna would come in handy. The build started with a “WiFi divining rod” [shawnhymel] created from a simple homebrew Yagi-Uda and an ESP8266 to display the received signal strength indication (RSSI) from a specific access point. Tired of manually moving the popsicle stick and paperclip antenna, he built a two-axis scanner to swing the antenna through a complete hemisphere.

The RSSI for each point is recorded, and when the scan is complete, the antenna swings back to the strongest point. Given the antenna’s less-than-perfect directionality — [shawnhymel] traded narrow beam width for gain — we imagine the “strongest point” is somewhat subjective, but with a better antenna this could be a handy tool for site surveys, automated radio direction finding, or just mapping the RF environment of your neighborhood.

Yagi-Uda antennas and WiFi are no strangers to each other, whether it be a WiFi sniper rifle or another recycling bin Yagi.  Of course this scanner isn’t limited to WiFi. Maybe scanning a lightweight Yagi for the 2-meter band would be a great way to lock onto the local Ham repeater.

Continue reading “Simple Scanner Finds The Best WiFi Signal”

Put Plasma To Work With This Basic Toolkit

Fair warning: [Justin Atkin]’s video on how to make plasma, fusors, and magnetrons is a bit long. But it’s worth watching because he’s laying a foundation for a series of experiments with plasma, which looks like it will be a lot of fun.

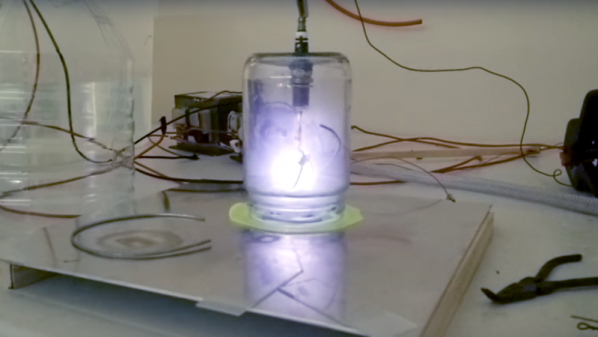
After a nice primer on the physics of plasma, [Justin] goes into some detail about the basic tools of the trade: high voltage and high vacuum. A couple of scrap microwave oven transformers, a bridge rectifier, and a capacitor provide the 2000 volts DC output needed. It’s a workable setup, but we’ll take issue with the incredibly dangerous “scariac” autotransformer, popularized by [The King of Random]. It seems foolish to risk a painful death mixing water and line current when a 20-amp variac can be had for $100.

A decent vacuum pump will be needed too, of course; perhaps the money you can save by building your own Sprengel vacuum pump can be put toward the electrical budget. Vacuum chambers are cheap too — Mason jars with ground rims and holes drilled for accessories like spark plugs. Magnets mounted below one chamber formed a rudimentary magnetron, thankfully without the resonating cavities needed for producing microwaves. Another experiment attempted vapor deposition of titanium nitride.

It’s all pretty cool stuff, and we’re looking forward to more details and results. While we wait, feel free to check out the tons of plasma projects we’ve featured, from tiny plasma speakers to giant plasma tubes.

Continue reading “Put Plasma To Work With This Basic Toolkit”

Budget Astrophotography With A Raspberry Pi

New to astrophotography, [Jason Bowling] had heard that the Raspberry Pi’s camera module could be used as a low-cost entry into the hobby. Having a Raspberry Pi B+ and camera module on hand from an old project, he dove right in, detailing the process for any other newcomers.

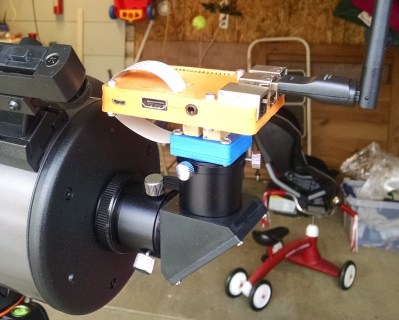
Gingerly removing the camera’s lens, the module fit snugly into a 3D printed case — courtesy of a friend — and connected it to a separate case for the Pi. [Bowling] then mounted he camera directly on the telescope — a technique known as prime-focus photography, which treats the telescope like an oversized camera lens. A USB battery pack is perfect for powering the Pi for several hours.

When away from home, [Bowling] has set up his Pi to act as a wireless access point; this allows the Pi to send a preview to his phone or tablet to make adjustments before taking a picture. [Bowling] admits that the camera is not ideal, so a little post-processing is necessary to flesh out a quality picture, but you work with what you have.
Continue reading “Budget Astrophotography With A Raspberry Pi”

FlowCode Graphical Programming

If you’ve ever been curious if there’s a way to program microcontrollers without actually writing software, you might be interested in FlowCode. It isn’t a free product, but there is a free demo available. [Web learning] did a demo of programming a Nucleo board using the system. You can check it out below.

The product looks slick and it supports a dizzying number of processors ranging from AVR (yes, it will do Arduino), PIC, and ARM targets. However, the pricing can add up if you actually want to target all of those processors as you wind up paying for the CPU as well as components. For example, the non-commercial starter pack costs about $75 and supports a few popular processors and components like LEDs, PWM, rotary encoders, and so on.

Continue reading “FlowCode Graphical Programming”

New Part Day: Very Cheap LIDAR

Self-driving cars are, apparently, the next big thing. This thought is predicated on advancements in machine vision and cheaper, better sensors. For the machine vision part of the equation, Nvidia, Intel, and Google are putting out some interesting bits of hardware. The sensors, though? We’re going to need LIDAR, better distance sensors, more capable CAN bus dongles, and the equipment to tie it all together.

This is the cheapest LIDAR we’ve ever seen. The RPLIDAR is a new product from Seeed Studios, and it’s an affordable LIDAR for everyone. $400 USD gets you one module, and bizarrely $358 USD gets you two modules. Don’t ask questions — this price point was unheard of a mere five years ago.

Basically, this LIDAR unit is a spinning module connected to a motor via a belt. A laser range finder is hidden in the spinny bits and connected to a UART and USB interface through a slip ring. Mount this LIDAR unit on a robot, apply power, and the spinny bit does its thing at about 400-500 RPM. The tata that comes out includes distance (in millimeters), bearing (in units of degrees), quality of the measurement, and a start flag once every time the head makes a revolution. If you’ve never converted polar to cartesian coordinates, this is a great place to start.

Although self-driving cars and selfie drones are the future, this part is probably unsuitable for any project with sufficient mass or velocity. The scanning range of this LIDAR is only about 6 meters and insufficient for retrofitting a Toyota Camry with artificial intelligence. That said, this is a cheap LIDAR that opens the door to a lot of experimentation ranging from small robots to recreating that one Radiohead video.