Taking Halloween To The Next Level With JARVIS

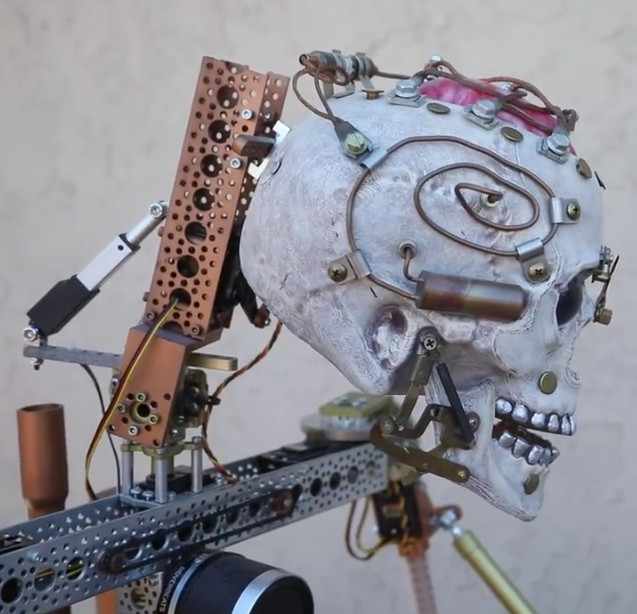
As an avid “Haunt Hacker”, [Steve Koci] knows a thing or two about bringing high-tech to Halloween. Wanting to build a mobile robot that could accompany him to conventions as a demonstration of the sort of animatronic mechanisms and controls he uses, he came up with the idea of JARVIS. The original plan was to make a more traditional robot, but with the addition of an animated skull and some Steampunk-style embellishments, JARVIS is definitely the kind of thing you don’t want to run into on an October night.

Construction of JARVIS started in 2016, after [Steve] saw the Agent 390 tracked robot chassis from ServoCity. With the addition of extra wheels and a custom track, he converted the Agent 390 into a triangular track arrangement which he said he’s had his eye on since “Johnny 5” sported them back in Short Circuit.

There’s a dizzying array of electronics required to make JARVIS move and talk, not least of which is the “Banshee” prop controller. This device is made to simplify the construction of animatronic heads and provides not only organic-looking randomized movement but automatic jaw synchronization. Using a wireless audio connection, [Steve] is able to talk through a speaker mounted on the chest of the robot, while the skull automatically matches its mouth to his speech in real time. Combined with the GoPro in a two-axis gimbal, this allows JARVIS to function as a fairly robust telepresence platform. Much to the delight/horror of those it’s used on.

Getting JARVIS to move requires not only the two beefy motors and a dedicated controller supplied by the Agent 390 platform, but no less than thirteen servos for the head, arms, and grippers. There’s even a linear actuator used to tilt the skull up and down, presumably for terrifying people of various heights and ages. JARVIS even has a pair of Adafruit’s electronic eyes mounted in the skull, as if you thought you would be spared the horror of seeing glowing eyes following you in the dark.

To control all this hardware, [Steve] uses two RC transmitters in conjunction with a smartphone displaying the video feed coming from the GoPro. It takes some serious finger-gymnastics to get JARVIS doing its thing, which [Steve] says he’s still trying to master.

As many projects that have graced these pages can attest to, hackers seem to delight in coming up with new and exciting ways to terrify the young and old alike. Sometimes they can’t even wait until Halloween.

Continue reading “Taking Halloween To The Next Level With JARVIS”

This Big, Bright Seven-Segment Display Is 3D-Printable

Seven-segment LED displays have been around forever, it seems, and the design is pretty optimized by now. Off-the-shelf units are readily available in all sorts of sizes and colors, but if you want a really big display, you might have to roll your own. Scaling up the size doesn’t necessarily mean you have to scale up the complexity, though, if this light-pipeless jumbo seven-segment LED display is any indication.

It’s clear that [Fran Blanche] has a thing for collecting and building oddball numeric displays, like this cathode ray tube Nixie knockoff or her Apollo DSKY electroluminescent display. Her plus-size seven-segment display is far less complicated than either of those, and that’s by design; [Fran] wanted something that was 3D-printable as a single part, rather than an assembly with light pipes and diffusers. To that end, the display is just a pair of X-shaped dividers stacked on top of each other behind the display’s face. They dividers form six triangular compartments and a diamond shaped one, with each compartment opening into a segment-shaped window. One LED goes in each triangular compartment, while the double-sized diamond space gets two. That’s it — the LEDs light up the inside of each compartment to turn on the appropriate segments. Watch it in action below.

The display still needs some tweaking, but it’s big and bright and has a large acceptance angle. What’s more, it’s scalable — imagine a display the size of a sheet of plywood using LED light bulbs. We’re looking forward to [Fran]’s improvements and her next display project, which appears to use hot glue as a light pipe.

Continue reading “This Big, Bright Seven-Segment Display Is 3D-Printable”

Pipe Your Way Through The Jams

Playing the bagpipes is an art that takes a significant effort to master, both in keeping a constant air supply through balancing blowstick and bag and in learning the finger positions on the chanter. This last task we are told requires constant finger practice, and a favorite place for this is on the steering wheel as a would-be piper drives. [DZL] therefore took this to the next level, placing touch sensors round a car steering wheel that could be interpreted by an Arduino Pro Mini to produce a passable facsimile of a set of bagpipes via an in-car FM transmitter. It lacks the drone pipes of the real thing, but how many other Škodas feature inbuilt piping?

We’ve covered an unexpected number of bagpipe projects over the years, but never had a close look at this rather fascinating musical instrument. If you are curious, the US Coast Guard pipe band has a short guide to its parts, and we’ve brought you a set of homemade pipes built from duct tape and PVC pipe. They may once have been claimed as an instrument of war, but they seem to also be a favorite instrument of hardware hackers.

Thanks [Sophi] for the tip.

Speaking The Same Language As A Wireless Thermometer

Temperature is a delicate thing. Our bodies have acclimated to a tight comfort band, so it is no wonder that we want to measure and control it accurately. Plus, heating and cooling are expensive. Measuring a single point in a dwelling may not be enough, especially if there are multiple controlled environments like a terrarium, pet enclosure, food storage, or just the garage in case the car needs to warm up. [Tim Leland] wanted to monitor commercially available sensors in several rooms of his house to track and send alerts.

The sensors of choice in this project are weather resistant and linked in his project page. Instead of connecting them to a black box, they are linked to a Raspberry Pi so your elaborate home automation schemes can commence. [Tim] learned how to speak the thermometer’s language from [Ray] who posted about it a few years ago.

The system worked well, but range from the receiver was only 10 feet. Thanks to some suggestions from his comments section, [Tim] switched the original 433MHz receiver for a superheterodyne version. Now the sensors can be a hundred feet from the hub. The upgraded receiver is also linked on his page.

We’ve delved into thermocouple reading recently, and we’ve featured [Tim Leland] and his 433MHz radios before.

From Cop Car Data Terminal, To Retro Computer

It is possible that you will have lived your life without ever coming into contact with a Motorola MDT9100-T. The data terminal of choice for use in police cars across the globe was a computer with a full-sized QWERTY keyboard, a small CRT display, a mainboard sporting an Intel 386SX processor, and a custom version of Windows 3.1. [Trammell Hudson] and some friends from NYC Resistor scored some MDT9100s in an online auction and found them to be just too good an opportunity not to crack them open and see what could be done.

The custom Windows install could be bypassed with a DOS prompt for some period demoscene action, but [Trammell] wanted more. The 386SX wasn’t even quick when it was new, and this computer deserved the power of a BeagleBone! A custom cape was created on a prototyping cape to interface with the MDT9100 header carrying both keyboard and video. A bit of detective work revealed the display to be a 640×480 pixel mono VGA. The ‘Bone’s LVDS output can drive VGA through a resistor ladder DAC with the aid of an appropriate device tree overlay. The keyboard was then taken care of with a Teensy working as a USB device, resulting in a working Linux computer in the shell of an MDT9100.

It’s always good to see old technology brought up to date. Amusingly a couple of years ago we reported on the death of VGA, but retro projects like this one mean it’ll be a long time before we’ve heard the last of it.

Control A Swarm Of RC Vehicles With ESP8266

Over at RCgroups, user [Cesco] has shared a very interesting project which uses the ever-popular ESP8266 as both a transmitter and receiver for RC vehicles. Interestingly, this code makes use of the ESP-Now protocol, which allows devices to create a mesh network without the overhead of full-blown WiFi. According to the Espressif documentation, this mode is akin to the low-power 2.4GHz communication used in wireless mice and keyboards, and is designed specifically for persistent, peer-to-peer connectivity.

Switching an ESP8266 between being a transmitter or receiver is as easy as commenting out a line in the source code and reflashing the firmware. One transmitter (referred to as the server in the source code) can command eight receiving ESP8266s simultaneously. [Cesco] specifically uses the example of long-range aircraft flying in formation; only coming out of the mesh network when it’s time to manually land each one.

[Cesco] has done experiments using both land and air vehicles. He shows off a very hefty looking tracked rover, as well as a quickly knocked together quadcopter. He warns the quadcopter flies like “a wet sponge”, but it does indeed fly with the ESP’s handling all the over the air communication.

To be clear, you still need a traditional PPM-compatible RC receiver and transmitter pair to use his code. The ESPs are simply handling the over-the-air communication. They aren’t directly responsible for taking user input or running the speed controls, for example.

This isn’t the first time we’ve seen an ESP8266 take the co-pilot’s seat in a quadcopter, but the maniacal excitement we feel when considering the possibility of having our very own swarm of flying robots gives this particular project an interesting twist.