Wonderful IPad Mini 2 Home Made Spiral Notebook Case

Part of the joy of hacking is the joy of discovery, of seeing how things go right as well as wrong. That’s one cool thing about this iPad Mini 2 case build by [Eric Strebel]: in the video, he details the things that went wrong as well as those that went right. For instance, he used glue on one version that melted the foam core he built the iPad holder from. The end product is wonderful, though. It combines an iPad Mini 2 case and a spiral-bound notebook so you can use both digital and paper mediums, with the iPad cleverly hidden behind a panel that both protects it and turns the screen off when not in use.

Continue reading “Wonderful IPad Mini 2 Home Made Spiral Notebook Case”

Turn Your Teddy Bear Into A Robot With Yale’s “Robotic Skin”

Despite what we may have seen in the new Winnie the Pooh movie, our cherished plush toys don’t usually come to life. But if that’s the goal, we have ways of making it happen. Like these “robotic skins” from Yale University.

Each module is a collection of sensors and actuators mounted on a flexible substrate, which is then installed onto a flexible object serving as structure. In a simple implementation, the mechanical bits are sewn onto a piece of fabric and tied with zippers onto a piece of foam. The demonstration video (embedded below the break) runs through several more variations of the theme. From making a foam tube (“pool noodle”) crawl like a snake to making a horse toy’s legs move.

There’s a serious motivation behind these entertaining prototypes. NASA is always looking to reduce weight that must be launched into space, and this was born from the idea of modular robotics. Instead of actuators and sensors embedded in a single robot performing a specific function, these robotic skins can be moved around to different robot bodies to perform a variety of tasks. Such flexibility can open up more capabilities while occupying less weight on the rocket.

This idea is still early in development and the current level prototypes look like something most of us can replicate and improve upon for use in our projects. We’ve even got a controller for those pneumatics. With some more development, it may yet place among the ranks of esoteric actuators.

Continue reading “Turn Your Teddy Bear Into A Robot With Yale’s “Robotic Skin””

This TARDIS Is Bigger On The Inside

A few months ago, YouTube user [Maladroit Modeller] uploaded a video of his model TARDIS from Doctor Who which shows an inside that’s bigger than the outside. Recently, [Maladroit Modeller] posted some pictures and has now uploaded a video showing how it’s done.

The TARDIS model itself is a 3:75 scale “Spin & Fly” model. The case to show everything off is built from foam core and the interior is built from foam core, silver paper, cardboard, styrene and other bits and pieces. There looks like there’s some EL wire being used, too, along with a lot of LEDs.

The build looks great and the illusion works very nicely in the video. Check out the video after the break, and then check out the “how it’s done” video for an explanation. Continue reading “This TARDIS Is Bigger On The Inside”

Make An Electric Skateboard For Your Cat

Have you ever looked at your cat and thought “You know, my kitten really needs an electric skateboard!” Probably not, but this seems to have happened to [Kim Pimmel] while looking at his cat MIDI, so he decided to build one. This process involved building a simple, low powered skateboard with a Feather mainboard and motor controller combined with a laser-cut switch mechanism. When [Kim] puts a treat into the mechanism, the cat pulls the switch and the skateboard moves forward, moving into a brave new e-skateboarding feline future. MIDI looks somewhat unimpressed by this whole business, but I suspect that as long as the treats keep coming, he will be happy to keep on truckin’. Now, if he can just figure out how to persuade the cat to ollie, we will be really getting somewhere.

Feline tomfoolery seems to be a regular pastime here on these pages, and more than just a quest for easy moggy-driven clickbait. A lot of cat feeders and cat finders abound, but this project isn’t the only cat-operated one. Our readers’ pets can probably spot an Arduino a mile away by now.

Continue reading “Make An Electric Skateboard For Your Cat”

The Un-Economy Of Building Your Own Spot Welder

If there’s one thing that brings hackers together, it’s the ability to build something for less money than it takes to buy it. It’s an exercise [Great Scott Gadgets] put to the test because he was playing around with some 18650 lithium cells, and had a huge need to put some tabs on batteries. This can be done by soldering, but to do it right you should really use a spot welder. Here’s the rub: you can buy a spot welder for about $250, and you can build one for a little less. So, the question: should [Great Scott] build or buy a spot welder? This wouldn’t be worth reading if he started off with an eBay order.

[Great Scott] designed this spot welder around a half-dozen supercaps, all securely held together with Kapton tape. This goes through a set of MOSFETs, and everything is controlled through an Arduino, a rotary encoder, and a dirt-cheap OLED display. It’s a simple enough circuit but a bit too much for perfboard, so [Great Scott] laid out a PCB and got a few boards for under $40. A bit of solder and some debugging later, and theoretically a spot welder was created.

After all that work, how did the spot welder work? Well, it didn’t. A slight misstep in the schematic meant this board didn’t have reference ground on the MOSFETs, so all this work was for naught. Of course, the only thing required to fix this board was a second board spin, as [Great Scott] probably bought more parts than necessary because that’s what smart people do. Still, he decided to cut his losses and shelve the project.

Continue reading “The Un-Economy Of Building Your Own Spot Welder”

Building A Pocket Sized Arduino Oscilloscope

There’s little question that an oscilloscope is pretty much a must-have piece of equipment for the electronics hacker. It’s a critical piece of gear for reverse engineering devices and protocols, and luckily for us they’re as cheap as they’ve ever been. Even a fairly feature rich four channel scope such as the Rigol DS1054Z only costs about as much as a mid-range smartphone. But if that’s still a little too rich for your taste, and you’re willing to skimp on the features a bit, you can get a functional digital oscilloscope for little more than pocket change.

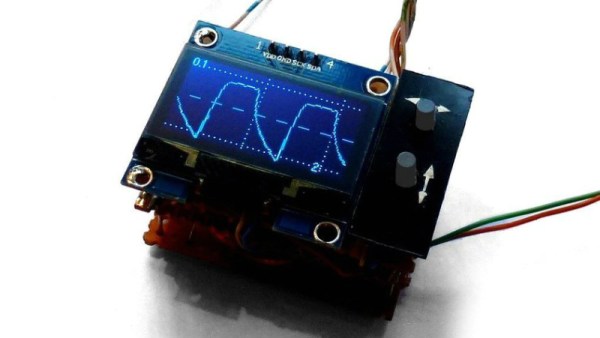
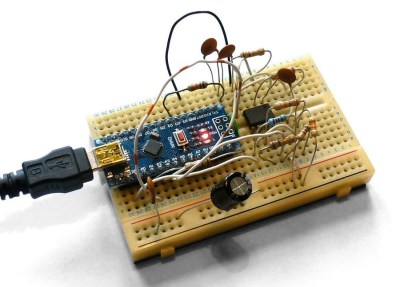
While there are a number of very cheap pocket digital storage oscilloscopes (DSOs) on the market, [Peter Balch] decided he’d rather spin up his own version using off-the-shelf components. Not only was it an excuse to deep dive on some interesting engineering challenges, but it ended up bringing the price even lower than turn-key models. Consisting of little more than an Arduino Nano and a OLED display, the cost comes out to less than $10 USD for a decent DSO that’s about the size of a matchbox.

But not a great one. [Peter] is very upfront about the limitations of this DIY pocket scope: it can’t hit very high sample rates, and the display isn’t really big enough to convey anything more than the basics. But if you’re doing some quick and dirty diagnostics in the field, that might be all you need. Especially since there’s a good chance you can build the thing out of parts from the junk bin.

Even if you’re not looking to build your own version of the Arduino-powered scope [Peter] describes, his write-up is still full of fascinating details and theory. He explains how his software approach is to disable all interrupts, and put the microcontroller into a tight polling loop to read data from the ADC as quickly as possible. It took some experimentation to find the proper prescaler value for the Atmega’s 16MHz clock, but in the end found he could get a usable (if somewhat noisy) output with a 1uS sample rate.

Unfortunately, the Arduino’s ADC leaves something to be desired in terms of input range. But with the addition of an LM358 dual op-amp, the Arduino scope gains some amplification so it can pick up signals down into the mV range. For completion’s sake, [Peter] included some useful features in the device’s firmware, such as a frequency counter, square wave signal source, and even a voltmeter. With the addition of a 3D printed case, this little gadget could be very handy to have in your mobile tool kit.

If you’d rather go the commercial route, Hackaday’s very own [Jenny List] has been reviewing a number of very affordable models such as the DSO Nano 3 and the JYE Tech DSO150 build-it-yourself kit.

[Thanks to BaldPower for the tip.]

The Diaphragm Is The Coil In These Flexible PCB Speakers

Speakers used to be largish electromechanical affairs, with magnets, moving coils, and paper cones all working together to move air around in a pleasing way. They’ve gotten much smaller, of course, small enough to screw directly into your ears or live inside the slimmest of smartphones and still delivery reasonable sound quality. The basic mechanism hasn’t changed much, but that doesn’t mean there aren’t other ways to make transduce electrical signals into acoustic waves.

Take these speakers made from flexible printed circuit boards, for instance. While working on his flexible PCB soft actuators, [Carl Bugeja] noticed that the PWM signals coursing through the coils on the thin PCB material while they were positioned over a magnet made an audible beeping. He decided to capitalize on that and try to make a decent speaker from the PCBs. An early prototype hooked to a simple amplifier showed promise, so he 3D-printed a ring to support the PCB like a diaphragm over a small neodymium magnet. The sound quality was decent, but the volume was low, so [Carl] experimented with a paper cone attached to the PCB to crank it up a bit. That didn’t help much, but common objects acting as resonators seemed to work fairly well. Check out the results in the video below.

This is very much a work in progress, but given [Carl]’s record with PCB creations from robotic fish to stepper motors built right into the PCB, we’d say he’ll make substantial improvements. Follow his and others’ progress in the Musical Instruments Challenge part of the 2018 Hackaday Prize.

Continue reading “The Diaphragm Is The Coil In These Flexible PCB Speakers”