Circuit VR: Starting An Amplifier Design

Sometimes I wish FETs had become practical before bipolar transistors. A FET is a lot more like a tube and amplifies voltages. Bipolar transistors amplify current and that makes them a bit harder to use. Recently, [Jenny List] did a series on transistor amplifiers including the topic of this Circuit VR, the common emitter amplifier. [Jenny] talked about biasing. I’ll start with biasing too, but in the next installment, I want to talk about how to use capacitors in this design and how to blend two amplifiers together and why you’d want to do that.

But before you can dive into capacitors and cascades, we need a good feel for how to get the transistor biased to start with. As always, there’s good news and bad news. The bad news it that transistors vary quite a bit from device to device. The good news is that we’ll use some design tricks to keep that from being a problem and that will also give us a pretty wide tolerance on component values. The resulting amplifier won’t necessarily be precise, but it will be fine for most uses. As usual, you can find all the design files on GitHub, and we’ll be using the LT Spice simulator.

Continue reading “Circuit VR: Starting An Amplifier Design”

OTTO: A Pi Based Open Source Music Production Box

Want an open source portable synth workstation that won’t break the bank? Check out OTTO. [Topisani] started OTTO as a clone of the well-known Teenage Engineering OP-1. However, soon [Topisani] decided to branch away from simply cloning the OP-1 — instead, they’re taking a lot of inspiration from it in terms of form factor, but the UI will eventually be quite different.

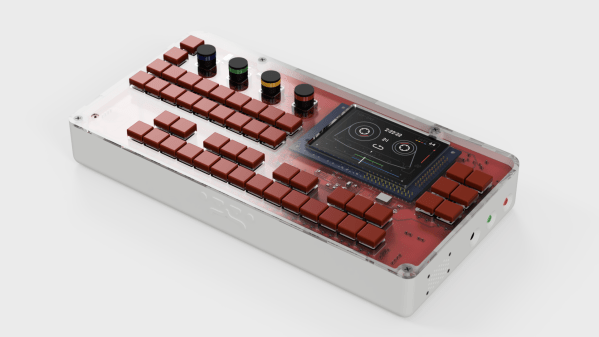
On the hardware side, the heart of the OTTO is a Raspberry Pi 3. The all-important audio interface is a Fe-Pi Audio Z V2, though a USB interface can be used. The 48 switches and four rotary encoders are wrangled by a pair of Arduino pro micros which pass the data on to the Pi. Data is related to the user through a 320×200 LCD.

The software is being written from scratch in C++17. If you’re not a hardcore C++ developer, don’t worry. The synth engines, audio effects, and other DSP software is written in Faust, which is a bit easier to learn.

OTTO is actively being developed, with synth engines already running, a prototype in progress, and fleshed out guidelines for programming the UI. If you’re into creating music, this one is worth checking out, as is Zynthian, another Raspberry Pi based synth.

Rediffusion Television: Early Cable TV Delivered Like Telephone

Recently I spent an enjoyable weekend in Canterbury, staying in my friend’s flat with a superb view across the rooftops to the city’s mediaeval cathedral. Bleary-eyed and in search of a coffee on the Sunday morning, my attention was immediately drawn to one of her abode’s original built-in features. There on the wall in the corner of the room was a mysterious switch.

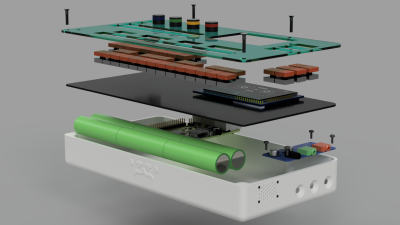
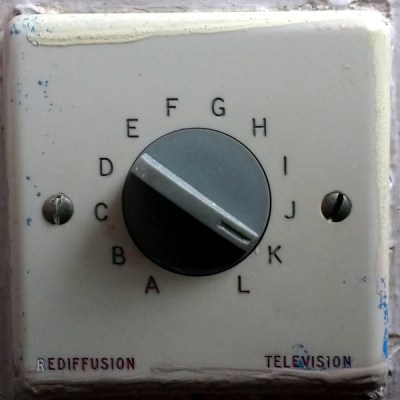
Housed on a standard-sized British electrical fascia was a 12-position rotary switch, marked with letters A through L. An unexpected thing to see in the 21st century and one probably unfamiliar to most people under about 40, I’d found something I’d not seen since my university days in the early 1990s: a Rediffusion selector switch.

If you have cable TV, there is probably a co-axial cable coming into your home. It is likely to carry a VHF signal, either a series of traditional analogue channels or a set of digital multiplexes. “Cable ready” analogue TVs had wideband VHF tuners to allow the channels to be viewed, and on encrypted systems there would have been a set-top box with its own analogue tuner and decoder circuitry.

Your digital cable TV set-top box will do a similar thing, giving you the channels you have subscribed to as it decodes the multiplex. At the dawn of television transmission though, none of this would have been possible. Co-axial cable was expensive and not particularly high quality, and transistorised wideband VHF tuners were still a very long way away. Engineers designing the earliest cable TV systems were left with the technology of the day derived from that of the telephone networks, and in Britain at least that manifested itself in the Rediffusion system whose relics I’d found.

Continue reading “Rediffusion Television: Early Cable TV Delivered Like Telephone”

3D Printers Get A Fuel Gauge: Adding A Filament Scale To OctoPrint

It seems a simple enough concept: as a 3D printer consumes filament, the spool becomes lighter. If you weighed an empty spool, and subtracted that from the weight of the in-use spool, you’d know how much filament you had left. Despite being an easy way to get a “fuel gauge” on a desktop 3D printer, it isn’t something we often see on DIY machines, much less consumer hardware. But with this slick hack from [Victor Noordhoek] as inspiration, it might become a bit more common.

He’s designed a simple filament holder which mounts on top of an HX711 load cell, which is in turn connected to the Raspberry Pi running OctoPrint over SPI. If you’re running OctoPrint on something like an old PC, you’ll need to use an intermediate device such as an Arduino to get it connected; though honestly you should probably just be using a Pi.

On the software side, [Victor] has written an OctoPrint plugin that adds a readout of current filament weight to the main display. He’s put a fair amount of polish into the plugin, going through the effort to add in a calibration routine and a field where you can enter in the weight of your empty spool so it can be automatically deducted from the HX711’s reading.

Hopefully a future version of the plugin will allow the user to enter in the density of their particular filament so it can calculate an estimate of the remaining length. The next logical step would be adding a check that will show the user a warning if they try to start a print that requires more filament than the sensor detects is currently loaded.

This is yet another excellent example of the incredible flexibility and customization offered by OctoPrint. If you’re looking for more reasons to make the switch, check out our guide on using OctoPrint to create impressive time lapse videos of your prints, or how you can control the printer from your mobile device.

A Display Made From Shoelaces

In our time here at Hackaday, we have seen many display builds, but this one from [Brian Lough] has to be a first. He’s created a 7-segment display made from shoelaces, and it works rather well.

Before you imagine the fabric cords you’re used to with your trainers, it’s worth explaining that these aren’t shoelaces in the traditional sense, but transparent light pipe taken from commercially available light-up shoelaces. He’s created a 3D-printed frame with receptacles for each end of the light pipe sections he’s used as segments, and spaces for addressable LEDs on the rear. He makes no bones about his soldering job being less than perfect, but the result when hooked up to an Arduino is very impressive. A large 7-segment LED display that’s visible in the glare of his bench lighting and not just in subdued illumination. Future plans include replacing the messy wiring with stripboard sections for a better result.

This isn’t the first 7-segment display using a light pipe that we’ve seen here at Hackaday, a previous effort used a more novel substance. But perhaps this Nixie-inspired take on the same idea also deserves a mention.

Continue reading “A Display Made From Shoelaces”

Op Amps Before Transistors: A 600V Vacuum Tube Monster

Op amps. Often the first thing that many learn about when beginning the journey into analog electronics, they’re used in countless ways in an overwhelmingly large array of circuits. When we think about op amps, images of DIPs and SOICs spring to mind, with an incredibly tiny price tag to boot. We take their abundance and convenience for granted nowadays, but they weren’t always so easy to come by.

[Mr Carlson] serves up another vintage offering, this time in the form of a tube op amp. The K2-W model he acquired enjoyed popularity when it was released as one of the first modular general purpose amplifiers, due to its ‘compact form’ and ‘low price’. It also came with large application manuals which helped it to gain users.

In order to power up the op amp and check its functionality, +300V and -300V supplies are needed. [Mr Carlson] is able to cobble something together, since it’s very apparent that he has an enviable stash of gear lying around. A 600V rail to rail supply is not something to be taken lightly, though it does give this particular model the ability to output 100V pk-pk without any distortion.

The op amp is set up as an inverting amplifier, and once powered on proves to work flawlessly. As always, the video is an entertaining watch, stuffed full of retro electronics trivia. We’re big fans of [Mr Carlson]’s work, and have previously written about his adventures with a colossal walk-in AM radio transmitter, as well as his restoration of a 1930s oscilloscope and subsequent transformer de-potting.

Continue reading “Op Amps Before Transistors: A 600V Vacuum Tube Monster”

High Tech Drone Scarecrows Can Make Airports Safer

If you pay attention to airplane news — or you watched the film Sully — you know planes have problems with birds. Sully was about US Airways flight 1549 which struck a flock of geese and ditched in the Hudson river.  Engineers at Caltech say that was the inspiration for them to develop a control algorithm that enables a single drone scarecrow to herd flocks of birds away from airports.

Airports have tried a lot of things to discourage birds ranging from trained falcons to manually-piloted drones. Apparently, herding birds is harder than you would think. If you fly the drone too far from a flock, it will ignore the threat. If you get too close, the flock will scatter making it both threaten a larger area and harder to control.

Continue reading “High Tech Drone Scarecrows Can Make Airports Safer”