Student-Built Rocket Engine Packs A Punch

A group of students at Boston University recently made a successful test of a powerful rocket engine intended for 100km suborbital flights. Known as the Iron Lotus (although made out of mild steel rather than iron), this test allowed them to perfect the timing and perfect their engine design (also posted to Reddit) which they hope will eventually make them the first collegiate group to send a rocket to space.

Unlike solid rocket fuel designs, this engine is powered by liquid fuel which comes with a ton of challenges to overcome. It is a pressure-fed engine design which involves a pressurized unreactive gas forcing the propellants, in this case isopropanol and N2O, into the combustion chamber. The team used this design to produce 2,553 lb*ft of thrust during this test, which seems to be enough to make this a class P rocket motor. For scale, the highest class in use by amateurs is class S. Their test used mild steel rather than stainless to keep the costs down, but they plan to use a more durable material in the final product.

The Boston University Rocket Propulsion Group is an interesting student organization to keep an eye on. By any stretch of the imagination they are well on their way to getting their rocket design to fly into space. Be sure to check out their other projects as well, and if you’re into amateur rocketry in general there are a lot of interesting things you can do even with class A motors.

Continue reading “Student-Built Rocket Engine Packs A Punch”

Retro Hardware Plots Again Thanks To Grbl And ESP32

When it comes to building a new CNC machine, you’ve got a wide world of controller boards to choose from. Whether you’re building a 3D-printer or a CNC plasma cutter, chances are good you’ll find a controller that fits your needs and your budget. Not so much, though, when you want to add CNC to a pen plotter from the early days of the PC revolution.

[Barton Dring] just posted the last installment of a five-part series in which he documented putting an Atari 1020 plotter under CNC control. The plotter was a peripheral for the Atari line of 6502 machines from the late 1970s; the guts of the little roll-fed, ballpoint-pen plotter appeared in Commodore, Tandy, and TI versions as well. [Bart]’s goal was to not add or modify anything to the mechanically simple device apart from the controller. That was easier said than done, given the unipolar stepper motors controlling the pen position and paper roll, and the fact that the pen lift mechanism uses a solenoid. Support for those had to be added to his Grbl_ESP32 firmware, as did dealing with the lack of homing switches in the plotter, and adapting the Grbl tool change command to the pen color change mechanism, which rotates the pen holder by bumping it into the right-hand carriage stop. The stock controller was replaced by a custom PCB that fits perfectly within the case, with plenty of room to spare. The video below shows it plotting out a vexillogically relevant sample.

From custom coasters to wooden nickels to complex string art, [Bart] has really put Grbl through the wringer. We really like this retro-redo, though, and fully support his stated desire to convert more old hardware to Grbl_ESP32.

Continue reading “Retro Hardware Plots Again Thanks To Grbl And ESP32”

LED Skirt Is Stealth By Day, Party By Night

Versatility is always a boon in any outfit. [Mikaela Holmes] wanted to create a skirt that could be unassuming by day, but be the life of the party when the lights go down. Her Day-To-Night Light Skirt achieves just that!

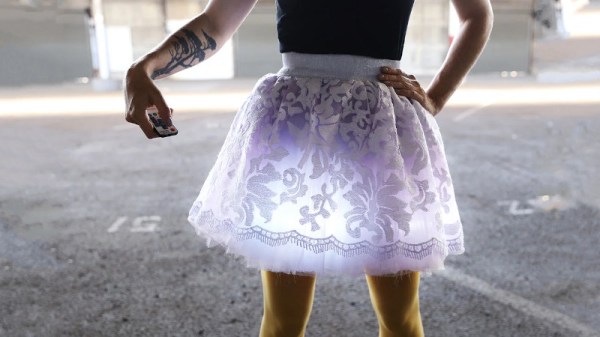
The build is one that should be achievable by anyone with basic dressmaking skills. White and lavender tutus are combined to form the base of the skirt, with a lace outer layer sewn on to create an attractive silhouette for the lights. A USB battery pack is hidden in a pocket in the back to power the show. A WS2812B LED strip is then attached to the skirt, and hidden behind an additional layer of white faux-fur to help diffuse the light.

A pre-programmed LED controller from Cool Neon is used to run the strip, meaning no microcontroller code is required. It also allows the skirt’s lighting effects to be controlled by remote. Such controllers can make getting a glowable project up and running more quickly, particularly for those with less experience in the microcontroller space. Plus, the project can always be upgraded with a fancier controller later. For the most part, the vast majority of glowable projects use similar flashing and fading animations anyway; there’s really no need to reinvent the wheel every time.

[Mikaela] does a great job of showing the necessary steps to produce a skirt that is both attractive and functional. We’ve seen other great projects in this space before, too – like this awesome fibre optic piece. If you’re sewing up your own impressive glowable fashions, be sure to let us know! Video after the break.

Continue reading “LED Skirt Is Stealth By Day, Party By Night”

Top Off A Dry Electrolytic

Making a capacitor is pretty easy. Just get two conductors close together. The bigger area you can get and the closer you can get them, the bigger the capacitor you can make. [BigClive] found some fake capacitors that were supposed to be very high value, but weren’t. Taking them apart revealed the capacitors didn’t have the electrolyte inside that gives these units both their name and their high values. What did he do? Mixed up some electrolyte and filled them back up to see what would happen. You can see the video below.

Electrolytic capacitors have a secret weapon to get the two electrodes as close as possible to each other. The electrolyte forms a very thin insulating layer on one electrode and the capacitance is between the conductive fluid and that electrode — not between the two electrodes. This allows for a very narrow gap between the conductors and explains why a small electrolytic can have a much greater capacitance than most other technologies in similar form factors.

Continue reading “Top Off A Dry Electrolytic”

A Double-Hybrid Mini-Lathe, From Scratch

It’s a treadle lathe! No, it’s a power lathe! It’s a wood lathe! No, it’s a metal lathe! Actually, [Uri Tuchman]’s homebrew lathe is all of the above, and it looks pretty snazzy too.

To say that [Uri]’s creations are quirky is a bit of an understatement – birds, crustaceans, hands, and feet all appear repeatedly as motifs in his work – but there’s no overstating his commitment to craftsmanship. [Uri] turns wood and metal into wonderful tools, nonsense machines, and finely detailed instruments, like this exquisitely engraved astrolabe we featured a while back.

[Uri] mostly works with hand tools, supplemented by an old Singer treadle-powered sewing machine that he turned into a scroll saw. The video below shows how he added a small scratch-built lathe to the treadle base. His first pass at a headstock, using pillow blocks for bearings, didn’t work as well as he wanted, so he built a new headstock around off-the-shelf lathe parts. The aluminum extrusion bed holds the headstock, tailstock, and a custom-built tool rest of heavy brass, all of which look great alongside the rich wood accent pieces and base. And for those times when his feet are tired, he added a surplus electric motor to turn the spindle. We especially like the two settings on the motor speed control: “0” and “>0”. Classic [Uri].

If you haven’t heard of [Uri] before, do yourself a favor and go check out his YouTube channel right now. Or start with our other coverage of his unique projects, from building an intricately detailed hammer to his lobster claw ink-dipping machine and even this unusual take on preserved lemons.

Continue reading “A Double-Hybrid Mini-Lathe, From Scratch”

Build This Handy Leak Detector For $1.02

You’ve probably noticed that modern life has become rather complicated, and the projects we cover here on Hackaday have not been immune to the march of progress. We certainly aren’t complaining, but we’ll admit to the occasional wistful daydream of returning to the days when the front page of Hackaday looked more MacGyver than Microsoft.

Which is precisely why this hacked together water alarm from [dB] is so appealing. Dubbed the “SqueakyLeaks”, this gadget started its life as a simple wireless intruder alarm from the Dollar Tree. When the magnet got far enough from the battery-powered base, a 90 dB warble would kick in and let you know somebody had opened a window or a door they shouldn’t have.

But with a little rewiring and two Canadian pennies serving as contacts, the alarm has been converted to a water detector that can be placed around potential leaky appliances like the water heater or in areas where you want to be alerted to water accumulation such as sumps. They’re basically “set and forget”, as [dB] says the three LR44 batteries used in the alarms should last about two years. Though with a BOM of $1.02 CAD, it’s probably cheaper to just make multiples and throw them out when the batteries die. Continue reading “Build This Handy Leak Detector For $1.02”

Daisy Chained Seven Segment Art Display


This seven segment art display makes use of a 81 seven segment red common cathode LED displays. The LEDs are arranged onto 100x100mm boards that each contain an Arduino Nano and 9 seven segment displays, daisy chained through three-pin headers located on the sides of the boards. The pins (power, ground, and serial) provide the signals necessary for propagating a program across each of the connected boards.

The first board – with two Arduino Nanos – sends instructions for which digits to light and drives the display, sending the instructions over to the next board on the chain.

In a multiplexed arrangement, a single Arduino Nano is able to drive up to 12 seven segment displays, but only 9 needed to be driven for the program, keeping D13’s built in LED and the serial pins free. Since no resistors are featured on the boards, current limiting is done through software. This was inspired by the Bubble LED displays on the Sinclair Scientific Calculator, and was done in order to achieve a greater brightness by controlling the current through the duty cycle.

The time between digits lighting up is 2ms, giving them some time to cool down. The animations in the demos featured falling and incrementing digits, as well as a random number generator using a linear feedback shift register.

Continue reading “Daisy Chained Seven Segment Art Display”