Circuit Art Brings Out The Lifelike Qualities Of Electricity

Functional circuit sculptures have been gaining popularity with adventuring electronic artists who dare attempt the finicky art form of balancing structure and wire routing. [Kelly Heaton’s] sculptures however are on a whole other creative level.

Not only does she use the circuits powering her works as part of their physical component, there are no controllers or firmware to be seen anywhere; everything is discrete and analog. In her own words, she tries to balance the “logical planning” of the engineering side with the “unfettered expression” of artworks. The way she does this is by giving her circuits a lifelike quality, with disorganized circuit structures and trills and chirps that mimic those of wildlife.

One of her works, “Birds at My Feeder”, builds up on another previous work, the analog “pretty bird”. On their own, each one of the birds uses a photoresistor to affect its analog-generated chirps, providing both realistic and synthetic qualities to their calls. What the full work expands on is a sizable breadboard-mounted sequencer using only discrete components, controlling how each of the connected birds sing in a pleasing chorus. Additionally, the messy nature of the wires gives off the impression of the sequencer doubling as the birds’ nest.

There are other works as well in this project, such as the “Moth Electrolier”, in which she takes great care to keep structural integrity in mind in the design of the flexible board used there. Suffice to say, her work is nothing short of brilliant engineering and artistic prowess, and you can check one more example of it after the break. However, if you’re looking for something more methodical and clean, you can check out the entries on the circuit sculpture contest we ran last year.

Continue reading “Circuit Art Brings Out The Lifelike Qualities Of Electricity”

Build A Fungus Foraging App With Machine Learning

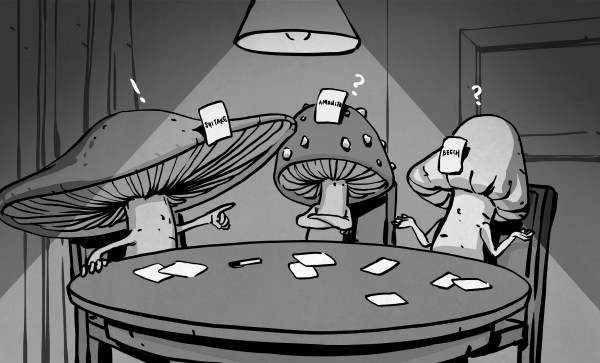
As the 2019 mushroom foraging season approaches it’s timely to combine my thirst for knowledge about low level machine learning (ML) with a popular pastime that we enjoy here where I live. Just for the record, I’m not an expert on ML, and I’m simply inviting readers to follow me back down some rabbit holes that I recently explored.

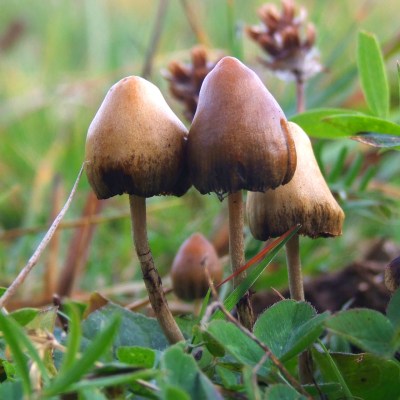
But mushrooms, I do know a little bit about, so firstly, a bit about health and safety:

  • The app created should be used with extreme caution and results always confirmed by a fungus expert.
  • Always test the fungus by initially only eating a very small piece and waiting for several hours to check there is no ill effect.
  • Always wear gloves  – It’s surprisingly easy to absorb toxins through fingers.

Since this is very much an introduction to ML, there won’t be too much terminology and the emphasis will be on having fun rather than going on a deep dive. The system that I stumbled upon is called XGBoost (XGB). One of the XGB demos is for binary classification, and the data was drawn from The Audubon Society Field Guide to North American Mushrooms. Binary means that the app spits out a probability of ‘yes’ or ‘no’ and in this case it tends to give about 95% probability that a common edible mushroom (Agaricus campestris) is actually edible. 

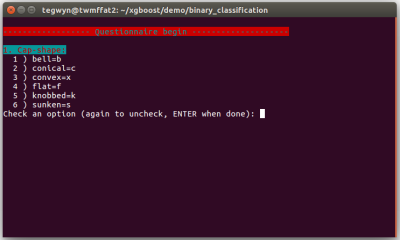
The app asks the user 22 questions about their specimen and collates the data inputted as a series of letters separated by commas. At the end of the questionnaire, this data line is written to a file called ‘fungusFile.data’ for further processing.

XGB can not accept letters as data so they have to be mapped into ‘classic LibSVM format’ which looks like this: ‘3:218’, for each letter. Next, this XGB friendly data is split into two parts for training a model and then subsequently testing that model.

Installing XGB is relatively easy compared to higher level deep learning systems and runs well on both Linux Ubuntu 16.04 and on a Raspberry Pi. I wrote the deployment app in bash so there should not be any additional software to install. Before getting any deeper into the ML side of things, I highly advise installing XGB, running the app, and having a bit of a play with it.

Training and testing is carried out by running bash runexp.sh in the terminal and it takes less than one second to process the 8124 lines of fungal data. At the end, bash spits out a set of statistics to represent the accuracy of the training and also attempts to ‘draw’ the decision tree that XGB has devised. If we have a quick look in directory ~/xgboost/demo/binary_classification, there should now be a 0002.model file in it ready for deployment with the questionnaire.

I was interested to explore the decision tree a bit further and look at the way XGB weighted different characteristics of the fungi. I eventually got some rough visualisations working on a Python based Jupyter Notebook script:


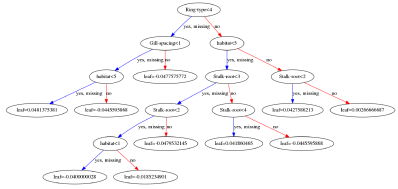
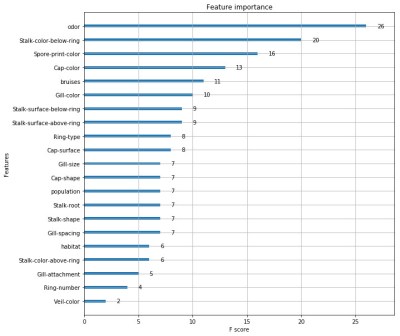
Obviously this app is not going to win any Kaggle competitions since the various parameters within the software need to be carefully tuned with the help of all the different software tools available. A good place to start is to tweak the maximum depth of the tree and the number or trees used. Depth = 4 and number = 4 seems to work well for this data. Other parameters include the feature importance type, for example: gain, weight, cover, total_gain or total_cover. These can be tuned using tools such as SHAP.

Finally, this app could easily be adapted to other questionnaire based systems such as diagnosing a particular disease, or deciding whether to buy a particular stock or share in the market place.

An even more basic introduction to ML goes into the baseline theory in a bit more detail – well worth a quick look.

Looking Around Corners With F-K Migration

The concept behind non-line-of-sight (NLOS) imaging seems fairly easy to grasp: a laser bounces photons off a surface that illuminate objects that are within in sight of that surface, but not of the imaging equipment. The photons that are then reflected or refracted by the hidden object make their way back to the laser’s location, where they are captured and processed to form an image. Essentially this allows one to use any surface as a mirror to look around corners.

Main disadvantage with this method has been the low resolution and high susceptibility to noise. This led a team at Stanford University to experiment with ways to improve this. As detailed in an interview by Tech Briefs with graduate student [David Lindell], a major improvement came from an ultra-fast shutter solution that blocks out most of the photons that return from the wall that is being illuminated, preventing the photons reflected by the object from getting drowned out by this noise.

The key to getting the imaging quality desired, including with glossy and otherwise hard to image objects, was this f-k migration algorithm. As explained in the video that is embedded after the break, they took a look at what methods are used in the field of seismology, where vibrations are used to image what is inside the Earth’s crust, as well as synthetic aperture radar and similar. The resulting algorithm uses a sequence of Fourier transformation, spectrum resampling and interpolation, and the inverse Fourier transform to process the received data into a usable image.

This is not a new topic; we covered a simple implementation of this all the way back in 2011, as well as a project by UK researchers in 2015. This new research shows obvious improvements, making this kind of technology ever more viable for practical applications.

Continue reading “Looking Around Corners With F-K Migration”

Rocket Lab Sets Their Sights On Rapid Reusability

Not so very long ago, orbital rockets simply didn’t get reused. After their propellants were expended on the journey to orbit, they petered out and fell back down into the ocean where they were obliterated on impact. Rockets were disposable because, as far as anyone could tell, building another one was cheaper and easier than trying to reuse them. The Space Shuttle had proved that reuse of a spacecraft and its booster was possible, but the promised benefits of reduced cost and higher launch cadence never materialized. If anything, the Space Shuttle was often considered proof that reusability made more sense on paper than it did in the real-world.

Rocket Lab CEO Peter Beck with Electron rocket

But that was before SpaceX started routinely landing and reflying the first stage of their Falcon 9 booster. Nobody outside the company really knows how much money is being saved by reuse, but there’s no denying the turn-around time from landing to reflight is getting progressively shorter. Moreover, by performing up to three flights on the same booster, SpaceX is demonstrating a launch cadence that is simply unmatched in the industry.

So it should come as no surprise to find that other launch providers are feeling the pressure to develop their own reusability programs. The latest to announce their intent to recover and eventually refly their vehicle is Rocket Lab, despite CEO Peter Beck’s admission that he was originally against the idea. He’s certainly changed his tune. With data collected over the last several flights the company now believes they have a reusability plan that’s compatible with the unique limitations of their diminutive Electron launch vehicle.

According to Beck, the goal isn’t necessarily to save money. During his presentation at the Small Satellite Conference in Utah, he explained that what they’re really going after is an increase in flight frequency. Right now they can build and fly an Electron every month, and while they eventually hope to produce a rocket a week, even a single reuse per core would have a huge impact on their annual launch capability:

If we can get these systems up on orbit quickly and reliably and frequently, we can innovate a lot more and create a lot more opportunities. So launch frequency is really the main driver for why Electron is going reusable. In time, hopefully we can obviously reduce prices as well. But the fundamental reason we’re doing this is launch frequency. Even if I can get the stage back once, I’ve effectively doubled my production ratio.

But, there’s a catch. Electron is too small to support the addition of landing legs and doesn’t have the excess propellants to use its engines during descent. Put simply, the tiny rocket is incapable of landing itself. So Rocket Lab believes the only way to recover the Electron is by snatching it out of the air before it gets to the ground.

Continue reading “Rocket Lab Sets Their Sights On Rapid Reusability”

Returning Digital Watches To The Analog Age: Enter The Charliewatch

The Charliewatch by [Trammell Hudson] is one of those projects which is beautiful in both design and simplicity. After seeing [Travis Goodspeed]’s GoodWatch21 digital watch project based around a Texas Instruments MSP430-based SoC, [Trammell] decided that it’d be neat if it was more analog. This is accomplished using the CC430F5137IRGZR (a simpler member of the MSP430 family) and a whole bunch of 0603 SMD LEDs which are driven using Charlieplexing.

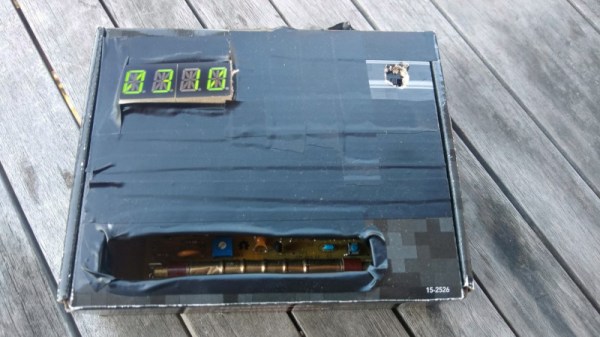
This time-honored method of using very few I/O pins to control many LEDs makes it possible to control 72 LEDs without dedicating 72 pins. The density makes animations look stunning and the digital nature melts away leaving a distinct analog charm.

A traditional sapphire crystal was sourced from a watchmaker for around 14€ as was the watch band itself. The rest is original work, with multiple iterations of the 3D printed case settling in on a perfect fit of the crystal, PCB, and CR2032 coin cell stackup. The watch band itself hold the components securely in the housing, and timekeeping is handled by a 32.768 kHz clock crystal and the microcontroller’s RTC peripheral.

The LEDs can be seen in both daylight and darkness. The nature of Charlieplexing means that only a few of the LEDs are ever illuminated at the same time, which does wonders for battery life. [Trammell] tells us that it can run for around six months before the coin cell needs replacing.

It’s completely open source, with project files available on the project’s Github page. We hope to see an army of these watches making appearances at all upcoming electronics-oriented events. Just make sure you lay off the caffeine as the process of hand-placing all those LEDs looks daunting.

Electric Dump Truck Produces More Energy Than It Uses

Electric vehicles are everywhere now. It’s more than just Leafs, Teslas, and a wide variety of electric bikes. It’s also trains, busses, and in this case, gigantic dump trucks. This truck in particular is being put to work at a mine in Switzerland, and as a consequence of having an electric drivetrain is actually able to produce more power than it consumes. (Google Translate from Portugese)

This isn’t some impossible perpetual motion machine, either. The dump truck drives up a mountain with no load, and carries double the weight back down the mountain after getting loaded up with lime and marl to deliver to a cement plant. Since electric vehicles can recover energy through regenerative braking, rather than wasting that energy as heat in a traditional braking system, the extra weight on the way down actually delivers more energy to the batteries than the truck used on the way up the mountain.

The article claims that this is the largest electric vehicle in the world at 110 tons, and although we were not able to find anything larger except the occasional electric train, this is still an impressive feat of engineering that shows that electric vehicles have a lot more utility than novelties or simple passenger vehicles.

Thanks to [Frisco] for the tip!

A Cheap And Cheerful Geiger Counter Build

Hackers often have broad interests across the sciences, of which nuclear topics are no exception. The Geiger counter remains a popular build, and could be a handy tool to have in a time of rising tensions between nuclear powers. [Leonora Tindall] had tinkered with basic units, but wanted a better idea of actual radiation levels in her area. Thus began the build!

The project began by leveraging the Geiger counter kit from the Mighty Ohm. [Leonora] had built one of these successfully, but wished for a visual readout to supplement the foreboding ticking noises from the device. This was achieved by installing a Metro Mini microcontroller along with a 4-character, 14-segment alphanumeric display. This, along with the cardboard enclosure, makes the build look like a prop from an 80s hacker movie. Very fitting for the Cold War-era technology at work.

By using a pre-built kit and upgrading it with display hardware, [Leonora] now has readings at a glance without having to reinvent the wheel and design her own board from scratch. Of course, if you’re thinking of taking on a more complex build, you might consider a scintillation detector instead.