Booting The Game Boy Advance Into Bluetooth

While it might not be quite as revered as its predecessor, the Game Boy Advance is arguably the peak of “classic” handheld gaming, before things got all 3D and dual screen on us. One of its best features is the so-called multiboot mode, which allows the GBA to download a program from its link port. Officially this feature was introduced so you could play multiplayer with your friends even if they didn’t have the game cartridge, but naturally it didn’t take long for hackers to realize you can use it to run arbitrary code on an unmodified system.

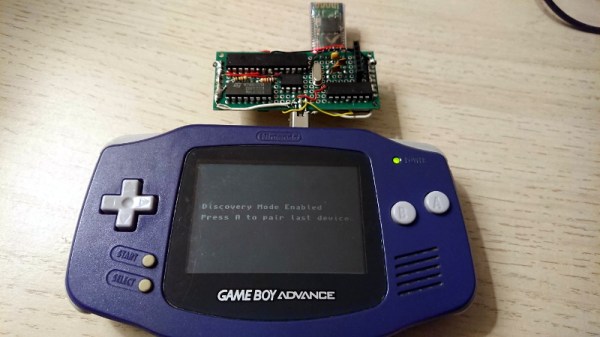
[Shyri Villar] has put this capability to excellent use with a plug-in board that allows a stock GBA to be used as a general purpose Bluetooth HID controller. Now you can emulate GBA games on your computer while using the real thing as your input device. Or if that’s a bit too redundant for you, then any 2D game you think could benefit from the classic Game Boy control layout.

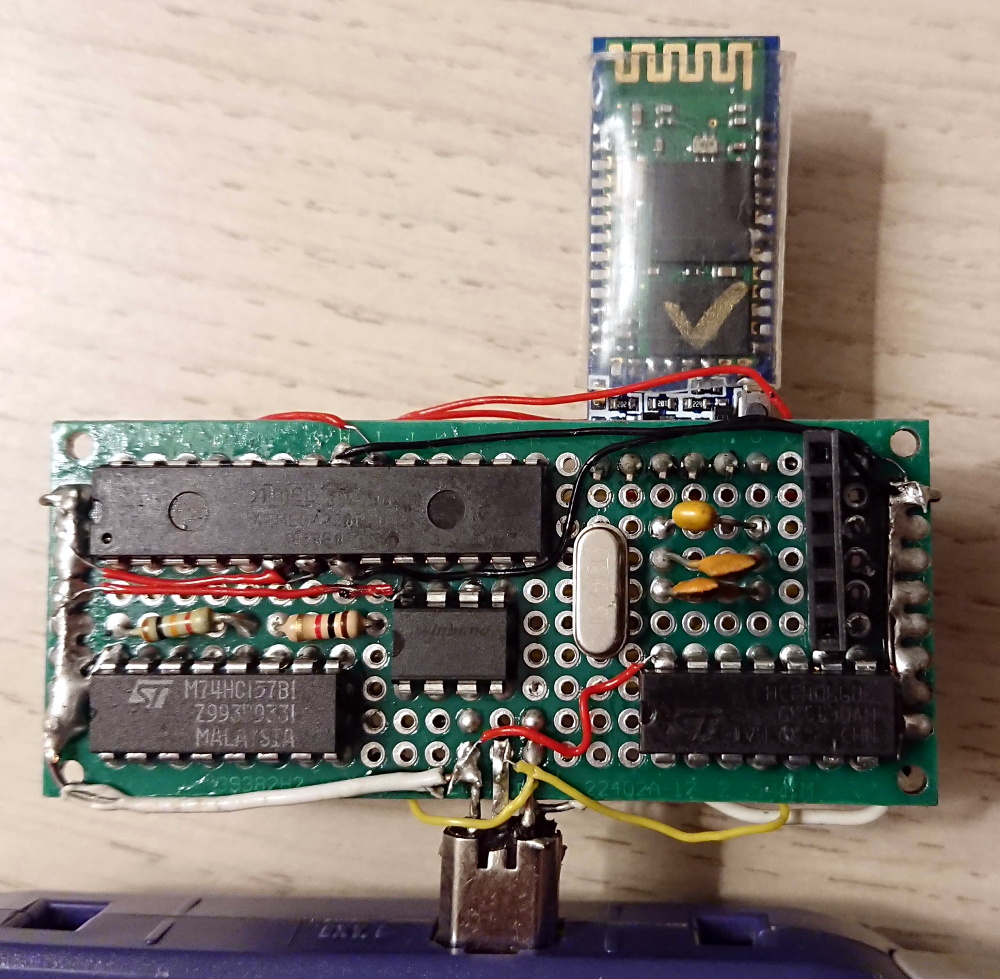
An ATmega328P on the board initiates the multiboot sequence when the system powers up, and feeds it the GBA program that’s stored on a W25Q32 chip. Once the code is running on the GBA, it communicates with a common HC-05 Bluetooth module through the same link port. To perform this handoff, [Shyri] uses a HCF4066 switch IC to literally change the pin assignments in the connector from the SPI used to upload the ROM to the UART lines of the Bluetooth module.

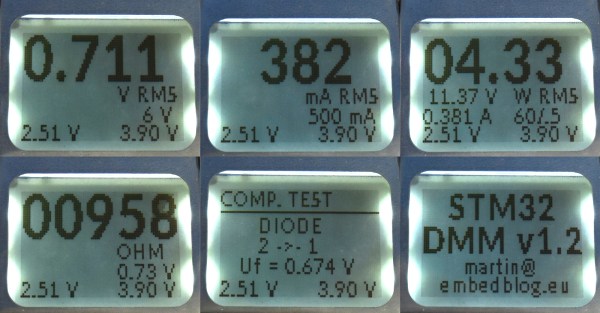
With everything powered from the 3.3 V provided by the GBA’s link port, and some software niceties like the ability to store Bluetooth pairing information for subsequent device connections, this is actually a very practical gadget. The fact that you can do this on a completely stock GBA is very compelling, especially considering some of the previous Bluetooth Game Boy modifications we’ve seen. Granted the market might be somewhat limited, but with a custom PCB and a 3D printed enclosure, we could see this potentially being a popular accessory for the classic handheld. It’s not like it can be any more niche than using the GBA as a remote display for your multimeter.

Grate Design On This Cutting Edge Raspberry Pi Case

Love ’em or hate ’em, you’ve got to hand it to Apple: they really know how to push people’s buttons with design. Their industrial designers can make a product so irresistible – and their marketing team can cannonball the hype train sufficiently – that people will stand in line for days to buy a new product, and shell out unfathomable amounts of money for the privilege.

But what if you’re a poor college student without the budget for such treasures of industrial design? Simple – you take matters into your own hands and stuff a Raspberry Pi into a cheese grater. That’s what a group of engineering students from the University of Aveiro in Portugal called [NeRD-AETTUA] did, in obvious homage to the world’s most expensive cheese grater. The video below for the aptly named RasPro is somewhat less slick that Apple’s promos for the Mac Pro, but it still gets the basics across. Like the painstakingly machined brushed aluminum housing on the Mac, the IKEA cheese grater on the RasPro is just a skin. It covers a 3D-printed chassis that houses a beefy power supply and fan to go along with the Raspberry Pi 3. There’s also a speaker for blasting the tunes, which seems to be the primary use for the RasPro.

All things considered, the cheese grater design isn’t really that bad a form factor for a Pi case. If that doesn’t appeal, though, take your pick: laser-cut plywood, an Altoids tin, or even inside your PC.

Continue reading “Grate Design On This Cutting Edge Raspberry Pi Case”

Pi Zero Streams Video From “Fake” Security Camera

Fake security cameras are advertised as a cheap way to deter anyone who might be up to no good. This isn’t a crime and punishment blog, so we’re not really in a position to say how accurate that claim actually is, but we see enough of these things for sale that somebody out there must believe they’re worth having. Though if it were us, we’d take this tip from [Daniel Andrade] and convert our “fake” camera into a real one with the Raspberry Pi and WebRTC.

There are an untold number of makes and models of these fake cameras out there, but it seems that many of them share a fairly common design in that the enclosure they use is actually pretty useful for putting your own hardware in. They’re hollow, relatively well protected from the elements, and as most of them use a blinking LED or some other feature to make them look more authentic, they already have a functional battery compartment.

As it turns out, the one that [Daniel] picked up for $9 USD is pretty much perfect for the Raspberry Pi Zero and its camera module. He even wired the blinking LED up to the Pi’s GPIO pins so it will still look the part, though replacing it with an RGB LED and appropriate scripts to drive it would be a nice way to get some visual feedback on what the system is doing.

The software side of things is done with Balena, a suite of tools for setting up and managing Linux Internet of Things devices. They provide everything from the SD card image that runs on the Pi itself to the cloud infrastructure that pulls all the data together. [Daniel] dove a little deeper into the software stack when he created his Bitcoin traffic light last year.

For any readers who may feel a sense of déjà vu looking at this project, you aren’t going crazy. We recently saw a similar project that used an ESP8266 and a PIR sensor to add motion sensing capabilities to one of these fake cameras. Now all we need is somebody to put an Arduino in one of them, and we’ll have the Holy Trinity represented.

The OS/2 Operating System Didn’t Die… It Went Underground

One problem with building things using state-of-the-art techniques is that sometimes those that look like they will be “the next big thing” turn out to be dead ends. Next thing you know, that hot new part or piece of software is hard to get or unmaintained. This is especially true if you are building something with a long life span. A case in point is the New York City subway system. Back in the 1990s the transit authority decided to adopt IBM’s new OS/2 operating system. Why not? It was robust and we used to always say “no one ever got fired for buying IBM.”

There was one problem. OS/2 was completely eclipsed by other operating systems, notably Windows and — mostly — has sunk from the public view. [Andrew Egan’s] post covers just how the conversion to a card-based system pushed OS/2 underground all over the Big Apple, and it is an interesting read.

Continue reading “The OS/2 Operating System Didn’t Die… It Went Underground”

Electric Wheelchair Makes A Great Base For A Big Robot

Wiring into the joystick is a quick and easy way to hack in custom control to a wheelchair.

Building robots can be fun, and remains a popular pastime among many in the hacker and maker set. However the hardware side of things can be daunting. This is particularly the case for those attempting to build something on a larger scale. A great shortcut is to start with a robust mechanical platform from the outset – and using an electric wheelchair is a great way to do so.

[Nikita] started this project way back in 2009, after finding a broken electric wheelchair at a flea market. It was no longer in fit condition for use as a wheelchair, so [Nikita] was able to score it for the low price of just $50. That’s a great price for a package which includes a robust chassis, wheels, motors and the required controllers to drive it all. With the platform in hand, it was time to get hacking.

Thus far, [Nikita] has gone so far as to strip the wheelchair of all extraneous parts, leaving it as a motorized carriage. Radio control has been implemented with the help of an Arduino, and a couple of “eyes” have been added to give it a little personality. It can also still be driven with the original joystick, which has been relocated on the chassis. Future plans involve adding a level of autonomy to allow the ‘bot to navigate waypoints and recognise faces, both tasks which should be significantly easier with 2019 technology. We’re eager to see where it goes next; we’ve seen great applications of wheelchair hardware before, after all. Video after the break.

Continue reading “Electric Wheelchair Makes A Great Base For A Big Robot”

The Feather “FAUXBERRY” Is Now A Real Thing

Last month we featured an interesting project from Hackaday.io that was essentially trying to recreate the iconic Blackberry form factor for use with Adafruit’s line of Feather development boards. This would let you drop in modules for everything from LTE to packet radio, opening up a nearly limitless possibilities for handheld hacking. The only problem was, it didn’t actually exist yet.

But recently creator [arturo182] wrote in to tell us that not only had all the parts arrived, but that he’d completed assembly of the first prototype. He even put together a video about the current status of the device, which you can see after the break. The short version is: it works, and it looks fantastic.

For those who might not have seen this project the first time around, the front features a 2.6 inch 320×240 touch screen display, four general purpose buttons, a RGB NeoPixel LED for visual status display, a five way joystick, and what’s arguably the star of the show, a QWERTY keyboard originally designed for the Blackberry Q10. Around the back it has an SD card slot, a socket for the Feather module of your choice, and some handy GPIO expansion pads you can attach your own hardware onto.

[arturo182] says he’s looking at a couple cosmetic changes, but on the whole, everything works and he considers the PCB essentially done. He’ll soon be sending out a handful of test units to individuals who’ve expressed interest in helping him develop the project and then…well, he’s not really sure what’s going to happen then. Some kind of commercial release seems like the logical conclusion given the interest he’s already seen in the project, but he hasn’t quite worked out whether that will be a kit or as assembled devices.

Until then, anyone who’s looking for a pocket sized device that will let them bang out some Python with a physical keyboard will have to stick with their TI-83s.

Continue reading “The Feather “FAUXBERRY” Is Now A Real Thing”

Finally, An Open Source Multimeter

For his Hackaday Prize entry, [Martin] is building an Open Source Multimeter that can measure voltage, current, and power. It’s an amazing build, and you too can build one yourself.

The features for this multimeter consist of voltage mode with a range of +/-6V and +/-60V. There’s a current mode, basically the same as voltage, with a range of +/-60 mA and +/-500mA. Unlike our bright yellow Fluke, there’s also a power mode that measures voltage and current at the same time, with all four combinations of ranges available. There’s a continuity test that sounds a buzzer when the resistance is below 50 Ω, and a component test mode that measures resistors, caps, and diodes. There’s a fully isolated USB interface capable of receiving commands and transmitting data, a real-time clock, and in the future there might be frequency measurement.

This build is based on the STM32F103 microcontroller, uses an old Nokia phone screen, and unlike so many other multimeters, this thing is small. It’s very small. More than small enough to fit in your pocket and forget about it, unlike nearly every other multimeter available. There’s one thing about multimeters, and it’s that the best multimeter is the one that you have in your hands when you need it, and this one certainly fits the bill.

The entire project is being written up on hackaday.io, there’s a GitHub repo for all the hardware and software, and there’s also a video demo covering all the features (available below). This is a stand-out project, and something we desperately want to get our hands on.

Continue reading “Finally, An Open Source Multimeter”