Digging In The Dirt Yields Homebrew Inductors

Let’s say you’re stranded on a desert island and want to get the news from the outside world. You’ll have to build your own crystal radio, of course, but your parts bin is nowhere to be found and Digi-Key isn’t delivering. So you’ll need to MacGuyver some components. Capacitors are easy with a couple of pieces of tinfoil, and a rectifier can be made from a pencil and a razor blade. But what about an inductor? Sure, air-core inductors will work, but just because you’re marooned doesn’t mean you’ve abandoned your engineering principles. Luckily, you’ve read [AC7ZL]’s treatise of making inductors from dirt, and with sand in abundance, you’re able to harvest enough material to put together some passable ferrite-core inductors.

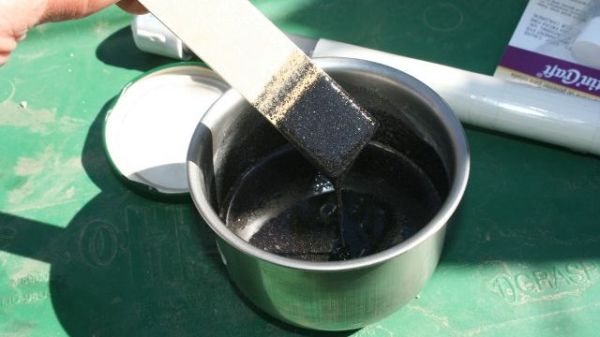
Obviously, making your own inductive elements isn’t practical even in fanciful and contrived situations, but that doesn’t make the doing of it any less cool. The story begins with a walk in the Arizona desert many years ago, where [AC7ZL], aka [H.P. Friedrichs], spied bands of dark sand shooting through the underlying lighter sediments. These bands turned out to be magnetite, one of many iron-bearing minerals found in the area. Using a powerful magnet from an old hard drive and a plastic food container, he was able to harvest magnetite sand in abundance and refine it with multiple washing steps.

After experimentally determining the material’s permeability — about 2.3 H/m — [AC7ZL] proceeded with some practical applications. He was able to make a bar antenna for an AM radio by packing the sand into a PVC pipe and rewinding the coils around it. More permanent cores were made by mixing the sand with polyester resin and casting it into bars. Toroids were machined from fat bars of the composite on a lathe, much to the detriment of the cutting tools used.

The full-length PDF account of [AC7ZL]’s experiments makes for fascinating reading — the inductive elements he was able to create all performed great in everything from a Joule Thief to a Hartley oscillator up to 27 MHz. We love these kinds of stories, which remind us of some of the work being done by [Simplifier] and others.

This LEGO Air Conditioner Is Cooler Than Yours

What’s the coolest thing a person can build with LEGO? Well it’s gotta be an air conditioner, right? Technically, [Manoj Nathwani] built a LEGO-fied swamp cooler, but it’s been too hot in London to argue the difference.

This thoroughly modular design uses an Arduino Uno and a relay module to drive four submersible pumps. The pumps are mounted on a LEGO base and sunk into a tub filled with water and ice packs. In the middle of the water lines are lengths of copper tubing that carry it past four 120mm PC case fans to spread the coolness. It works well, it’s quiet, and it was cheap to build. Doesn’t get much cooler than that.

[Manoj] had to do a bit of clever coupling to keep the tubing transitions from leaking. All it took was a bit of electrical tape to add girth to the copper tubes, and a zip tie used as a little hose clamp.

We think the LEGO part of this build looks great. [Manoj] says they did it by the seat of their pants, and lucked out because the copper and plastic tubing both route perfectly through the space of a 1x1x1 brick.

DIY cooling can take many forms. It really just depends what kind of building blocks you have at your disposal. We’ve even seen an A/C built from a water heater.

USB Bell Rings In Custom Terminal

Old TeleTypes and even typewriters had bells. Real bells. So that ASCII BEL character is supposed to make an honest to goodness ringing sound. While some modern terminals make a beep from the computer speakers, it isn’t the same. [Tenderlove] must agree, because the turned a Microchip USB to I2C bridge chip into a HID-controlled bell.

The only problem we see is that you have to have a patch to your terminal to ring the bell. We’d love to see some filter for TCP or serial that would catch BEL characters, but on the plus side, it is easy to ring the bell from any sort of application since it responds to normal HID commands.

Continue reading “USB Bell Rings In Custom Terminal”

Soldering Glass And Titanium With Ultrasonic Energy

Ultrasonic soldering is a little-known technology that allows soldering together a variety of metals and ceramics that would not normally be possible. It requires a special ultrasonic soldering iron and solder that is not cheap or easy to get hold of, so [Ben Krasnow] of [Applied Science] made his own.

Ultrasonic soldering irons heat up like standard irons, but also require an ultrasonic transducer to create bonds to certain surfaces. [Ben] built one by silver soldering a piece of stainless steel rod (as a heat break) between the element of a standard iron and a transducer from an ultrasonic cleaner. He made his special active solder by melting all the ingredients in his vacuum induction furnace. It is similar to lead-free solder, but also contains titanium and small amounts of cerium and gallium. In the video below [Ben] goes into the working details of the technology and does some practical experimentation with various materials.

Ultrasonic soldering is used mainly for electrically bonding metals where clamping is not possible or convenient. The results are also not as neat and clean as with standard solder. We covered another DIY ultrasonic soldering iron before, but it doesn’t look like that one ever did any soldering.

Ultrasonic energy has several interesting mechanical applications that we’ve covered in the past, including ultrasonic cutting and ultrasonic welding.

Continue reading “Soldering Glass And Titanium With Ultrasonic Energy”

Open Source VR Headset For $200

We’ve seen homemade VR headsets before, but, often they are dependent on special software or are not really up to par with commercial products. Not so with Relativity, an open source project from [Max Coutte] and [Gabriel Combe]. [Max] says it best:

Relativty is not a consumer product. We made Relativty in my bedroom with a soldering iron and a 3D printer and we expect you to do the same: build it yourself.

Unlike some homebrew gear, Relativity has full Steam VR support. It also has experimental support for positional scaling that tracks your body based on video input.

Continue reading “Open Source VR Headset For $200”

World Radio Lets Your Fingers Do The Walking

Listening to radio from distant countries used to take a shortwave rig, but thanks to the Internet we can now pull in streams from all over the globe from the comfort of our own desktop. With a few clicks you can switch between your local news station and the latest in pop trends from Casablanca. But as convenient as online streaming might be, some folks still yearn for the traditional radio experience.

For those people, the Raspberry Pi World Radio by [Abraham Martinez Gracia] might be the solution. Built into the body of a 1960s Invicta radio, this Internet radio uses a very unique interface. Rather than just picking from a list of channels, you use the knobs on the front to pan and zoom around a map of the world. Streaming channels are represented by bubbles located within their country of origin, so you’ll actually have to “travel” there to listen in. The video after the break gives a brief demonstration of how it works in practice.

We’ll admit it might become a bit tedious eventually, but from a visual standpoint, it’s absolutely fantastic. [Abraham] even gave the map an appropriately vintage look to better match the overall aesthetic. Normally we’d say using a Raspberry Pi 4 to drive a streaming radio player would be a bit overkill, but considering the GUI component used here, it’s probably the right choice.

Of course we’ve seen Internet radios built into vintage enclosures before, and we’ve even seen one that used a globe to select the station, but combining both of those concepts into one cohesive project is really quite an accomplishment.

Continue reading “World Radio Lets Your Fingers Do The Walking”

Learn About Historic Firearm Design With A 3D Printer

Over the last century, very little of the basic design of firearm cartridges has changed, but the mechanics of firearms themselves have undergone many upgrades. The evolution of triggers, safeties, magazines, and operating mechanisms is a fascinating field of study. Hands-on experience with these devices is rare for most people, but thanks to people like [zvc], you can 3D print accurate replicas of historical firearms and see how all the parts fit together for yourself.

[zvc] is slowly building up a library of 3D models, with nine available so far, from the Mauser C96 “Broomhandle” pistol to the modern M4 rifle. Except for springs and some fasteners, almost every single part of [zvc]’s models are 3D printed, down to the takedown pins and extractors. With the obvious exception of being able to fire a live round, it looks like all the components fit and work together like on the real firearms. None were ever designed with 3D printing in mind, so a well-tuned printer, lots of support structure, and post-processing are required to make everything work. The surface finish will be a bit rough, and some smaller and thin-walled components might be susceptible to breaking after the repeated operation or excessive force. The models are not free, but all prices are below €10.

These models do demonstrate one of the real superpowers of 3D printing: functional mock-ups and prototypes. The ability to do rapid iterative design updates and to have the latest design in hand within a few hours is invaluable in product development. [Giaco] used this extensively during the development of his kinetic driver. When you buy 3D printable models online, always make sure what possible pitfalls exist.