Battery Analyzer Puts Alkaline Cells To The Test

We know, we know. Generally speaking, you should try and switch your household devices over to rechargeable cells rather than using disposable alkaline batteries. But while they might seem increasingly quaint in the lithium-ion era, features such as a long shelf life make it worth keeping a pack of disposables around. So which ones should you buy? That’s what [Moragor] wanted to find out with his personal battery analyzer.

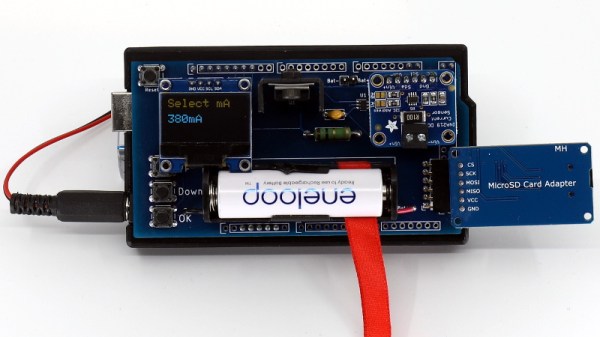
Designed as a shield for the Arduino Mega 2560, the analyzer combines a small programmable electronic load with a INA219 current sensor, OLED display, and SD card reader. The user selects the cutoff voltage and discharge rate before the test begins, and once it’s running, data is collected every second and saved to the SD card for later analysis. Once the battery voltage reaches the predetermined value, the test is over and you’re ready to put a new cell through its paces.

After testing 27 different brands of batteries, [Moragor] tabulated all the data and produced some helpful charts to illustrate the results. With few exceptions, the performance level for most of the batteries was remarkably similar. If anything, the test seemed to show that higher tier batteries from companies like Duracell and Energizer actually performed slightly worse than the mid-range offerings. Perhaps the biggest surprise is that, when the per-cell cost was factored in, the local cheapo batteries provided a better value than anything else in the test.

While the selection of battery brands may be different from where you live, the data [Moragor] collected is still a fascinating even if you don’t recognize some of the names on the chart. Of particular note is the confirmation that lithium batteries handily outperformed any of the Alkaline cells tested when it came to high-drain applications. We’d still rather they came in rechargeable form, but at least it’s a step in the right direction.

A Useful Macro Pad For Microsoft Teams

Working from home has now become de rigeur for many more people around the globe. With it, has sprung up a desire for better controls for streaming and conferencing software. There are plenty of streamdecks on the market, of course, but this isn’t BuyADay, it’s HackADay. Thus, you’ll want to check out this great build for Microsoft Teams by [Build Comics].

The build consists of a series of Cherry MX Silent Red key switches in a 3D printed housing, dedicated to muting audio, switching video, and making and hanging up on calls. Naturally, they’re marked with their individual functions and lit with RGB LEDs for obvious feedback. The keys are read by a Raspberry Pi Pico, which handles USB communication with the PC. AutoHotKey is then pressed into service to make the final link to the Microsoft Teams software. [Build Comics] also worked on a 3D-printed busylight that indicates when they’re on a call; however, thus far it isn’t quite working properly. Jump into the conversation on Github or comment below if you’ve got insight on the problem.

It’s a build that likely saves a lot of hassle when you’re on several calls a day. The mute button is a sure-fire jobsaver on some occasions, and it’s better to have it and not need it, then need it and not have it. We’ve featured work from [Build Comics] before, too – like this excellent vintage meter restoration. Video after the break.

Continue reading “A Useful Macro Pad For Microsoft Teams”

No-Nixie Nixie Clock

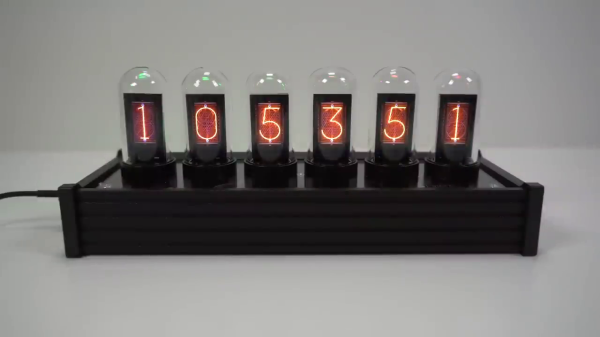
Over on [Techmoan]’s YouTube channel he’s excited about a new gadget that finally arrived after months of waiting — the EleksTube IPS fake Nixie tube clock. This is a re-imagining of a Nixie tube clock using six 135×240 pixel IPS display panels. They are mounted like tiny billboards, each one inside glass bulbs to mimic that retro look. Based on [Techmoan]’s measurement of these displays, it appears they are the same 16:9 IPS displays used in the TTGO ESP32 modules. The effect is quite impressive, and the fact that each digit is a complete display leads to quite a bit of flexibility. For example, if you don’t like the Nixie look, you can select from a suite of styles or make your own set of custom digits.

Additional digit styles are provided

Continue reading “No-Nixie Nixie Clock”

You Won’t Believe How Much Tech Is Hiding In This Desk

Say what you will about office life: there were definitely some productivity perks, but the coffee is much better at home. Like many of us, [Pierre] has been working from home for the last year or so. And as much as he might enjoy spending so much time in his small Parisian apartment, it lacks many of the amenities of the office such as a scanner, printer, and, you know, a reasonable amount of space in which to work.

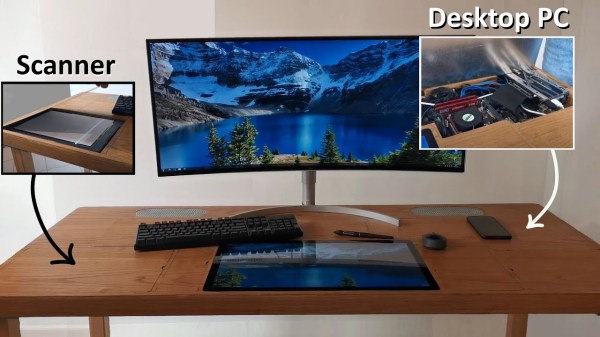
Inspired by another build, [Pierre] set out to build his dream desk that is maximum PC power in minimum space. It is chock full of easily-accessible cavities that hide everything you’d expect, plus a few things you don’t, like a flatbed scanner, a printer, a router, and a wireless charging pad. One cavity is dedicated to I/O, and another has three international power sockets. The only thing it doesn’t hide is the 22″ pen display that [Pierre] uses for sketching, signing documents, and occasionally as a second monitor.

A home-brew jig makes consistent dowel drilling much easier.

This desk may look like solid wood, but the top is a veneer that’s glued on to a custom-cut 1mm steel sheet. The inside frame is made of hardwood and so are the legs — one of them has a hidden channel for the only two cords that are even somewhat visible — the power and Ethernet cables. He joined all the frame pieces with dowel rods, and made a 3D-printed and metal-reinforced drilling jig to get the holes just right.

[Pierre] started this build by planning out the components and making meticulous notes about the dimensions of every piece. Then he sketched it and modelled it in FreeCAD to get all the cavities and cable runs correct and ensure good airflow through the desk. After that it was on to woodworking, metalworking, and PCB fab for relocated and hidden display controls and a custom-built amplifier.

It’s obvious that a lot of thought went in to this, and there’s a ton of work appreciate here, so clear off that inferior desk of yours and check out the build video after the break. Wish you had a PC desk? [Pierre] is seriously considering a Kickstarter if enough people show interest.

Are you into minimalism, but don’t want to build something of this magnitude? There’s more than one way to get there.

Continue reading “You Won’t Believe How Much Tech Is Hiding In This Desk”

Camera Hack Peels Back Layers Of Embedded Linux

Embedded Linux devices are everywhere these days, and sooner or later, you’re going to want to poke around in one of them. But how? That’s where posts like this one from [Felipe Astroza] come in. While his work is focused on the Foscam C1 security camera, the techniques and tools he outlines here will work on all sorts of gadgets that have a tiny penguin at their core.

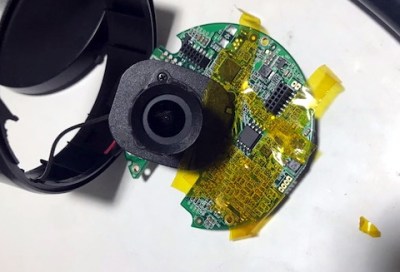
Rather than trying to go in through the front door, [Felipe] starts his assault with the nuclear option: removing the SPI MX25L12835F flash chip from the camera’s PCB and dumping its contents with a Raspberry Pi. From there he walks through the use of different tools to determine the partition scheme of the chip and eventually extract passwords and other interesting bits of information from the various file systems within.

Getting ready to remove the flash chip.

That alone would be worth the read, but things really get interesting once [Felipe] discovers the FirmwareUpgrade program. Since the Foscam’s software updates are encrypted, he reasons that reverse engineering this binary would uncover the key and allow for the creation of custom firmware images that can be flashed through the stock interface.

Further investigation with Ghidra and friends identifies an interesting shared library linked to the executable in question, which is then disassembled in an effort to figure out how the key is being obfuscated. We won’t ruin the surprise, but [Felipe] eventually gets what he’s after.

This isn’t the first time [Felipe] has played around with the firmware on these Internet connected cameras, and we dare say it won’t be his last. For those who are really into tinkering with these sort of devices, it’s not unheard of to install a socket for the flash chip to make software modifications faster and easier.

Art of 3D printer in the middle of printing a Hackaday Jolly Wrencher logo

What To Expect From 3D Scanning, And How To Work With It

3D scanning and 3D printing may sound like a natural match for one another, but they don’t always play together as easily and nicely as one would hope. I’ll explain what one can expect by highlighting three use cases the average hacker encounters, and how well they do (or don’t) work. With this, you’ll have a better idea of how 3D scanning can meet your part design and 3D printing needs.

How Well Some Things (Don’t) Work

Most 3D printing enthusiasts sooner or later become interested in whether 3D scanning can make their lives and projects easier. Here are a three different intersections of 3D scanning, 3D printing, and CAD along with a few words on how well each can be expected to work.

Goal Examples and Details Does it work?
Use scans to make copies of an object.
  • 3D scan something, then 3D print copies.
  • Objects might be functional things like fixtures or appliance parts, or artistic objects like sculptures.
Mostly yes, but depends on the object
Make a CAD model from a source object.
  • The goal is a 1:1 model, for part engineering purposes.
  • Use 3D scanning instead of creating the object in CAD.
Not Really
Digitize inconvenient or troublesome shapes.
  • Obtain an accurate model of complex shapes that can’t easily be measured or modeled any other way.
  • Examples: dashboards, sculptures, large objects, objects that are attached to something else or can’t be easily moved, body parts like heads or faces, and objects with many curves.
  • Useful to make sure a 3D printed object will fit into or on something else.
  • Creating a CAD model of a part for engineering purposes is not the goal.
Yes, but it depends

In all of these cases, one wants a 3D model of an object, and that’s exactly what 3D scanning creates, so what’s the problem? The problem is that not all 3D models are alike and useful for the same things.

Continue reading “What To Expect From 3D Scanning, And How To Work With It”

Incandescent 7-Segment Displays Are Awesome

When we think of 7-segment displays as the ubiquitous LED devices that sprung into popularity in the 1970s. However, numbers have existed for a lot longer than that, and people have wanted to know what the numbers are for quite some time, too. Thus, a variety of technologies were used prior to the LED – such as these magnificent incandescent 7-segment displays shown off by [Fran Blanche].

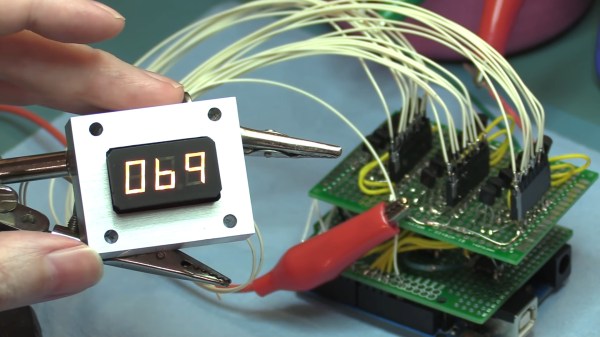
The displays are basic in concept, but we imagine a little frustrating in execution. Electronics was tougher back in the days when valves needed huge voltages and even a basic numerical display drew a load of current. Built to industrial-grade specifications, they’re complete with a big heatsinking enclosure and rugged gold-plated connectors. [Fran] surmises that due to the likely military applications of such hardware, the filaments in the bulbs were likely built in such a way as to essentially last indefinitely. The glow of the individual segments has a unique look versus their LED siblings; free of hotspots and the usual tapered shape on each segment. Instead, the numerals are pleasingly slab-sided for a familiar-but-not-quite aesthetic.

[Fran] demonstrates the display running with a CD4511B BCD-to-7-segment decoder, hooked up with a bunch of 3904 power transistors to get the chip working with filament bulbs instead of LEDs. It’s a little fussy, but the displays run great with the hardware sorted.

We’d love to see these used on a very heavy ridiculous watch; nixies aren’t the only game in town after all. If you do happen to make one, be sure to let us know. Video after the break.

Continue reading “Incandescent 7-Segment Displays Are Awesome”