It Isn’t Rocket Science — Wait, Maybe It Is

We don’t know why, but for some reason, the more dangerous something is, the more hacker appeal it seems to have. We like to deal with high temperatures, high voltages, dangerous chemicals, and powerful lasers. So [Tech Ingredient’s] recent video about homemade rocket motors certainly caught our attention. You may need a little commitment, though. The first video (yes, there isn’t just one) is over an hour long.

Turns out, [Tech] doesn’t actually want to use the rockets for propulsion. He needed a source of highly-ionized high-velocity plasma to try to get more power from his magnetohydrodynamic project. Whatever you want to use it for, these are serious-sized motors. [Tech] claims that his design is both powerful and easy to build. He also has a “secret” rocket fuel that he shares. What is it? We won’t spoil the video for you, but it is a sweet surprise.

Continue reading “It Isn’t Rocket Science — Wait, Maybe It Is”

Smart Power Delivery For Long LED Strips

Addressable LED strips, most commonly using the WS2812B, have revolutionized the pursuit of the glowiest and flashiest of builds. No longer does a maker have to compromise on full RGB color or number of LEDs due to the limitations of their chosen microcontroller, or fuss around with multiplexing schemes. However, the long strips of bright LEDs do have an issue with voltage drop on long runs, leading to dimming and color irregularities. Thankfully, [Jan Mrázek] has come up with a useful solution in the form of the Neopixel Booster.

The device consists of a small PCB which packs a 5 volt regulator capable of putting out up to 4 amps. It’s designed with pads that match typical Neopixel strips, such that it can be neatly soldered in every 50cm or every 60 LEDs or so. Each booster PCB is fed with a set of fat power wires, at between 6-18 volts. This allows electricity to be fed to the full length of the strip at higher voltage, and thus lower current, greatly reducing resistive power losses. By having several regulators along the length of the strip, it helps guarantee that the whole length of a long run is receiving plenty of voltage and current and can light up the correct color as desired.

It’s a well thought out solution to a frustrating problem, and [Jan’s] efforts on the design front mean that a 5 meter long waterproof strip can be converted in around about an hour. We can imagine this could be manufactured into strips in future, too. If you’re wondering what to do with all those LEDs, consider making yourself a custom display.

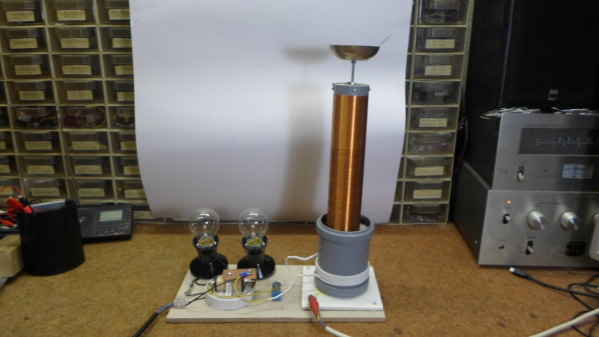
Extremely Simple Tesla Coil With Only 3 Components

Tesla Coils are a favourite here at Hackaday – just try searching through the archives, and see the number of results you get for all types of cool projects. [mircemk] adds to this list with his Extremely simple Tesla Coil with only 3 Components. But Be Warned — most Tesla coil designs can be dangerous and ought to be handled with care — and this one particularly so. It connects directly to the 220 V utility supply. If you touch any exposed, conductive part on the primary side, “Not only will it kill You, it will hurt the whole time you’re dying”. Making sure there is an ELCB in the supply line will ensure such an eventuality does not happen.

No prizes for guessing that the circuit is straight forward. It can be built with parts lying around the typical hacker den. Since the coil runs directly off 220 V, [mircemk] uses a pair of fluorescent lamp ballasts (chokes) to limit current flow. And if ballasts are hard to come by, you can use incandescent filament lamps instead. The function of the “spark gap” is done by either a modified door bell or a 220 V relay. This repeatedly charges the capacitor and connects it across the primary coil, setting up the resonant current flow between them. The rest of the parts are what you would expect to see in any Tesla coil. A high voltage rating capacitor and a few turns of heavy gauge copper wire form the primary LC oscillator tank circuit, while the secondary is about 1000 turns of thinner copper wire. Depending on the exact gauge of wires used, number of turns and the diameter of the coils, you may need to experiment with the value of the capacitor to obtain the most electrifying output.

If you have to look for one advantage of such a circuit, it’s that there is not much that can fail in terms of components, other than the doorbell / relay, making it a very robust, long lasting solution. If you’d rather build something less dangerous, do check out the huge collection of Tesla Coil projects that we have featured over the years.

Continue reading “Extremely Simple Tesla Coil With Only 3 Components”

Vertical Mill Completes Scrapyard Lathe Build

One thing’s for sure: after seeing [Roland Van Roy] build a vertical mill from industrial scrap, we’ve got to find a better quality industrial scrapyard to hang around.

The story of this build started, as many good shop stories do, at the lathe, which in this case was also a scrapyard build that we somehow managed to miss when it first posted. This lathe is decidedly different from the common “Gingery method” we’ve seen a few times, which relies on aluminum castings. Instead, [Roland] built his machine from plate stock, linear slides, and various cast-off bits of industrial machines.

To make his lathe yet more useful, [Roland] undertook this build, which consists of a gantry mounted over the bed of the lathe. The carriage translates left and right along the bed while the spindle, whose axis lines up perfectly with the center axis of the lathe, moves up and down. [Roland] added a platform and a clever vise to the lathe carriage; the lathe tool post and the tailstock are removed to make room for these mods, but can be added back quickly when needed. Digital calipers stand in for digital read-outs (DROs), with custom software running on a Picaxe and a homebrew controller taking care of spindle speed control.

[Roland] reports that the machine, weighing in at about 100 kg, exhibits a fair amount of vibration, which limits him to lighter cuts and softer materials. But it’s still an impressive build, and what really grabbed us was the wealth of tips and tricks we picked up. [Roland] used a ton of interesting methods to make sure everything stayed neat and square, such as the special jig he built for drilling holes in the T-slot extrusions to the use of cyanoacrylate glue for temporary fixturing.

Continue reading “Vertical Mill Completes Scrapyard Lathe Build”

Remote Control Robot Deals Dominoes

Oh, dominoes — the fun of knocking them down is inversely proportional to the pain of setting them all up again. [DIY Machines] is saving loads of time by automating the boring part with a remote control domino-laying machine. If only it could pick them back up.

This machine can be driven directly over Bluetooth like an R/C car, or programmed to follow a predetermined path via Arduino code. Here’s how it works: an Arduino Uno drives two servos and one motor. The 1:90 geared motor drives the robot around using a 180° servo to steer. A continuous servo turns the carousel, which holds nearly 140 dominoes. We love that the carousel is designed to be hot-swappable, so you can keep a spare ready to go.

[DIY Machines] really thought of everything. Every dozen or so dominoes, the machine leaves a gap in case one of the dominoes is tipped prematurely. There are also a couple of accessories for it, like a speedy domino loading stick and a fun little staircase bridge to add to your domino creations. Though all the machine files are freely available, [DIY Machines] requests a small donation for the accessories files. Check out the complete build video after the break, followed by a bonus video that focuses on upgrading the machine with an HM10 Bluetooth module for controlling it directly with a phone.

This certainly isn’t the first domino-laying device we’ve seen, though it might be the most accessorized. [Matthias Wandel]’s version uses only one motor to move and deal the dominoes.

Continue reading “Remote Control Robot Deals Dominoes”

Visualizing Ionizing Radiation With DIY Plastic Scintillators

Although most types of radiation are invisible, except for the visible part of the EM spectrum, there are many ways that we can make various types of radiation visible. One of these methods is called ‘scintillation’, which can be used to make ionizing radiation visible. Recently [Lukas Springer] demonstrated how to make scintillators out of what is essentially plastic: bisphenol-A (E45, ‘epoxy’) resin with hardener and other additives.

The essential principle of operation behind a scintillator is its sensitivity to ionizing radiation, along with the tendency to absorb the energy and re-emit it in the form of light, i.e. luminescence. This is akin to the luminescence of LEDs, except that in their case the underlying principle is that of electro-luminescence. In the case of a plastic scintillator, the scintillating material is suspended in the solid polymer matrix base.

As [Lukas] points out, plastic scintillators are hardly ideal when it comes to their sensitivity to ionizing radiation, but they compensate for this by being easy to shape and produce, while being very durable. For this experiment, he used regular epoxy as the scintillator matrix, p-Terphenyl as primary scintillator and Coumarin 102 as the wavelength shifter. These three compounds act as a reaction chain, with the matrix absorbing the radiation and transferring it to the primary scintillator, which in turns emits the energy as light.

As the primary scintillator tends to radiate in the deep UV part of the EM spectrum, a wavelength shifter (i.e. secondary scintillator) which ‘shifts’ the emitted UV radiation into the visible part of the spectrum.

After producing a batch of plastic scintillators following the above recipe, [Lukas] irradiated them with gamma radiation, and found them to perform worse than some already not remarkable Russian PS-based scintillators. [Lukas’s] guess is that the matrix may be absorbing the primary scintillator’s output, or a mismatch between the primary and second scintillator.

While tricky to get right, it does seem like a fun hobby if one has some interesting in chemistry. [Lukas] (@GigaBecquerel on Twitter) provides a basic recipe as well as many other compounds to use for the primary and secondary scintillator, as well as the matrix compound. Enough to get started with.

Death Of The Serial Squid: When Do You Give Up?

While searching for a connector recently, I revisited an old project of mine called the Serial Squid. This was to have been my first open-source hardware design. After completing the entire design, PCB, BOM, and preparing for a crowd-funded campaign, I eventually gave up for reasons discussed below, I’ve always thought of this as a failure, but on further reflection I see it in a new light. There were some good lessons learned along the path to abandonment.

When do you let go?  When should you push through? Continue reading “Death Of The Serial Squid: When Do You Give Up?”