AVR Microcontroller Doubles Up As A Switching Regulator

[SM6VFZ] designed, built and tested a switched-mode DC-DC boost regulator using the core independent peripherals (CIP) of an ATtiny214 micro-controller as a proof of concept, and it looks pretty promising!

A Buck, Boost, or Buck-Boost switching regulator topology usually consists of a diode, a switching element (MOSFET) and an energy storage device (inductor/capacitor) in the power path, and a controller that can measure the output voltage, control the switching element and add safety features such as current limiting and temperature shutdown. A search for switching regulators or controllers throws up thousands of parts, and it’s possible to select one specifically well suited for any desired application. Even so, the ability to use the micro-controller itself as the regulator can have several use cases. Such an implementation allows for a software configurable switch-mode regulator and easy topology changes (boost, buck, fly back etc.).

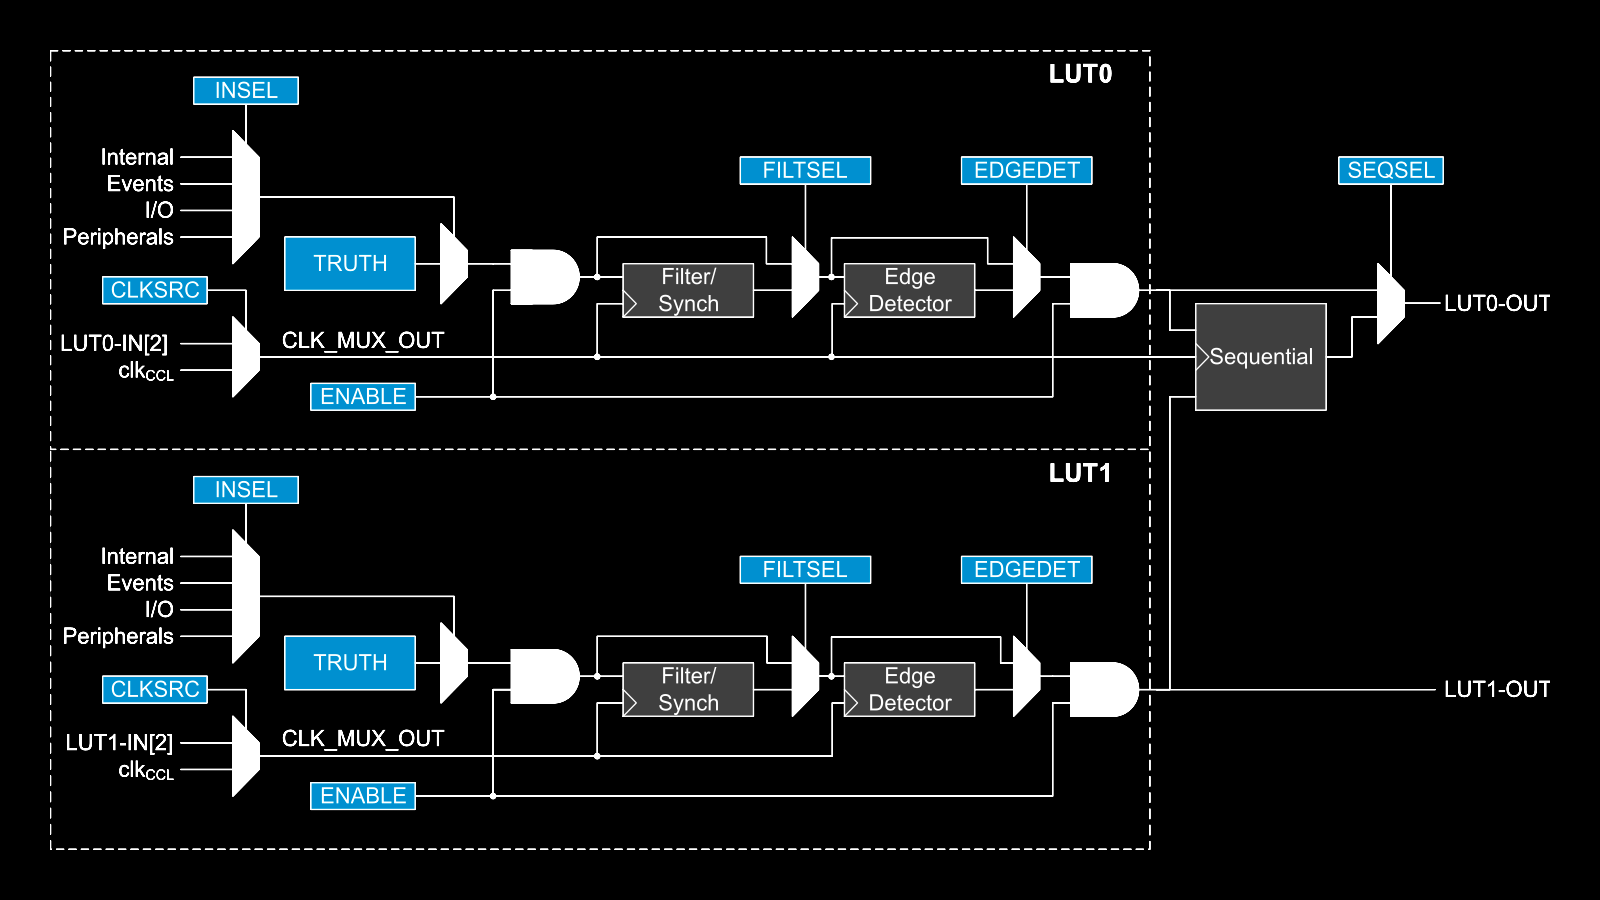
The “Getting Started with Core Independent Peripherals on AVR®” application note is a good place to get an overview of how the CIP functionality works. Configurable Custom Logic (CCL) is among one of the powerful CIP peripherals. Think of CCL as a rudimentary CPLD — a programmable logic peripheral, which can be connected to a wide range of internal and external inputs such as device pins, events, or other internal peripherals. The CCL can serve as “glue logic” between the device peripherals and external devices. The CCL peripheral offers two LookUp Tables (LUT). Each LUT consists of three inputs, a truth table, a synchronizer, a filter, and an edge detector. Each LUT can generate an output as a user programmable logic expression with three inputs and any device that have CCL peripherals will have a minimum of two LUTs available.

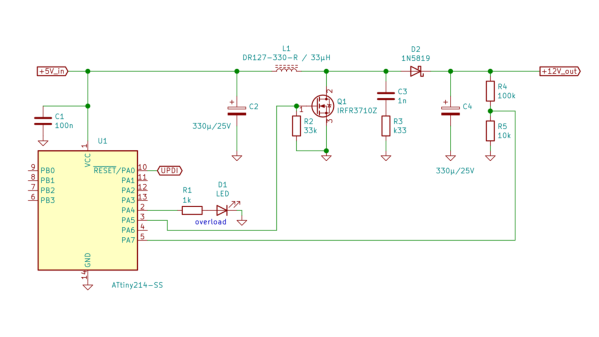
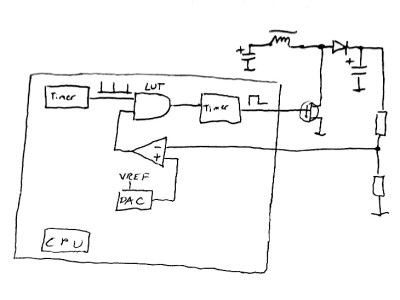
This napkinCAD sketch shows how [SM6VFZ] implemented the boost regulator in the ATtiny214. The AND gate is formed using one of the CCL LUT’s. The first “timer 1” on the left, connected to one input of the AND gate, is free running and set at 33 kHz. The analog comparator compares the boosted output voltage against an internally generated reference voltage derived from the DAC. The output of the comparator then “gates” timer 1 signal to trigger the second “timer 2” — which is a mono-shot timer set to max out at 15 us. This makes sure there is enough time left for the inductor to completely release its energy before the next cycle starts. You can check out the code that [SM6VFZ] used to built this prototype, and his generous amounts of commenting makes it easy to figure out how it works.

Based on this design, the prototype that he built delivers 12 V at about 200 mA with an 85% efficiency, which compares pretty well against regular switching regulators. Keep in mind that this is more of a proof-of-concept (that actually works), and there is a lot of scope for improvement in terms of noise, efficiency and other parameters, so everyone’s comments are welcome.

In an earlier blog post, we looked at how ATmegas with Programmable Logic came about with this feature that is usually found in PIC micro-controllers, thanks to Microchip’s acquisition of Atmel a few years back. But we haven’t seen any practical example of the CCL peripheral in an Atmel chip up until now.

The Shell And The Microcontroller

One of the nicest amenities of interpreted programming languages is that you can test out the code that you’re developing in a shell, one line at a time, and see the results instantly. No matter how quickly your write-compile-flash cycle has gotten on the microcontroller of your choice, it’s still less fun than writing blink_led() and having it do so right then and there. Why don’t we have that experience yet?

If you’ve used any modern scripting language on your big computer, it comes with a shell, a read-eval-print loop (REPL) in which you can interactively try out your code just about as fast as you can type it. It’s great for interactive or exploratory programming, and it’s great for newbies who can test and learn things step by step. A good REPL lets you test out your ideas line by line, essentially running a little test of your code every time you hit enter.

This is your development environment

The obvious tradeoff for ease of development is speed. Compiled languages are almost always faster, and this is especially relevant in the constrained world of microcontrollers. Or maybe it used to be. I learned to program in an interpreted language — BASIC — on computers that were not much more powerful than a $5 microcontroller these days, and there’s a BASIC for most every micro out there. I write in Forth, which is faster and less resource intensive than BASIC, and has a very comprehensive REPL, but is admittedly an acquired taste. MicroPython has been ported over to a number of micros, and is probably a lot more familiar.

But still, developing MicroPython for your microcontroller isn’t developing on your microcontroller, and if you follow any of the guides out there, you’ll end up editing a file on your computer, uploading it to the microcontroller, and running it from within the REPL. This creates a flow that’s just about as awkward as the write-compile-flash cycle of C.

What’s missing? A good editor (or IDE?) running on the microcontroller that would let you do both your exploratory coding and record its history into a more permanent form. Imagine, for instance, a web-based MicroPython IDE served off of an ESP32, which provided both a shell for experiments and a way to copy the line you just typed into the shell into the file you’re working on. We’re very close to this being a viable idea, and it would reduce the introductory hurdles for newbies to almost nothing, while letting experienced programmers play.

Or has someone done this already? Why isn’t an interpreted introduction to microcontrollers the standard?

New Part Day: Espressif ESP32-S3

Since Espressif Systems arrived in our collective consciousness they have expanded their range from the ESP8266 to the ESP32, and going beyond the original WROOM and WROVER modules to a range of further ESP32 products. There’s a single-core variant and one that packs a RISC-V core in place of the Tensilica one, and now they’ve revealed their latest product. The ESP32-S3 takes the ESP to a new level, packing as it does more I/O, onboard USB, and an updated version of the two Tensilica cores alongside Bluetooth version 5. It’s still an ESP32, but one that’s more useful, and it’s worth a closer look because we expect it to figure in quite a few projects.

Espressif's block diagram for the chip.
Espressif’s block diagram for the chip.

Sadly the data sheet does not seem to have been released, but we do have some tidbits to consider. Espressif are anxious to tell us about its “AIOT” capabilities thanks to the vector instructions in the EXTensa LX7 cores (PDF) that were not present in the previous model’s LX6. They claim that this will speed up software neural networks; this does have an air of marketing about it but we’ll withhold judgement until we see it in use. The new core certainly will offer a performance improvement across the board though, which should be of interest to all ESP32 developers. Meanwhile the ultra-low-power core that existing ESP32 developers will be familiar with remains.

Then there is that USB support, which appears in the feature block diagram but has little information elsewhere. It’s listed as USB OTG which raises the possibility of the ESP32 being the host, but what it should also bring is the ability to emulate other USB devices. We’ve seen badges mount as WebUSB devices using STM32 clones as peripherals for an ESP32, but in future these tricks should be possible on the Espressif chip itself.

Probably the most anticipated piece of the new device’s specification comes in the addition of 10 new I/O lines. This has historically been a weakness of the ESP line, that it’s an easy chip with which to run out of available pins. These extra lines will make it more competitive with for example the STM32 series of microcontrollers that have larger package options, and will also mean that designs can have more in the way of peripherals without the use of port expanders.

In summary then, the latest member of the ESP32 family delivers a significant and useful update, and brings some of the features first seen in the single core version to the more powerful line of chips. Sadly it doesn’t have the hoped-for on-chip RAM boost, but it brings enough in the way of new capabilities to be of interest. At the moment it doesn’t look like the ESP32-S3 is available to order, but we hope to have engineering samples soon and should be bringing you a hands-on report in due course.

Micromachining Glass With A Laser — Very, Very Slowly

When it comes to machining, the material that springs to mind is likely to be aluminum, steel, or plastic. We don’t necessarily think of glass as a material suitable for machining, at least not in the chuck-it-up-in-the-lathe sense. But glass is a material that needs to be shaped, too, and there are a bunch of different ways to accomplish that. Few, though, are as interesting as micromachining glass with laser-induced plasma bubbles. (Video, embedded below.)

The video below is from [Zachary Tong]. It runs a bit on the longish side, but we found it just chock full of information. The process, formally known as “laser-induced backside wet-etching,” uses a laser to blast away at a tank of copper sulfate. When a piece of glass is suspended on the surface of the solution and the laser is focused through the glass from the top, some interesting things happen.

The first pulse of the laser vaporizes the solution and decomposes the copper sulfate. Copper adsorbs onto the glass surface inside the protective vapor bubble, which lasts long enough for a second laser pulse to come along. That pulse heats up the adsorbed copper and the vapor in the original bubble, enough to melt a tiny bit of the glass. As the process is repeated, small features are slowly etched into the underside of the glass. [Zachary] demonstrates all this in the video, as well as what can go wrong when the settings are a bit off. There’s also some great high-speed footage of the process that’s worth the price of admission alone.

We doubt this process will be a mainstream method anytime soon, not least because it requires a 50-Watt Nd:YAG fiber laser. But it’s an interesting process that reminds us of [Zachary]’s other laser explorations, like using a laser and Kapton to make graphene supercapacitors.

Continue reading “Micromachining Glass With A Laser — Very, Very Slowly”

Replacement LED Light Build Uses A Few Tricks

Microscopes have become essential work bench tools for hackers, allowing them to work with tiny SMD parts for PCB assembly and inspection. Couple of years back, mad scientist [smellsofbikes] picked up a stereo microscope from eBay. But its odd-sized, 12 volt Edison-style screw base lamp, connected to a 17 volt AC supply, burned off after a while. He swapped the burnt lamp with the spare, which too blew up after some time. Dumb lamps. Maybe the original spec called for 24 volt lamps, which were unobtanium due to the odd Edison screw base, but those would throw out a pretty yellow-orange glow. Anyhow, for some time, he worked with a jury-rigged goose neck lamp, but frequently moving the microscope and the lamp was becoming a chore. When he got fed up enough about it, he decided to Build a Replacement LED Microscope Light.

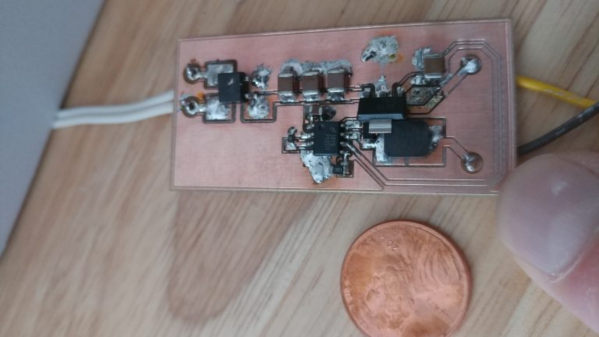
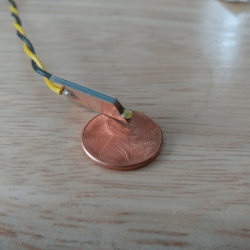
Usually, such builds are plain vanilla and not much to write in about, but [smellsofbikes] has a few tricks worth taking note of. He found a couple of high power, SMD LEDs in his parts bin. They were just slightly wider than 1.6 mm across the terminals. So he took a piece of double sided, copper clad FR4, and edge mounted the LED against one side of the PCB piece, twisting it slightly so he could solder both terminals. This works as a great heat sink for the LED while still having a very narrow profile. This was important as the replacement LED board had to fit the cylinder in which the original lamp was fitted.

The LED is driven by a constant current buck regulator, powered by the original 17 volt transformer. A bridge rectifier and several filter capacitors result in a low ripple DC supply, for which he used the KiCad spice functionality to work out the values. The LM3414 driver he used is a bit off the beaten track. It can run LEDs up to 60 watts at 1 amps and does not require an external current sense resistor. This was overkill since he planned to run the LED at just 150 mA, which would result in a very robust, long lasting solution. He designed the driver PCB in KiCad, and milled it on his LPKF circuit board plotter. The nice thing with CNC milled PCBs is that you can add custom copper floods and extend footprint pads. This trick lets you solder either a 0805 or a 1206 part to the same footprint – depending on what you can dig up from your parts bin.

Continue reading “Replacement LED Light Build Uses A Few Tricks”

Learning To Speak Peloton

Recently [Imran Haque]’s family bought the quite popular Peloton bike. After his initial skepticism melted to a quiet enthusiasm, [Imran] felt his hacker curiosity begin to probe the head unit on the bike. Which despite being a lightly skinned android tablet, has a reputation for being rather locked down. The Peloton bike will happily collect data such as heart rate from other devices but is rather reticent to broadcast any data it generates such as cadence and power. [Imran] set out to decode and liberate the Peleton’s data by creating a device he has dubbed PeloMon. He credits the inspiration for his journey to another hacker who connected a Raspberry Pi to their bricked exercise bike.

As a first step, [Imran] step began with decoding the TRRS connector that connects the bike to the head unit. With the help of a multi-meter and a logic analyzer, two 19200bps 8N1 RS-232 channels (TX and RX) were identified. Once the basic transport layer was established, he next set to work decoding the packets. By plotting the bytes in the packets and applying deductive reasoning, a rough spec was defined. The head unit requested updates every 100ms and the bike responded with cadence, power, and resistance data depending on the request type (the head unit did a round-robin through the three data types).

Once the protocol was decoded, the next step for [Imran] was to code up an emulator. It seems a strange decision to write an emulator for a device with a simple protocol, but the reasoning is quite sound. It avoids a 20-minute bike ride every time a code change needs to be tested. [Imran] wrote both an event-driven and a timing-accurate emulator. The former runs on the same board as the PeloMon and the latter runs on a separate board (an Arduino).

The hardware chosen for the PeloMon was an Adafruit Feather 32u4 Bluefruit LE. It was chosen for supporting Bluetooth LE as well as having onboard EEPROM. A level shifter allows the microcontroller to talk directly to the RS-323 on the bike. After a few pull requests to the Adafruit Bluetooth libraries and a fair bit of head-banging, [Imran] has code that advertises two Bluetooth services, one for speed and another for power. A Bluetooth serial console is also included for debugging without having to pull the circuit out.

The code, schematics, emulators, and research notes are all available on GitHub.

Helping Hands, Reinvented

[Nixie] was tired of using whatever happens to be around to hold things in place while soldering and testing. It was high time to obtain a helping hands of some kind, but [Nixie] was dismayed by commercial offerings — the plain old alligator clips and cast metal type leave a lot to be desired, and the cooling tube cephalopod type usually have the alligator clips just jammed into the standard tube ends with no thought given to fine control or the possibility of reducing cable count.

[Nixie] happened to have some unneeded cooling tube lying around and started designing a new type of helping hands from the ground plane up. Taking advantage of the fact that cooling tubes are hollow,  [Nixie] routed silicone-jacketed wires through them for power and low speed signals. These are soldered to five banana jacks that are evenly spaced around an alligator clip.

Even if you don’t need power, all those extra alligators would come in quite handy for circuit sculpture or anything else that requires a lot of hands. [Nixie] put the files up on Thingiverse if you want to make your own.

We’ve seen plenty of helping hands over the years, but this concrete-based helper ought to cement your decision to make your own.