Drill Jig Helps Mount WeMos D1 Mini

As far as ESP8266 boards go, the WeMos D1 Mini is a great choice if you’re looking to get started with hackerdom’s microcontroller du jour. It’s small, well supported, and can be had ridiculously cheap. Often going for as little as $3 USD each, we buy the things in bulk just to have spares on hand. But that’s not to say it’s a perfect board. For one, it lacks the customary mounting holes which would allow you to better integrate it into finished products.
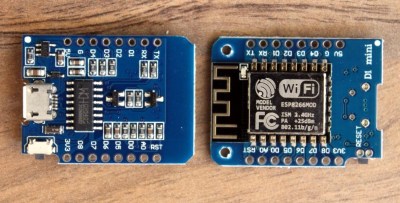
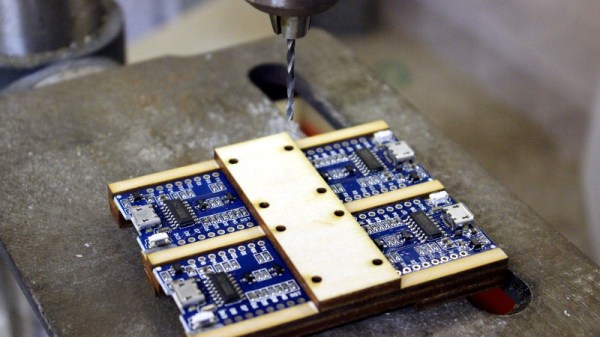
This minor annoyance was enough to spring [Martin Raynsford] into action. He noticed there was some open area on the D1 Mini’s PCB where it seemed he could drill through to add his own mount points, but of course popping holes in a modern PCB can be risky business. There’s not a lot of wiggle room between success and heartbreak, and it’s not like the diminutive D1 Mini is that easy to hold down to begin with. So he designed a laser-cut jig to allow him to rapidly add mounting holes to his D1 Mini’s assembly line style.

For those who might be skeptical, [Martin] reports he’s seen no adverse effects from drilling through the board, though does admit it’s possible the close proximity of the metal screw heads to the ESP8266’s antenna may have a detrimental effect. That said, he’s tested them in his projects out to 25 m (82 feet) with no obvious problems. He’s using a 2 mm drill bit to make his hole, and M2 x 6 mm machine screws to hold the boards down.

The jig design is released as a SVG and DXF for anyone with a laser cutter to replicate, but it shouldn’t be too difficult to extrude those designs in the Z dimension for hackers who haven’t yet jumped on the subtractive manufacturing bandwagon.

When a project makes the leap from prototype to in-house production, designing and building jigs become an essential skill. From flashing firmware to doing final checkout, the time and effort spent building a jig early on will pay for itself quickly in production.

Attack On The Clones: A Review Of Two Common ESP8266 Mini D1 Boards

ESP8266-based development boards have proliferated rapidly. One favorite, the WEMOS Mini-D1 is frequently imitated and sold without any branding. As these boards continue to ship to hobbyists and retailers around the world, we thought it might be interesting to conduct a little experiment.

There are a few ESP8266 development boards available, and the most popular seem to be the NodeMCU ‘Amica’ board. Of course, there are dozens of other alternatives including the WiFiMCU, Sparkfun’s ESP8266 Thing, and Adafruit’s HUZZAH ESP8266. Given that, why is this review limited to the Mini D1 boards? Because the Mini D1 is the cheapest. Or was, until it was cloned.

We took a look at some of these ‘clone’ boards to figure out the differences, find out if they work as intended, and perhaps most importantly, are these clone boards shipped out reliably. What are the results? Check that out below.

Continue reading “Attack On The Clones: A Review Of Two Common ESP8266 Mini D1 Boards”

A Simple Laser Harp MIDI Instrument

Craig Lindley is a technical author and a prolific maker of things. This simple project was his first attempt to create a laser harp MIDI device. While on vacation, Craig saw a laser harp with only three strings and decided to improve upon it by expanding it to twelve strings. The principle of operation is straightforward: twelve cheap diode laser modules aim a beam towards an LDR, which changes resistance if the light level changes when the beam is interrupted.

The controller is a simple piece of perf board, with a Wemos D1 mini ESP32 module flanked by some passives, a barrel socket for power, and the usual DIN connector for connecting the MIDI instrument. Using the ESP32 is a smart choice, removing all the need for configuration and user indication from the physical domain and pushing it onto a rarely-needed webpage. After a false start, attempting to use a triangular frame arrangement, [Craig] settled upon a simple linear arrangement of beams held within a laser-cut wooden box frame. Since these laser modules are quite small, some aluminium rod was machined to make some simple housings to push them into, making them easier to mount in the frame and keeping them nicely aligned with their corresponding LDR.

Sadly, the magnetic attachment method [Craig] used to keep the LDRs in place and aligned with the laser didn’t work as expected, so it was necessary to reach for the hot glue. We’ve all done that!

An interesting addition was using an M5 stack Unit-Synth module for those times when a proper MIDI synthesiser was unavailable. Making this luggable was smart, as people are always fascinated with laser harps. That simple internal synth makes travelling to shows and events a little easier.

Laser harps are nothing new here; we have covered plenty over the years. Like this nice build, which is more a piece of art than an instrument, one which looks just like a real harp and sounds like one, too, due to the use of the Karplus-Strong algorithm to mimic string vibrations.

Photo of a Nice-Power supply

Quick & Capable WiFi For Your Nice-Power Supply

Rejoice, those of us who have purchased a Nice-Power lab PSU from an Eastern source. Yes, the name might sound like a re-brand of a generic product, maybe you will even see this exact PSU on a shelf at a physical store near you, under a more local brand name and with a fair markup. Nevermind the circumstances, the most important part is that [Georgi Dobrishinov] found a way to add an ESP8266 to the PSU by tapping its internal UART control interface, and wrote a web UI for all your Internet-of-Lab-PSUs needs, called the PowerLinkESP project.

All you need is a Wemos D1 development board, or any other ESP8266 board that has UART pins exposed and handles 5 V input. [Georgi] brings everything else, from pictures showing you where to plug it in and where to tap 5 V, to extensive instructions on how to compile and upload the code, using just the Arduino IDE. Oh, and he tops it off with STLs for a 3D printed case, lest your Wemos D1 board flop around inside.

With [Georgi]’s software, you can monitor your PSU with interactive charts for all readings, export charts in both PNG and CSV, and access a good few features. Your ESP8266’s network uplink is also highly configurable, from an STA mode for a static lab config, to an AP mode for any on-the-go monitoring from your phone, and it even switches between them automatically! The firmware makes your PSU all that more practical, to the point that if you’re about to build an interface for your PSU, you should pay attention to [Georgi]’s work.

Lab PSUs with WiFi integration are worth looking into, just check out our review of this one; smart features are so nice to have, we hackers straight up rewrite PSU firmware to get there if we have to. Oh, and if you ever feel like standardizing your work so that it can interface to a whole world of measurement equipment, look no further than SCPI, something that’s easier to add to your project than you might expect, even with as little as Python and a Pi.

Linear LED clock displaying the time using different-colored triangles.

Linear LED Clock Looks Decidedly Vintage

We just love a good clock around here, and something about those triangles gives this linear LED clock a deliciously mid-century vibe. If you’ve read these pages for any length of time, you know that [andrei.erdei] loves clocks as much as we do, and is always coming up with interesting ways of displaying the passage of time.

Two upward-facing triangles sandwich one downward-facing triangle, and they are lighting up as follows: right, left, middle.This one is a remix of some other linear RGB clocks, but the result is distinctly [andrei.erdei]’s style. There’s nothing crazy going on under the hood here — it’s essentially a Wemos D1 mini running a strip of RGBs, and the microcontroller connects to a Wi-Fi router to get the time from a server. The magic is in the programming and the way the clock is read.

The brief but thorough demo video after the break does a much better job of explaining the display by showing various times of the day, but we’ll give it a shot. For one thing, it uses 24-hour time exclusively. There are four groups of triangles; yellow, red, green, and blue which correspond to tens and units of hours, and tens and units of minutes.

The triangles light up in groups of three in the order depicted in the animation. At midnight, none of the triangles are lit up. Again, it’s best explained in the video, looking at various times of day.  Plus you can see the neat-o startup animation.

Are you more into sound than blinkenlights? Then this customizable bird clock may be for you.

Continue reading “Linear LED Clock Looks Decidedly Vintage”

The Perfect Desktop Kit For Experimenting With Self Driving Cars

When we think about self-driving cars, we normally think about big projects measured in billions of dollars, all funded by major automakers. But you can still dive into this world on a smaller scale, as [jmoreno555] demonstrates.

The build consists of a small RC car—an HSP 94123, in fact. It’s got a simple brushed motor inside, driven by a conventional speed controller, and servo-driven steering. A Raspberry Pi 4 is charged with driving the car, but it’s not alone. It’s outfitted with a Google Coral USB stick, which is a machine learning accelerator card capable of 4 trillion operations per second. The car also has a Wemos D1 onboard, charged with interfacing distance sensors to give the car a sense of its environment. Vision is courtesy of a 1.2-megapixel camera with a 160-degree lens, and a stereoscopic camera with twin 75-degree lenses. Software-wise, it’s early days yet. [jmoreno555] is exploring the use of Python and OpenCV to implement basic lane detection and other self driving routines, while using Blender as a simulator.

The real magic idea, though, is the treadmill. [jmoreno555] realized that one of the frustrations of working in this space is in having to chase a car around a test track. Instead, the use of a desktop treadmill allows the car to be programmed and debugged with less fuss in the early stages of development.

If you’re looking for a platform to experiment with AI and self-driving, this could be an project to dive in to. We’ve covered some other great builds in this space, too. Meanwhile, if you’ve cracked driving autonomy and want to let us know, our tipsline is always standing by!

Build Your Own RGB Fill Light For Photography

Photography is all about light, and capturing it for posterity. As any experienced photographer will tell you, getting the right lighting is key to getting a good shot. To help in that regard, you might like to have a fill light. If you follow [tobychui]’s example, you can build your own!

Colors!

The build relies on addressable WS2812B LEDs as the core of the design. While they’re not necessarily the fanciest LEDs for balanced light output, they are RGB LEDs, so they can put out a ton of different colors for different stylistic effects. The LEDs are under the command of a Wemos D1, which provides a WiFI connection for wireless control of the light.

[tobychui] did a nice job of building a PCB for the project, including heatsinking to keep the array of 49 LEDs nice and cool. The whole assembly is all put together inside a 3D printed housing to keep it neat and tidy. Control is either via onboard buttons or over the WiFi connection.

Files are on GitHub if you’re seeking inspiration or want to duplicate the build for yourself. We’ve seen some other similar builds before, too. Meanwhile, if you’re cooking up your own rad photography hacks, don’t hesitate to let us know!