8-bit Game Uses Our Favourite IC And Zero Lines Of Code

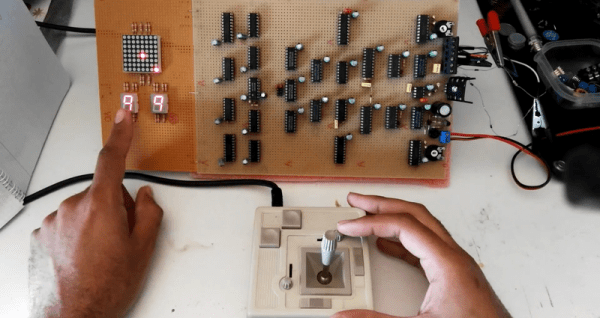
If a hacker today wanted to build a simple game, he or she could whip it up using an Arduino board and a few other bits and pieces in about an hour, only to be greeted with “where’s the hack?” But when you look at [OiD]’s SPEBEG (Single Player Eight Bit Electronic Game), you’ll understand why building anything using old-skool 70s tech is so awesome and educational.

The SPEBEG is a simple 8-bit game where you aim with the joystick at the target and fire to gain points. As your score increases, so does the game speed. It doesn’t need a single line of code, since the whole design is completely hardware based. And it uses the venerable 555. The display is an 8×8 LED matrix while score and levels are displayed on two 7-segment LED displays.

An 8-bit bus forms the backbone of the game and it is all held together by lots of 74-series TTL logic. The 555 provides a 47 kHz secondary clock, while the 100 Hz signal after the rectifier diodes is used to introduce the essential “randomness” that every game requires. [OiD] does a good job of describing the whole circuit by breaking it down into byte-sized chunks and walking us through each. For something so simple to build using modern technology, he needed over 25 different chips to build it, and ended up setting himself back by almost 200 €.
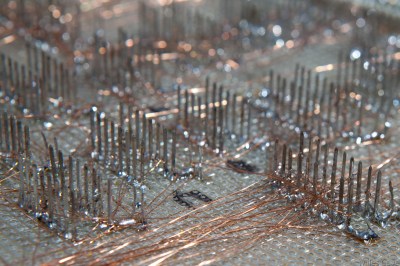
But there’s one more part of this project that amazes us, and that is its construction technique. [OiD] purchased IC sockets with extra long pins and a lot of thin, enamel (insulated) copper wire. A soldering station with a fine tip and high temperature setting allowed him to heat the end of the copper wire to melt its enamel insulation, so it could be soldered to the long pin sockets. Using this method, he assembled the circuit using point-to-point soldering, pretty much like wire wrapping. Only, instead of wrapping the wires, he soldered them.

Despite all of his efforts, the game was pretty much unplayable when he first built it almost five years back. He recently pulled it out of storage, swatted all the hardware bugs, and fixed it nicely. Check out the video after the break. [OiD]’s project is decidedly more simple compared to this game that was Fabricated from the Original Arcade Pong Schematics.

Continue reading “8-bit Game Uses Our Favourite IC And Zero Lines Of Code”

Robot Radar Module

For his Hackaday Prize entry, [Ted Yapo] is building a Robot Radar Module breakout board. His design uses the A111 60 GHz pulsed coherent radar (PCR) sensor from Acconeer AB (New Part alert!) .

The A111 is a low power, high precision sensor ideal for use in object detection or gesture sensing applications. The BGA package is tiny – 5.5 mm x 5.2 mm, but it does not appear very difficult for a hacker to assemble. The sensor includes an integrated baseband, RF front-end and Antenna in Package so you don’t have to mess with RF layout headaches. Acconeer claims the sensor performance is not affected with interference from noise, dust, color and direct or indirect light. Sensing range is about 2 m with a +/- 2 mm accuracy. And at just under $10 a pop for 10 units or more, it would make a nice addition to augment the sensor package on a Robot.

To get started, [Ted] is keeping his design simple and small – the break out board measures just 32 mm x 32 mm. The radar sensor itself doesn’t require any parts other than a crystal and its loading capacitors. A LDO takes care of the 1.8 V required by the A111. Three 74LVC2T45 chips translate the SPI digital interface from 1.8 V to external logic levels between 1.8 V to 5 V. The three level translation chips could possible be replaced by a single six or eight channel translator – such as one from the TXB series from TI. For his first PCB iteration, [Ted] is expecting to run in to some layout or performance issues, so if you have any feedback to give him on his design, check out his hardware repository on Github.

Acconeer provides a Getting Started guide for their Evaluation Kits, which includes a detailed Raspberry-Pi / Raspbian installation and an accompanying video (embedded after the break) targeted at hackers. We are eagerly looking forward to the progress that [Ted] makes with this sensor breakout. Combined with LiDAR ToF sensor breakout boards, such as the MappyDot, it would be a great addition to your robot’s sensing capabilities.

Continue reading “Robot Radar Module”

Soda Can Art

A can of soda costs about half a dollar, and once you’re done with the sugary syrup, most cans end up in the trash headed for recycling. Some folks re-use them for other purposes, but we’re guessing no one up-cycles them quite like artist [Noah Deledda] does. He turns them into pieces of Soda Can art that sell for anywhere between $2000 to $3000 a pop.
Don’t be fooled by that smashing hit in the GIF. It’s just some trick photography that [Noah] did to impress people. If you looked at the end product without the back story first, you’d think the cans were manipulated in to contorted shapes using some kind of mechanical assistance, at the very least, or probably a purpose-built machine.

But [Noah Deledda] does it with bare hands. This is the bare-metal version of Origami. While on a road trip many years ago, he was bereft of electronic devices to keep him busy. Playing with an empty can of soda, he started denting and squeezing the thin metal in to an abstract shape. That’s when the artist in him realized that he was playing with an exciting new medium. After making some abstract art pieces out of empty cans of a vermillion bovine energy drink, he figured it would look much more awesome if he could remove all the paint from the cans and give them a smooth, polished, natural finish. He made a little machine that rotates the cans so he can strip the paint and bring the cans to a high polish. The technique is simple but requires a lot of patience, practice, time and skill, not to mention that it will cause a lot of pain in the thumb.

If you’ve ever been to Japan and drank a can of Kirin Hyoketsu, you’d notice the un-opened can is smooth, but immediately changes to a pattern of indented diamonds once you open it. That design was created by Kyoro Miura, well-known for the Miura Fold that lets you fold and unfold large sheets of paper in one smooth movement. Like that discarded map in the glove box of the car you’re riding in, while playing with an empty can of soda.

If you want to hone some ambidextrous skills, this would be a good way to do it while on your next road, plane or train trip. Check out the two videos embedded below. In the second one, you can see snapshots of the design process.

Thanks, [Keith O], for this tip.

Continue reading “Soda Can Art”

Building Badges The Hard Way

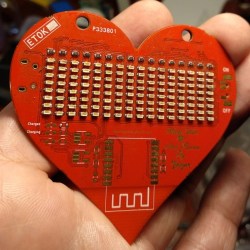
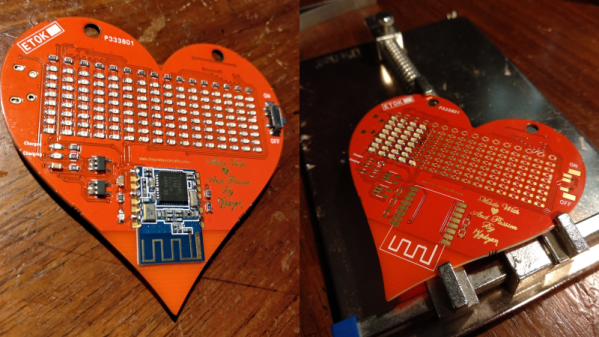
What’s a hacker to do to profess his love for his dearest beloved? [Nitesh Kadyan] built his lady-love this awesome LED pendant – the LED BLE Hearty Necklace Badge.

The hardware is pretty vanilla by today’s hacker standards. An ATMega328p  does most of the heavy lifting. An HM-11 BLE module provides connection to an Android mobile app. Two 74HC595 shift registers drive 16 columns of red LEDs and a ULN2803 sinks current from the 8 rows. The power section consists of a charger for the 320mAh LiPo and an LDO for the BLE module. All the parts are SMD with the passives mostly being 0603, including the 128 LEDs.

128 LEDs soldered wrong way around

[Nitesh] didn’t get a stencil made for his first batch of boards, so all the parts were painstakingly soldered manually and not in a reflow oven. And on his first board, he ended up soldering all of the LED’s the wrong way around. Kudos to him for his doggedness and patience.

The Arduino code on the ATmega is also quite straightforward. All characters are stored as eight bytes each in program memory and occupy 8×8 pixels on the matrix. The bytes to be displayed are stored in a buffer and the columns are left shifted fast enough for the marquee text effect. The Android app is built by modifying a demo BLE app provided by Google. The firmware, Android app, and the KiCAD design files are all hosted on his Github repository.

[Nitesh] is now building a larger batch of these badges to bring them to hillhacks – the annual hacker-con for making and hacking in the Himalayas. Scheduled for later this month, you’ll have to sign up on the mailing list for details and if you’d like to snag one of these badges. To make it more interesting, [Nitesh] has added two games to the code – Tetris and Snakes. Hopefully, this will spur others to create more games for the badge, such as Pong.

Continue reading “Building Badges The Hard Way”

Universal Quick-Release Bar Clamps

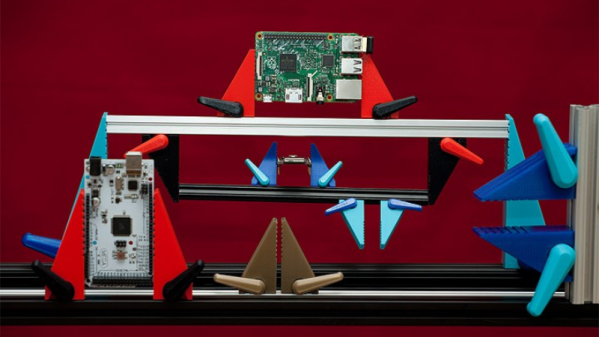
The typical hacker can never say no to more tools. And when it comes to clamps, one just can’t have enough of them. From holding small PCB’s to clamping together large sheets of plywood, you need a variety of sizes and quantities. So it would be pretty neat if we could just 3D print them whenever needed. [Mgx3d] has done that by designing 3D printable bar clamp jaws with a quick release mechanism that can be used with standard T-slot aluminum extrusion. This allows you to create ad-hoc bar clamps of any size and length quickly.
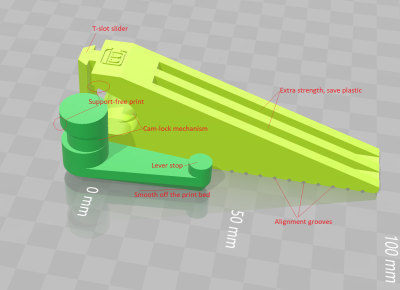
The design consists of two pieces – the jaw and its quick release lever, and does not require any additional parts or fasteners for assembly. Both pieces can be easily 3D printed without supports. The quick release lever is a simple eccentric cam design which locks the jaw in place by pushing down on the extrusion. The design is parametric and can be easily customized for different sizes, either in OpenSCAD or via the online customizer.  The online customizer supports Misumi 15 mm and 20 mm extrusion, 1″ 1010-S and 20 mm 20-2020 from 80/20 Inc., 15 mm from OpenBeam and 10 mm from MicroRax. But it ought to be easy to create fresh designs in OpenSCAD. Check out the video after the break to see the bar-clamps in action.

If you’d like to start equipping your shop with more 3D printed tools, look no further. We’ve featured many types over the years, such as the StickVise and its Gooseneck System, this 3D printed rubber band PCB Vise, and even a 3D printed Mini-Lathe.

Continue reading “Universal Quick-Release Bar Clamps”

Rapidly Prototyping Prosthetics, Braille, And Wheelchairs

We live in an amazing time where the availability of rapid prototyping tools and expertise to use them has expanded faster than at any other time in human history. We now have an amazing ability to quickly bring together creative solutions — perfect examples of this are the designs for specialized arm prosthetics, Braille printing, and custom wheelchair builds that came together last week.

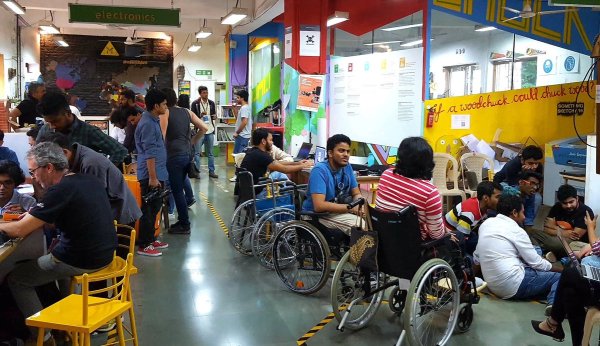
Earlier this month we published details about the S.T.E.A.M. Fabrikarium program taking place at Maker’s Asylum in Mumbai. The five-day event was designed to match up groups of makers with mentors to build assistive devices which help improve the condition of differently-abled people.

The participants were split into eight teams and they came up with some amazing results at the end of the five-day program.

Hands-On: Prosthetic Designs That Go Beyond

Three teams worked on projects based on Bionico – a myoelectric prosthesis

DIY Prosthetic Socket – a Human Machine Interface : [Mahendra Pitav aka Mahen] lost his left arm during the series of train bomb blasts in Mumbai in 2006, which killed 200 and injured over 700 commuters. He uses a prosthetic arm which is essentially a three-pronged claw that is cable activated using his other good arm. While it is useful, the limited functionality restricted him from doing many simple things. The DIY Prosthetic socket team worked with [Mahen] and [Nico Huchet] from MyHumanKit (who lost his right arm in an accident 16 years back), and fabricated a prosthetic forearm for [Mahen] with a modular, 3D printed accessory socket. Embedded within the arm is a rechargeable power source that provides 5V USB output at the socket end to power the devices that are plugged in. It also provides a second port to help recharge mobile phones. Also embedded in the arm was an IR reflective sensor that can be used to sense muscle movements and help trigger specific functions of add-on circuits, for example servos.

Continue reading “Rapidly Prototyping Prosthetics, Braille, And Wheelchairs”

S.T.E.A.M. Fabrikarium Builds Assistive Tech In Mumbai

Starting this weekend, a group of 65 invited Maker’s from various disciplines, along with 20 awesome Mentors, will gather at the Maker’s Asylum in Mumbai for the five day S.T.E.A.M. Fabrikarium program. The aim is to improve the capabilities of the differently-abled by building and expanding upon existing open source projects. At the same time, the teams will learn more about rapid prototyping techniques.

Among the participants will be at least 15 differently-abled people who will be a part of the whole process of learning as well as providing their inputs on the problems being tackled. Participants have an opportunity to understand how design thinking works and work on improving the existing designs.

Participants will team up and choose from five existing open source projects:

  • Bionico – a myoelectric prosthesis
  • Braille rap – using a 3D printer as a braille embosser.
  • e-Trotti – a low-cost, removable electrical assistance for wheelchair use, made from electric scooter parts.
  • Project Shiva – customized and beautiful upper limb prosthetics.
  • Flying Wheelchair – a wheelchair specially adapted for use while paragliding.

The Asylum’s fully-fledged workshop facilities offer a wood shop, a laser cutter, a CNC, several 3D printers, electronics tools and instruments and an infectious environment that will allow the participants to learn a lot during the five short days. While working on prototyping their projects, all teams will have constant access to a team of mentors and industry experts who will help solve their problems and give guidance when necessary.

The Maker’s Asylum includes fully-fledged workshop facilities for the build process, and the team succeeded in bringing onboard a slew of industrial partners and supporters to ensure that the program can be offered to the participants for free. That is a great way to bring makerspaces, makers, and the industry together in a symbiotic program that benefits society. The program was developed in collaboration with My Human Kit, a company from France who selected the five open-source projects mentioned above. The Fabrikarium is made possible via Bonjour-India, which fosters Indo-French partnerships and exchanges.

Hackaday is proud to be a part of this program and will be present to help document all of the awesome projects. Participants will share their progress on Hackaday.io, so watch for updates over the coming week. To get an idea of what to expect at the S.T.E.A.M. Fabrikarium 2018, check out the video from an earlier version embedded below.

Continue reading “S.T.E.A.M. Fabrikarium Builds Assistive Tech In Mumbai”