The DisplayPort altmode is semi-proprietary, but it can absolutely be picked apart if we try. Last time, we found a cool appnote describing the DisplayPort altmode in detail, switched the FUSB302 into packet sniffing mode and got packet captures, learned about PD VDMs (vendor-defined messages), and successfully replayed the captured messages to switch a USB-C port into the DisplayPort altmode. Today, we will go through the seven messages that summon the DisplayPort altmode, implement them, and tie them all into a library – then, figure out the hardware we need to have DisplayPort work in the wild.
 For a start, as you might have seen from the diagram, a single command can be either a request or a response. For instance, if you get a
 Discover Identity REQ (request), you reply to it with a Discover Identity ACK (response), adding your identity data to your response along the way. With some commands, the DP source will add some data for you to use; for most commands, your DP sink will have to provide information instead – and we’ll do just that, armed with the PDF provided and the packet captures.
We have seven commands we need to handle in order to get DisplayPort out of a compatible USB-C port – if you need a refresher on these commands, page 13 of the ST’s PDF on the DP altmode will show you the message sequence. These commands are: Discover Identity, Discover SVIDs, Discover Modes, Enter Mode, DP Status Update, DP Configure, and Attention. Out of these, the first four are already partially described in the base USB PD standard, the two DP commands afterwards are DisplayPort-altmode-specific but sufficiently described in the PDF we have, and the Attention command is from the base standard as well, mostly helpful for reporting state of the HPD pin. Let’s start with the first two! Continue reading “DisplayPort: Taming The Altmode”
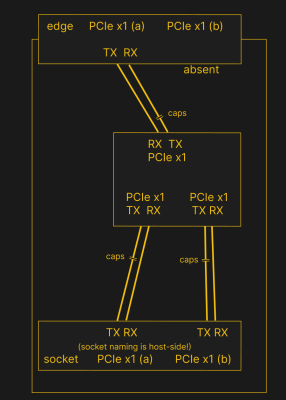 PCIe needs TX pairs connected to RX on another end, like UART – and this is non-negotiable. Connectors will use host-side naming, and vice-versa. As the diagram demonstrates, we connect the socket’s TX to chip’s RX and vice-versa; if we ever get confused, the laptop schematic is there to help us make things clear. To sum up, we only need to flip the names on the link coming to the PCIe switch, since the PCIe switch acts as a device on the card; the two links from the switch go to the E-key socket, and for that socket’s purposes, the PCIe switch acts as a host.