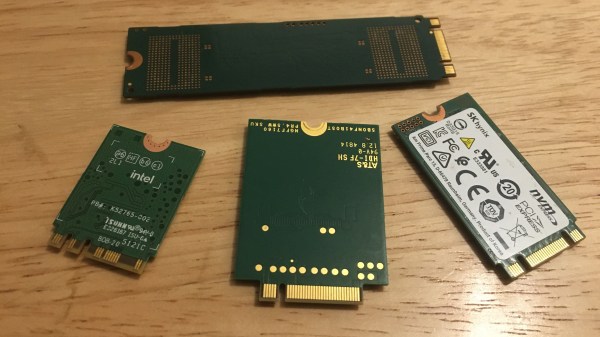
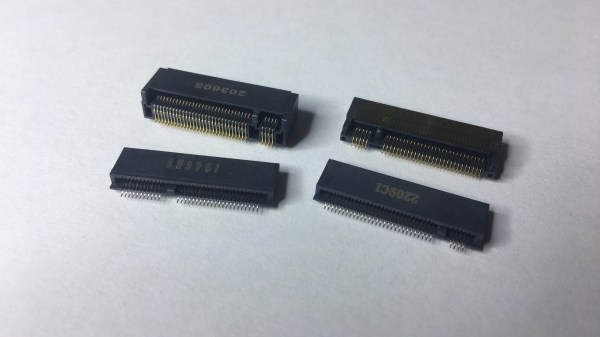
Four M.2 cards of different sizes on a desk surface

M.2 For Hackers – Cards

Last time, I’ve explained everything you could want to know if you wanted to put an M.2 socket onto your board. Today, let’s build M.2 cards! There’s a myriad of M.2 sockets out there that are just asking for a special card to be inserted into it, and perhaps, it’s going to be your creation that fits.

Why Build Cards?

Laptops and other x86 mainboards often come with M.2 slots. Do you have a free B-key slot? You can put a RP2040 and bunch of sensors on a B-key PCB as an experimental platform carried safely inside your laptop. Would you like to do some more advanced FPGA experiments? Here’s a miniscule FPGA board that fits inside your laptop and lets you play with PCIe on this same laptop – the entire setup having a super low footprint. Are you looking for an extra PCIe link because you’re reusing your laptop as a home server? Again, your WiFi slot will provide you with that. Want to get some PCIe out of a SteamDeck? Building a M-key 2230 card seems to be your only hope! Continue reading “M.2 For Hackers – Cards” →
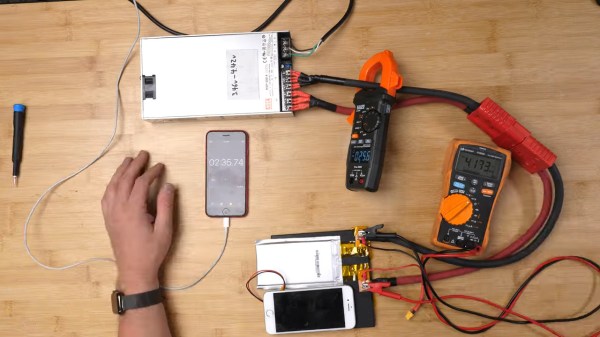
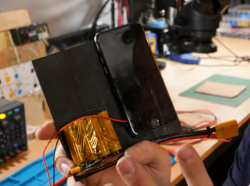
PSU charging an externally connected supercapacitor bank that's powering the phone. There's a current clamp on one of the wires to measure charging current, and a multimeter measuring the charging voltage.

Just How Fast Could You Charge An IPhone?

An iPhone 8, now a relatively cheap model, can charge its battery fully in two hours’ time. There’s hardly ever a need for faster charging, but it’s fair to ask – how much faster could it really go? [Scotty Allen] from [Strange Parts], back after a hiatus, is back to stretching the limits of what a regular iPhone can do, and decides to start off with an exploration of battery technologies.

What people commonly encounter is that charging speed depends on the charger involved, but even one hundred chargers in parallel won’t speed up this iPhone’s charging rate, so what’s up? First off, the phone’s charger chip and the battery’s BMS will both limit charging current, so for experiment purposes, those had to be bypassed. First attempt was using a hefty DC power supply with the original cell, and, unsatisfied with the lack of fire and still relatively slow charging, [Scotty] decides to up the ante.
Continue reading “Just How Fast Could You Charge An IPhone?” →

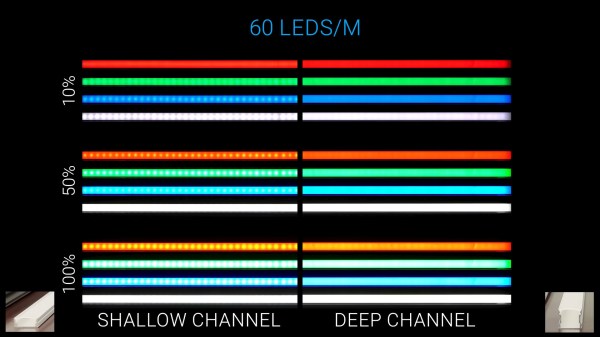
Screenshot from the video showing comparisons between diffused light pictures at different brightnesses and diffusers applied

LED Diffusers Confusing? Organize A Practical Contest

We all want a nice and shiny LED strip that doesn’t actually look like it consists of individual LEDs – a bar of uniform light is just that much more attractive. There’s all kinds of diffusion options available out there, but they can be confusing – sometimes you’d just like to know, which one is better? If there’s one thing that could easily settle this, it’s a practical test, and that’s what [The Hook Up] has devised for us to learn from.

First off, he talks about LED strips available – between 30, 60 and 144 LED per meter variations, the latter is going to be easier to diffuse than the former. From there, there’s a few different kinds of diffuser covers and aluminum profiles you can get, and [The Hook Up] pairs them in combinations, filming them from a distance and giving us concise visuals of how each combination works at different duty cycles, as well as making brightness measurements every now and then to evaluate losses of different diffuser layers. He proposes a simple rule – when picking a diffuser, distance between the LEDs and the diffuser has to be larger than the between-LED distance, and experiments confirm that. In the end, one of the takeaways is that the differences between 60LED/m and 144LED/m strips are not significant enough that they can’t be compensated for with a decent diffuser.

Continue reading “LED Diffusers Confusing? Organize A Practical Contest” →

M.2 For Hackers – Connectors

In the first M.2 article, I’ve described real-world types and usecases of M.2 devices, so that you don’t get confused when dealing with various cards and ports available out there. I’ve also designed quite a few M.2 cards and card-accepting adapters myself. And today, I’d like to tell you everything you need to know in order to build M.2 tech on your own.

There’s two sides to building with M.2 – adding M.2 sockets onto your PCBs, and building the PCBs that are M.2 cards. I’ll cover both of these, starting with the former, and knowing how to deal with M.2 sockets might be the only thing you ever need. Apart from what I’ll be describing, there’s some decent guides you can learn bits and pieces from, like the Sparkfun MicroMod design guide, most of which is MicroMod-specific but includes quite a few M.2 tips and tricks too.

First, Let’s Talk About The Y-Key

What could you do with a M.2 socket on your PCB? For a start, many tasty hobbyist-friendly SoMs and CPUs now have a PCIe interface accessible, and if you’re building a development board or a simple breakout, an M.2 socket will let you connect an NVMe SSD for all your high-speed low-power storage needs – many Raspberry Pi Compute Module mainboards have M.2 M-key sockets specifically for that, and there’s NVMe support in the RPi firmware to boot. Plus, you can always plug a full-sized PCIe adapter or an extender into such a socket and connect a PCIe network card or other much-needed device – even perhaps, an external GPU! However, as much as PCIe-equipped SoMs are tasty, they’re far from the only reason to use M.2 sockets.

Continue reading “M.2 For Hackers – Connectors” →

Infrastructure diagram of [Stefan]'s network at the end of his fiber optics journey

Say No To Obsolescence, Wire Up Your House With Fiber

These days, if you wire your house with anything less than gigabit, you might end up throttling your Internet connection. If you wired things up using two pairs per device back in 100BASE-T days, however, you’ll want to redo your cabling before you buy new switches. Now, some of us are already starting to equip ourselves with 2.5G hardware — which may require new cabling once again. Would you like to opt out of the Ethernet cabling upgrade rat race, at least for a while? Do like [Stefan Schüller] did, and use fiber optics for your home networking needs!

[Stefan] walks you through everything you’d need to know if you ever choose to look into fiber for your networking needs, and explains the design decisions he’s made — from splicing fiber optics himself, to building a PC to do routing instead of getting a hardware Small Form-factor Pluggable (SFP) equipped router. He also describes pitfalls, like SFP modules requiring reconfiguration to work with different router brands, and having to buy a fiber splicer with an eye-watering pricetag.

In the end, he shows a cost breakdown, and says he’s quite happy with the upgrade. While the costs might seem prohibitive compared to running Ethernet, upgrading to fiber will have your equipment function at top speed whenever you need it – who knows, perhaps in a few years time, 2.5G will no longer suffice for new advancements in home technology needs, and we’ll see more SFP modules in hackers’ hands. After all, modern TVs already use fiber optics for video data transfer.

Continue reading “Say No To Obsolescence, Wire Up Your House With Fiber” →

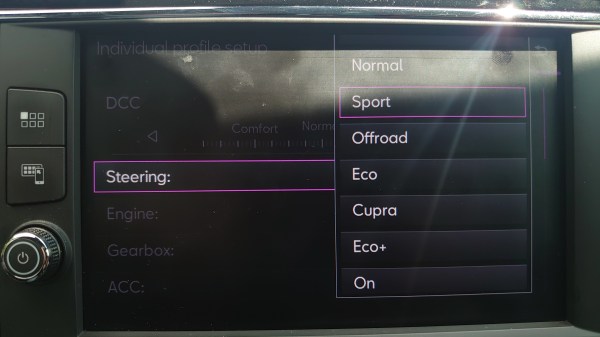
Showing a car dash screen with options menu, showing a "Steering" entry and a bunch of options one can change, i.e. Normal, Sport, offroad, Eco etc.

Your Car Has Driving Profiles – Here’s How To Change Them

Just like mobile phones of yesteryear, modern cars have profiles. They aren’t responsible for the sounds your car produces, however, as much as they change how your car behaves – for instance, they can make your engine more aggressive or tweak your steering resistance. On MQB platform cars, the “Gateway” module is responsible for these, and it’s traditionally been a black box with a few user-exposed profiles – not as much anymore, thanks to the work of [Jille]. They own a Volkswagen hybrid car, and had fun changing driving modes on it – so naturally, they decided to reverse-engineer the configuration files responsible.

Now, after two years of experimentation, tweaking values and observing changes, there’s quite some sense made of the configuration binaries. You can currently edit these binaries, also referred to as datasets, in a hex editor – there’s profiles for the 010 hex editor that make sense of the data you load, and explanation of the checksums involved. With this, you are no longer limited by profiles the manufacturer composed – if a slightly different driving combination of parameters makes more sense to you, you can recombine them and have your own profile, unlock modes that the manufacturer decided to lock out for non-premium cars, and even fix some glaring oversights in factory modes.

This is pretty empowering, and far from ECU modifications that introduce way more fundamental changes to how your car operates – the parameters being changed are within the range of what the manufacturer has implemented. The smarter our cars become, the more there is for us hackers to tweak, and even in a head unit, you can find things to meaningfully improve given some reverse-engineering smarts.

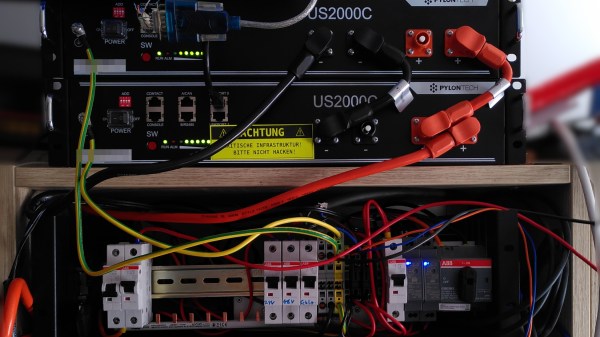
Breakers for the system on a DIN rail, with markings like 48V and 24V and 12V and so on on the bottom, and two hefty devices of some kind on the bottom, probably MPTT controllers, with hefty wires running from them.

Low-Voltage DC Network Build Incited By Solar Panels

Nowadays, some people in Europe worry about energy prices climbing, and even if all the related problems disappear overnight, we’ll no doubt be seeing some amounts of price increase. As a hacker, you’re in a good position to evaluate the energy consuming devices at your home, and maybe even do something about them. Well, [Peter] put some solar panels on his roof, but couldn’t quite figure out a decent way to legally tie them into the public grid or at least his flat’s 220V network. Naturally, a good solution was to create an independent low-voltage DC network in parallel and put a bunch of devices on it instead!

He went with 48V, since it’s a voltage that’s high enough to be efficient, easy to get equipment like DC-DCs for, safe when it comes to legal matters concerned, and overall compatible with his solar panel setup. Since then, he’s been putting devices like laptops, chargers and lamps onto the DC rail instead of having them be plugged in, and his home infrastructure, which includes a rack full of Raspberry Pi boards, has been quite content running 24/7 from the 48V rail. There’s a backup PSU from regular AC in case of overcast weather, and in case of grid power failures, two hefty LiFePO4 accumulators will run all the 48V-connected appliances for up to two and a half days.

The setup has produced and consumed 115kWh within the first two months – a hefty contribution to a hacker’s energy independence project, and there’s enough specifics in the blog post for all your inspiration needs. This project is a reminder that low-voltage DC network projects are a decent choice on a local scale – we’ve seen quite viable proof-of-concept projects done at hackercamps, but you can just build a small DC UPS if you’re only looking to dip your feet in. Perhaps, soon we’ll figure out a wall socket for such networks, too.