Finding A Cheaper USB To Serial Chips

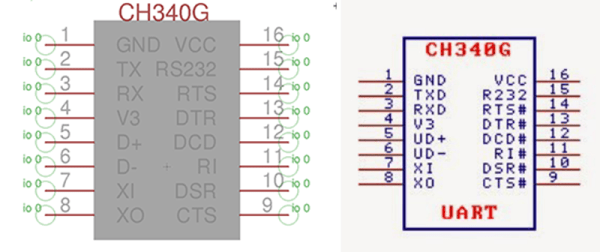
FTDI-gate wasn’t great for anybody, and now with hardware hobbyists and technological tinkerers moving away from the most popular USB to serial adapter, some other chip has to fill the void. The cheapest USB to serial chip on the market appears to be the CH340G, available for 20-40 cents apiece from the usual retailers. There is, however, almost no English documentation, and the datasheet for the CH340 family doesn’t include this chip. [Ian]’s here to help you out. He got his mitts on a few of these chips and managed to figure out the pinout and a few reference schematics. He even made an Eagle part for you. Isn’t that nice?

The CH340 series of chips do exactly what you would expect them to do: a full-speed USB device that emulates a standard serial interface, with speeds from 50bps to 2Mpbs. The chip supports 5V and 3.3V, and all the weird modem lines are supported. This chip even has an IrDA mode, because wireless communication in the 90s was exactly as rad as you remember.

With [Ian]’s help, we now have a cheap source of USB to serial chips. If you need the datasheet, here you go. The driver is a bit more difficult to find, but what you’re looking for is the CH341 family of chips. That can be found with a little bit of Google fu.
3D Printing Lock Picks

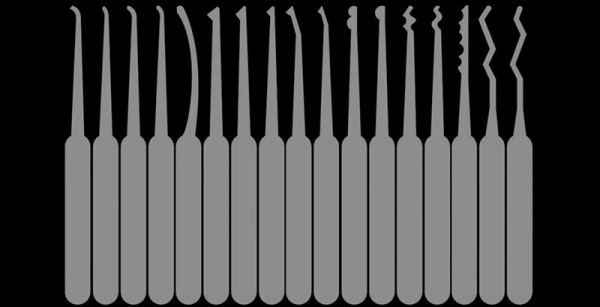
Over at the 23B hackerspace in Fullerton, CA, [Dano] had an interesting idea. He took a zip tie, and trimmed it to have the same profile of a lock pick. It worked. Not well, mind you, but it worked. After a few uses, the pick disintegrated, but still the concept of picks you can take through a TSA checkpoint was proven.

A few days after this demonstration, [C] realized he had a very fancy Objet 3D printer at work, and thought printing some pics out would be an admirable goal. After taking an image of some picks through the autotracer in Solidworks, [C] had an STL that could be printed on a fancy, high-end 3D printer. The printer ultimately used for these picks was a Objet 30 Pro, with .001″ layer thickness and 600dpi resolution. After receiving the picks, [C] dug out an old lock and went to town. The lock quickly yielded to the pick, and once again the concept of plastic lock picks was proven.

Although the picks worked, there were a few problems: only half the picks were sized appropriately to fit inside a lock. Two picks also broke within 15 minutes, something that won’t happen with traditional metal picks.

Still, once the models are figured out, it’s easy to reproduce them time and time again. A perfect lock pick design is then trivial, and making an injection mold becomes possible. They might still break, but they’ll be far easier to manufacture and simple to replace.

Christmas Lights And Ships In A Bottle

Thanksgiving was last week, and Christmas has been invading department stores for two or three months now, and that can only mean one thing: it’s time to kill a tree, set it up in your living room, and put a few hundred watts of lights on it. All those lights, though; it’s as if Christmas lights were specifically invented as fodder for standup comedians for two months out of the year. Why can’t someone invent wireless Christmas lights?

We don’t know if it’s been invented, but here’s a Kickstarter campaign that’s selling that same idea. It’s called Aura, and it’s exactly what it says on the tin: wireless Christmas lights, controllable with a smartphone. If it works, it’s a brilliant idea.

Continue reading “Christmas Lights And Ships In A Bottle”

A Z80 Computer With Switches And Blinkenlights

While most people who build their own computer from chips want the finished product to do something useful, there’s something to be said about a huge bank of switches and a bunch of blinkenlights. They’re incredibly simple – most of the time, you don’t even need RAM – and have a great classic look about them.

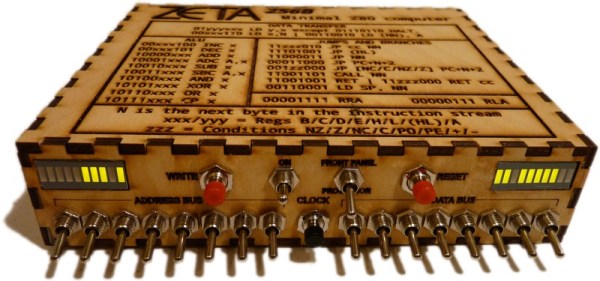
[Jim] wanted to build one of these computers and wound up creating a minimal system with switches and blinkenlights. It’s based on the Z80 CPU, has only 256 bytes of RAM, and not much else. Apart from a few extra chips to output data and address lines to LEDs and a few more to read switches, there are only two major chips in this computer.

With the circuit complete, [Jim] laser cut a small enclosure big enough to house his stripboard PCB, the switches and LEDs, and a few buttons to write to an address, perform a soft reset, and cycle the clock. One of the most practical additions to this switch/blinkenlight setup is a hand crank. There’s no crystal inside this computer, and all clock cycles are done manually. Instead of pushing a button hundreds of times to calculate something. [Jim] added a small hand crank that cycles the clock once per revolution. Crazy, but strangely practical.

[Jim] made a demo video of his computer in action, demonstrating how it’s able to calculate the greatest common divisor of two numbers. You can check that video out below.

Continue reading “A Z80 Computer With Switches And Blinkenlights”

3D Printing Atomic Force Microscopy

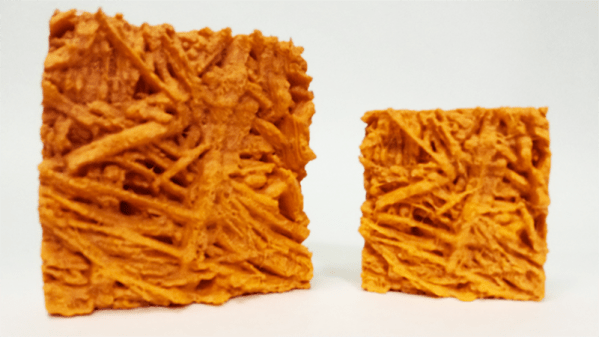
[Andres] is working with an Atomic Force Microscope, a device that drags a small needle across a surface to produce an image with incredible resolution. The AFM can produce native .STL files, and when you have that ability, what’s the obvious next step? That’s right. printing atomic force microscope images.

The AFM image above is of a hydrogel, a network of polymers that’s mostly water, but has a huge number of crosslinked polymers. After grabbing the image of a hydrogel from an Agilent 5100 AFM, [Andres] exported the STL, imported it into Blender, and upscaled it and turned it into a printable object.

If you’d like to try out this build but don’t have access to an atomic force microscope, never fear: you can build one for about $1000 from a few pieces of metal, an old CD burner, and a dozen or so consumable AFM probes. Actually, the probes are going to be what sets you back the most, so just do what they did in olden times – smash diamonds together and look through the broken pieces for a tip that’s sufficiently sharp.

Using The Second Microcontroller On An Arduino

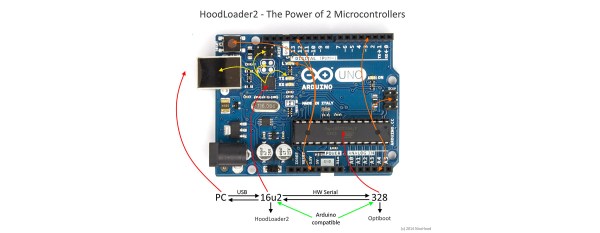
While newer Arduinos and Arduino compatibles (including the Hackaday.io Trinket Pro. Superliminal Advertising!) either have a chip capable of USB or rely on a V-USB implementation, the old fogies of the Arduino world, the Uno and Mega, actually have two chips. An ATMega16u2 takes care of the USB connection, while the standard ‘328 or ‘2560 takes care of all ~duino tasks. Wouldn’t it be great is you could also use the ’16u2 on the Uno or Mega for some additional functionality to your Arduino sketch? That’s now a reality. [Nico] has been working on the HoodLoader2 for a while now, and the current version give you the option of reprogramming the ’16u2 with custom sketches, and use seven I/O pins on this previously overlooked chip.

Unlike the previous HoodLoader, this version is a real bootloader for the ’16u2 that replaces the DFU bootloader with a CDC bootloader and USB serial function. This allows for new USB functions like HID keyboard, mouse, media keys, and a gamepad, the addition of extra sensors or LEDs, and anything else you can do with a normal ‘duino.

Setup is simple enough, only requiring a connection between the ‘328 ISP header and the pins on the ’16u2 header. There are already a few samples of what this new firmware for the ’16u2 can do over on [Nico]’s blog, but we’ll expect the number of example projects using this new bootloader to explode over the coming months. If you’re ever in an Arduino Demoscene contest with an Arduino and you’re looking for more pins and code space, now you know where to look.

3D Printing Without Support

3D printing is getting better every year, a tale told by dozens of Makerbot Cupcakes nailed to the wall in hackerspaces the world over. What was once thought impossible – insane bridging, high levels of repeatability, and extremely well-tuned machines – are now the norm. We’re still printing with supports, and until powder printers make it to garages, we’ll be stuck with that. There’s more than one way to skin a cat, though. It is possible to print complex 3D objects without supports. How? With pre-printed supports, of course.

[Markus] wanted to print the latest comet we’ve landed on, 67P/Churyumov–Gerasimenko. This is a difficult model for any 3D printer: there are two oversized lobes connected by a thin strand of comet. There isn’t a flat space, either, and cutting the model in half and gluing the two printed sides together is certainly not cool enough.

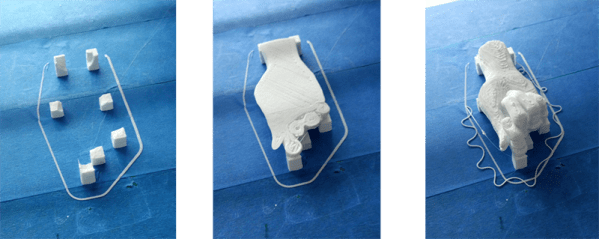
To print this plastic comet without supports, [Markus] first created a mold – a cube with the model of the comet subtracted with a boolean operation. If there’s one problem [Markus] ran into its that no host software will allow you to print an object over the previous print. That would be a nice addition to Slic3r or Repetier Host, and shouldn’t be that hard to implement.