How To Reverse Engineer, Featuring The Rigol DS1054Z

For a few years now, the Rigol DS1052E has been the unofficial My First Oscilloscope™. It’s cheap, it’s good enough for most projects, and there have been a number hacks and mods for this very popular scope to give it twice as much bandwidth and other interesting tools. The 1052E is a bit long in the tooth and Rigol has just released the long-awaited update, the DS1054Z. It’s a four-channel scope, has a bigger screen, more bells and whistles, and only costs $50 more than the six-year-old 1052E. Basically, if you’re in the market for a cheap, usable oscilloscope, scratch the ~52E off your list and replace it with the ~54Z.

With four channels of input, [Dave Jones] was wondering how the engineers at Rigol managed to stuff two additional front ends into the scope while still meeting the magic price point of $400. This means it’s time for [Dave] to reverse engineer the 1054Z, and give everyone on the Internet a glimpse at how a real engineer tears apart the worth of other engineers.

The first thing [Dave] does once the board is out of the enclosure is taking a nice, clear, and in-focus picture of both sides of the board. These pictures are edited, turned into a line drawing, and printed out on a transparency sheet. This way, both sides of the board can be viewed at once, allowing for a few dry erase marker to highlight the traces and signals.

Unless your voyage on the sea of reverse engineering takes you to the island of despair and desoldering individual components, you’ll be measuring the values of individual components in circuit. For this, you’ll want a low-voltage ohms function on your meter; if you’re putting too much voltage through a component, you’ll probably turn on some silicon in the circuit, and your measurements will be crap. Luckily, [Dave] shows a way to test if your meter will work for this kind of work; you’ll need another meter.

From there, it’s basically looking at datasheets and drawing a schematic of the circuit; inputs go at the left, outputs at the right, ground is at the bottom, and positive rails are at the top. It’s harder than it sounds – most of [Dave]’s expertise in this area is just pattern recognition. It’s one thing to reverse engineer a circuit through brute force, but knowing the why and how of how the circuit works makes things much easier.

Continue reading “How To Reverse Engineer, Featuring The Rigol DS1054Z”

Watch That Windows Update: FTDI Drivers Are Killing Fake Chips

The FTDI FT232 chip is found in thousands of electronic baubles, from Arduinos to test equipment, and more than a few bits of consumer electronics. It’s a simple chip, converting USB to a serial port, but very useful and probably one of the most cloned pieces of silicon on Earth. Thanks to a recent Windows update, all those fake FTDI chips are at risk of being bricked. This isn’t a case where fake FTDI chips won’t work if plugged into a machine running the newest FTDI driver; the latest driver bricks the fake chips, rendering them inoperable with any computer.

Reports of problems with FTDI chips surfaced early this month, with an explanation of the behavior showing up in an EEVblog forum thread. The new driver for these chips from FTDI, delivered through a recent Windows update, reprograms the USB PID to 0, something Windows, Linux, and OS X don’t like. This renders the chip inaccessible from any OS, effectively bricking any device that happens to have one of these fake FTDI serial chips.

Because the FTDI USB to UART chip is so incredibly common,  the market is flooded with clones and counterfeits. it’s very hard to tell the difference between the real and fake versions by looking at the package, but a look at the silicon reveals vast differences. The new driver for the FT232 exploits these differences, reprogramming it so it won’t work with existing drivers. It’s a bold strategy to cut down on silicon counterfeiters on the part of FTDI. A reasonable company would go after the manufacturers of fake chips, not the consumers who are most likely unaware they have a fake chip.

The workaround for this driver update is to download the FT232 config tool from the FTDI website on a WinXP or Linux box, change the PID of the fake chip, and never using the new driver on a modern Windows system. There will surely be an automated tool to fix these chips automatically, but until then, take a good look at what Windows Update is installing – it’s very hard to tell if your devices have a fake FTDI chip by just looking at them.

Function Generator With Zero CPU Cycles

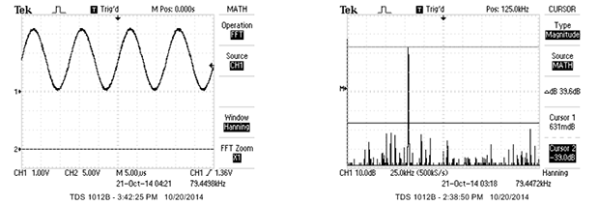
No one is sitting around their workbench trying to come up with the next great oscilloscope or multimeter, but function generators still remain one of the pieces of test equipment anyone – even someone with an Arduino starter pack – can build at home. Most of these function generators aren’t very good; you’re lucky if you can get a sine wave above the audio spectrum. [Bruce Land] had the idea to play around with DMA channels on a PIC32 and ended up with a function generator that uses zero CPU cycles. It’s perfect for a homebrew function generator build, or even a very cool audio synthesizer.

The main obstacles to generating a good sine wave at high frequencies are a high sample rate and an accurate DAC. For homebrew function generators, it’s usually the sample rate that’s terrible; it’s hard pushing bits out a port that fast. By using the DMA channel on a PIC32, [Bruce] can shove arbitrary waveforms out of the chip without using any CPU cycles. By writing a sine wave, or any other wave for that matter, to memory, the PIC32 will just spit them out and leave the CPU to do more important work.

[Bruce] was able to generate a great-looking sine wave up to 200 kHz, and the highest amplitude of the harmonics was about 40db below the fundamental up to 100 kHz. That’s a spectacular sine wave, and the perfect basis for a DIY function generator build.

The Hoverboard You Can Build At Home

Press embargoes lifted today, heralding the announcement of the world’s first hoverboard. Yes, the hovering skateboard from Back to the Future. It’s called the Hendo hoverboard, it’s apparently real, and you can buy one for $10,000. If that’s too rich for your blood, you can spend $900 for a ‘technology demonstrator’ – a remote-controlled hovering box powered by the same technology.

Of course the world’s first hoverboard is announced to the world as a crowd funding campaign, so before we get to how this thing is supposed to work, we’ll have to do our due diligence. The company behind this campaign, Arx Pax Labs, Inc, exists, as does the founder. All the relevant business registration, biographical information, and experience of the founder and employees of Arx Pax check out to my satisfaction. In fact, at least one employee has work experience with the innards of electric motors. At first glance, the company itself is actually legit.

The campaign is for a BttF-style hoverboard, but this is really only a marketing strategy for Arx Pax; the hoverboards themselves are admittedly loss leaders even at $10,000 – the main goal of this Kickstarter is simply to get media attention to the magnetic levitation technology found in the hoverboard. All of this was carefully orchestrated, with a ‘huge event’ to be held exactly one year from today demonstrating a real, working hoverboard. What’s so special about demoing a hoverboard on October 21, 2015?

next year

I defy anyone to come up with a better marketing campaign than this.

The meat of the story comes from what has until now been a scientific curiosity. Everyone reading this has no doubt seen superconductors levitated off a bed of magnets, and demonstrations of eddy currents are really just something cool you can do with a rare earth magnet and a copper pipe. What [Greg Henderson] and Arx Pax have done is take these phenomena and turned them into a platform for magnetic levitation.

According to the patent, the magnetic levitation system found in the Hendo hoverboard works like this:

  • One or more electric motors spin a series of rotors consisting of an arrangement of strong permanent magnets.
  • The magnets are arranged in a Halbach array that enhances the magnetic field on one side of the array, and cancels it on the other.
  • By placing the rotors over a conductive, non-ferrous surface – a sheet of copper or aluminum, for example – eddy currents are induced in the conductive surface.
  • These eddy currents create a magnetic field that opposes the magnetic field that created it, causing the entire device to levitate.

hoverboard

That’s it. That’s how you create a real, working hoverboard. Arx Pax has also developed a method to control a vehicle equipped with a few of these hover disks; the $900 ‘Whitebox’ technology demonstrator includes a smart phone app as a remote control.

If you’re still sitting in a steaming pile of incredulity concerning this invention, you’re in good company. It’s a fine line between being blinded by brilliance and baffled by bullshit, so we’re leaving this one up to you: build one of these devices, put it up on hackaday.io, and we’ll make it worth your while. We’re giving away some gift cards to the Hackaday store for the first person to build one of these hoverboards, preferably with a cool body kit. The Star Wars landspeeder has already been done, but the snowspeeder hasn’t. Surprise us.

Carvey, The CNC Machine For Everyone

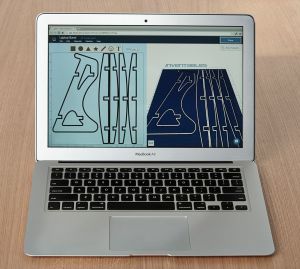
Over the past few years, [Bart Dring] has contributed immensely to the homebrew CNC machine scene, with the creation of MakerSlide linear rail, the buildlog.net open source laser cutters and CNC machines, and a host of other builds that have brought the power of digital fabrication to garages and workshops the world over. After a year of work, he, along with Inventables, is releasing Carvey, the CNC machine for everyone else.

Carvey is heavily inspired by Inventables other CNC machine, the Shapeoko, but built to be the Makerbot to the Shapeoko’s RepRap, without all the baggage that goes along with that analogy, of course. The machine has a 300W spindle capable of cutting wood, plastic, foam, carbon fiber, and linoleum, as well as aluminum and brass. There are a few interesting features like a color-coded bit system, and this time the machine has an enclosure for containing MDF dust.

CiebwEA13yxYp576g_7HRNUx06KmzO3QEqGCLfs4kRoCAD programs might be a little too foreboding for someone just getting into the world of CNC, so Inventables has created their own design program called Easel. It’s a web app that allows you to design all your parts for the Carvey and send them all to the machine without worrying about speeds, feeds and all the other intimidating machinist terminology. You can, of course, output GCode from Easel, so those of us with slightly more complex toolchains can still use the Carvey.
Inventables is Kickstarting their production, with the non-early bird Carveys going for $2400. That’s a bit cheaper than some extremely similar machines we’ve seen on Kickstarter before.

What Is This, A Microcontroller Board For Ants?

You youngins probably don’t remember this, but a few years ago there was an arms race on Kickstarter to create the smallest Arduino-compatible microcontroller board. Since then, a few people have realized they can make more money on Kickstarter through fraud or potato salad, and the race to create the smallest ‘duino board petered out.

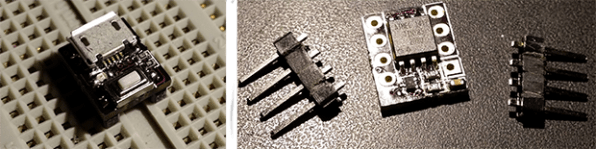
It’s a shame [Meizhu] wasn’t part of the great miniature Arduinofication of Kickstarter, because this project would have won. It’s an Atmel ATtiny85, with USB port, resistors, diodes, reset button, LED, and pin headers, that is just 72 mils larger than the PDIP package of the ‘tiny85. Outside of getting a bare die of ‘tiny85s, there isn’t much of a chance of this board becoming any smaller.

[Meizhu] was inspired to create this board from [Tim]’s Nanite 85, which up until a few days ago was the current champion of micro microcontroller boards. With a bit of work in KiCAD, the new board layout was created that is just a hair larger than the 0.4″ x 0.4″ footprint of the PDIP ATtiny85. There were a few challenges in getting a working board this small; you’d be surprised how large the plastic bits around pin headers are, but with some very crafty soldering, [Meizhu] was able to get it to work.

The Internet Of Things Chip Gets A New Spectrum

Last year we learned about Weightless, an Internet of Things chip that solves all the problems of current wireless solutions. It’s low power and has a 10-year battery life (one AA cell), the hardware should cost around $2 per module, and the range of the Weightless devices range from 5+km in urban environments to 20-30km in rural environments. There haven’t been many public announcements from the Weightless SIG since the specification was announced, but today they’re announcing Weightless will include an additional spectrum, the 868/915 MHz ISM spectrum.

weightless

The original plan for Weightless was to use the spectrum left behind by UHF TV – between 470 and 790MHz. Regulatory agencies haven’t been moving as fast as members of the Weightless SIG would have hoped, so now they’re working on a slightly different design that uses the already-allocated ISM bands. They’re not giving up on the TV whitespace spectrum; that’s still part of the plan to put radio modules in everything. The new Weightless-N will be available sooner, though, with the first publicly available base station, module, and SDK arriving sometime next spring.

Weightless has put up a video describing their new Weightless-N hardware; you can check that out below. If you want the TL;DR of how Weightless can claim such a long battery life and huge range from an Internet of Things radio module, here’s an overly simplified explanation: power, range, and bandwidth. Pick any two.

Continue reading “The Internet Of Things Chip Gets A New Spectrum”