Large language models (LLMs) have been all the rage lately, assisting from all kinds of tasks from programming to devising Excel formulas to shortcutting school work. They’re also relatively easy to access for the most part, but as the old saying goes, if something on the Internet is free the real product is you (and your data). Luckily there are ways of hosting LLMs on your own to avoid your personal data getting harvested, as well as taking advantage of open-source solutions, but building these systems takes a little bit of effort. [Stephen] and a team from Mozilla walk us through this process and show us a number of options currently available.
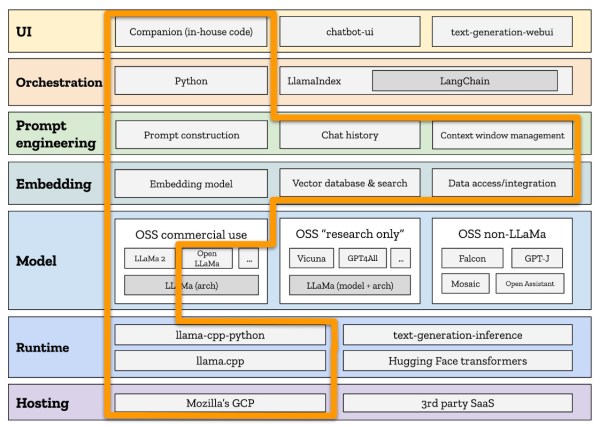
Working from the ground up, the group first decides on hosting, which (unsurprisingly) involves using Mozilla hosting services. The choice of runtime environment was a little bit more challenging. The project was time constrained, so they looked at two options here: Hugging Face and llama.cpp. Eventually deciding to move forward with llama.cpp largely due to its ability to run on more consumer-oriented hardware (especially Apple silicon) and the fact that it doesn’t need a powerful GPU, the next task was to choose the model. Settling on the LLaMa model that Facebook recently open-sourced, this model works well with the runtime environment and is essentially the only one that does.
From there, the team at Mozilla wanted to make sure their chat bot would be able to provide other Mozilla employees with information more readily pertinent to their jobs, so they trained their model with some internal Mozilla data as well as other more generic information. This doesn’t mean the job is done, though, there are a number of other factors that went in to designing this system before it was finally complete. Even then, since they built this in a week it’s not perfect; there are some issues with non-permissive licensing of some of the components and many of the design choices may not have been ideal. It’s impressive what’s out there if you’re hosting your own system, though, and while this might be a little more advanced for a self-hosted project, take a look at some other more beginner-friendly projects you can try if you’re just starting out on the self-hosted path.