Pinball machines have something for everyone. They’re engaging, fast-paced games available in a variety of sizes and difficulties, and legend has it that they can be played even while deaf and blind. Wizardry aside, pinball machines have a lot to offer those of us around here as well, as they’re a complex mix of analog and digital components, games, computers, and artistry. [Daniele Tartaglia] is showing off every one of his skills to build a tabletop pinball machine completely from the ground up.
Author: Bryan Cockfield1760 Articles
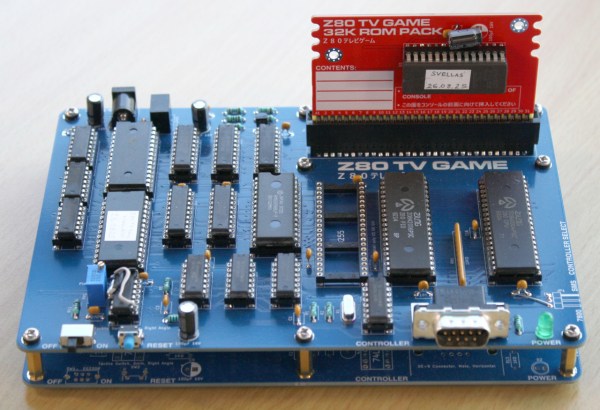
Recreating A Homebrew Game System From 1987
We often take for granted how easy it is to get information in today’s modern, Internet-connected world. Especially around electronics projects, datasheets are generally a few clicks away, as are instructions for building almost anything. Not so in the late 80s where ordering physical catalogs of chips and their datasheets was generally required.
Mastering this landscape took a different skillset and far more determination than today, which is what makes the fact that a Japanese electronics hobbyist built a complete homebrew video game system from scratch in 1987 all the more impressive.[Alex] recently discovered this project and produced a replica of it with a few modern touches.
Continue reading “Recreating A Homebrew Game System From 1987”
Original E39 Head Unit Modernized
Although most modern cars have moved to using proprietary components nearly everywhere, especially when it comes to infotainment systems, for a brief moment which peaked in the 90s and 00s most cars shipped with radios that fit in a standard size opening called a DIN slot. If you wanted a new Pioneer or Kenwood stereo it was usually a simple matter to slide the factory radio out and put your choice of aftermarket head unit in its place. [Stefan] has an E39 BMW from this era and wanted to upgrade the factory radio but use the original hardware instead of replacing it.
This isn’t just a simple stereo upgrade either. [Stefan] has gone all-out for this build which he started in 2020. Beginning with a Kotlin/Jetpack Compose Linux application to handle control input from the vehicle’s various knobs and buttons he moved on to a map application and an on-screen keyboard. From there he implemented VGA to send video to the OEM screen, and now has a fully functional system based on a Raspberry Pi. It does everything the original unit can do including playing music and showing the feed from the backup camera, plus adds plenty of new, modern features like Bluetooth.
For a certain classic car enthusiast, this build hits a sweet spot of modernizing a true classic like the E39 without removing or permanently modifying any OEM components. The amount of work that went into it is pretty staggering as well, with [Stephan] putting in over 100 hours of work just to get the video signal timing correct. We also like it because it reminds us of the flash-in-the-pan “carputer” trend from the late 00s where people in the pre-smartphone age were shoving all kinds of computing horsepower in their trunks.
Mushrooms As Computer Memory
Fungi make up a massive, interconnected part of Earth’s ecosystems, yet they’re vastly underrepresented in research and public consciousness compared to plants and animals. That may change in the future though, as a group of researchers at The Ohio State University have found a way to use fungi as organic memristors — hinting at a possible future where fungal networks help power our computing devices.
A memristor is a passive electronic component whose resistance changes based on the voltage and current that has passed through it, which means it can effectively remember past electrical states even when power is removed. To create these circuit components with fungus, the researchers grew shiitake and button mushroom mycelium for these tests, dehydrated their samples for a number of days, and then attached electrodes to the samples. After misting them briefly to restore conductivity, the samples were exposed to various electrical wave forms at a range of voltages to determine how effective they were at performing the duties of a memristor. At one volt these systems were the most consistent, and they were even programmed to act like RAM where they achieved a frequency of almost 6 kHz and an accuracy of 90%.
In their paper, the research group notes a number of advantages to building fungal-based components like these, namely that they are much more environmentally friendly and don’t require the rare earth metals that typical circuit components do. They’re also easier to grow than other types of neural organoids, require less power, weigh less, and shiitake specifically is notable for its radiation resistance as well. Some work needs to be done to decrease the size required, and with time perhaps we’ll see more fungi-based electrical components like these.
HRV Gets Home Automation Upgrades
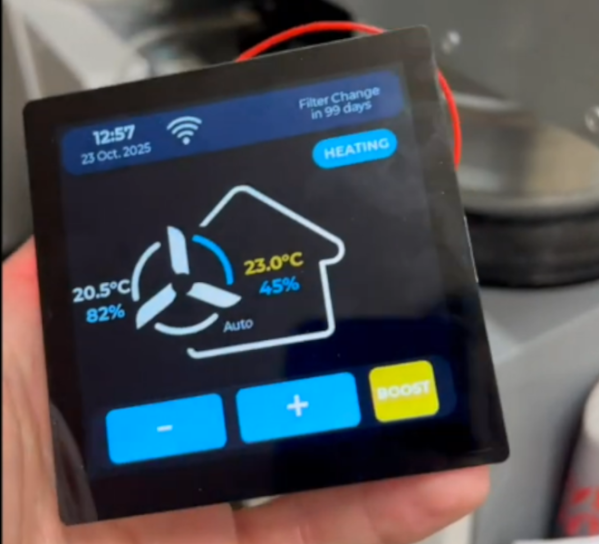
In our modern semi-dystopia, it seems like most companies add automation features to their products to lock them down and get consumers to buy even more proprietary, locked-down components. The few things that are still user-upgradable are getting fewer and farther between, but there are still a few things that can be modified and improved to our own liking like this control panel for a heat recovery ventilator (HRV).
HRVs are systems that exchange fresh, outside air with stale, inside air while passing them both through a heat exchanger to keep from wasting energy. Many systems run continuously but they aren’t always needed, so some automation is beneficial. This upgrade from [vincentmakes] improves the default display for a Zehnder Comfoair Q350 HRV with a color display as well as adding it in to a home automation system, letting a user control fan speeds remotely as well as alerting the user when it’s time for filter replacements and providing up-to-date information from all the sensors in the HRV.
The project builds on a previous project which adapted an ESP32 to interact with the CAN bus used on these devices. With these upgrades the user can forgo the $300 proprietary upgrade that would be needed to get the same functionality otherwise. It’s also fully open-source so all that’s needed is to flash the firmware, replace the display, and enjoy the fresh air. There’s other modern HVAC equipment that can benefit from new controllers and a bit of automation as well.
Tiny UPS Keeps WiFi Online
For any mission-critical computer system, it’s a good idea to think about how the system will handle power outages. At the very least it’s a good idea to give the computer enough time to gracefully shut down if the power outage will last for an indefinite time. But for extremely critical infrastructure, like our home Wi-Fi, we might consider a more long-term battery backup that can let us get through the longest of power outages.
Part of why this project from [Next Builder] works so well is that most off-the-shelf routers don’t actually use that much energy. Keeping that and a modem online when the power is out only requires a few lithium batteries. To that end, three lithium ion cells are arranged in series to provide the router with between 9 and 12 volts, complete with a battery management system (BMS) to ensure they aren’t over- or under-charged and that they are balanced. The router plugs directly into a barrel jack, eliminating any switching losses from having to use an inverter during battery operation.
While [Next Builder] is a student who lives in an area with frequent interruptions to the electricity supply, this does a good job of keeping him online. If you’re planning for worse or longer outages, a design like this is easily adapted for more batteries provided the correct BMS is used to keep the cells safely charged and regulated. You can also adapt much larger UPS systems to power more of your home’s electrical system, provided you can find enough batteries.
Automatically Serving Up Canned Cat Food
If there’s any one benefit to having a cat as a pet instead of a dog, it’s that they’re a bit more independent and able to care for themselves for many days without human intervention. The only thing that’s really needed is a way to make sure they get food and water at regular intervals, but there are plenty of off-the-shelf options for these tasks. Assuming your cat can be fed dry food, that is. [Ben Heck]’s cat has a health problem that requires a special canned wet food, and since there aren’t automatic feeders for this he built his own cat-feeding robot.
Unlike dry food that can dispense a measured amount from a hopper full of food, the wet food needs to be opened and dispensed every day. To accomplish this, his robot has a mechanism that slowly slides a wedge under the pull tab on the can, punctures the can with it, and then pulls it back to remove the lid. From there the food is ejected from the feeder down a ramp to a waiting (and sometimes startled) cat. The cans are loaded into 3D-printed cartridges and then stacked into the machine on top of each other, so the machine can dispense food cans until it runs out. This design has space for six cans.
Although there are many benefits to having pets of any sort, one of the fun side quests of pet ownership is building fun things for them to enjoy or to make caring for them easier. We even had an entire Hackaday contest based on this premise. And, if biological life forms aren’t your cup of tea, there are always virtual pets to care for as well.
Thanks to [Michael C] for the tip!


