Roller Skating, Wile E. Coyote-Style

They say you learn something new every day, and they’re usually right about that. Today’s tidbit is that just anybody (including [Ian Charnas]) can exchange money for jet engines, no questions asked. Scary, huh? So once [Ian] secured the cutest little engine, he took a poll regarding possible uses for it. Jetpack rollerskating won, that’s obvious enough. So let’s get into those details.

[Ian] procured this particular jet engine from an outfit called CRX Turbines. It tops out at 98,000 RPM and 30 kg (66 lbs.) of thrust. Essentially, he is pulsing the engine’s ECU with PWM from an Adafruit RadioFruit and controlling it with a pair of stripped drills that are just being used for their convenient grips and switches. One is wired as a dead man’s switch, and the other controls the throttle signal.

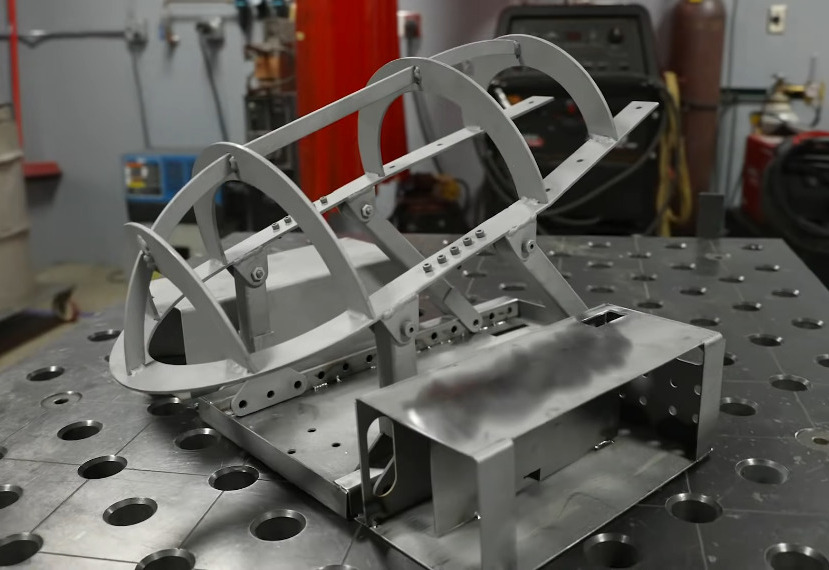
In order to run the thing and test the thrust a bit before strapping it on his back, [Ian] went about this the smart way and welded together a sliding stand. And he didn’t use just any old Jansport backpack, he welded together a frame and roll cage for the engine and attached it to a full-body harness. There’s also a heat shield to keep his backside from catching fire.

At first he tested the jet pack with shoes instead of skates to make sure it was going to behave as he predicted. Then it was time to bust out the roller skates. [Ian] achieved a top speed of 17 MPH before losing his balance, but he knew it could go faster, so he invited some roller derby skaters to try it out. One of them went over 30 MPH! Be sure to check it out in the build and demo video after the break.

If you’re at all familiar with [Ian]’s videos, you know that he usually raffles off the build and gives the money to charity. Well, not this time! That wouldn’t be prudent. Instead, he’s going to choose the best suggestion for what to attach it to, build it, and raffle that off. Hopefully, he stays away from airports with that thing on his back.

Continue reading “Roller Skating, Wile E. Coyote-Style”

Waterslide Decals For Wingding Keycaps

We know this feeling all too well [YOHON!] spent $340 building, lubing, and filming a custom keyboard and it still wasn’t perfect until they got the keycaps sorted. They bought blank ‘caps because they’re awesome, but also because they wanted to make their own custom ‘caps for all those painstakingly lubed and filmed Gateron yellows. At first [YOHON!] thought about doing it DIY dye-sublimation style with a hair straightener and polyimide tape, but that is too permanent of a method. Instead, [YOHON!] wanted room to experiment, make changes, and make mistakes.

Eventually, [YOHON!] learned about waterslide decals and settled on doing them that way. Every step sounds arduous, but we think it was way worth it because these look great. Since [YOHON!] wanted the keyboard to be weird, they designed a cute little symbol for each key which gives it a cryptic-but-accessible Wingdings feel.

We think these pictograms are all totally adorable, and we particularly like the owl for O, the volcano for V, and of course, the skeleton for X is a solid choice. Oh, and there’s a tiny fidget spinner knob to round out the cuteness. Designing and applying the keycaps took longer than the entire keyboard build, but you can check out the sped-up version after the break.

Want to just throw money at the keycaps problem? You may not want an entire keyboard full of cheeseburger and hot dog keycaps, but one or two fun keycaps are pretty cool to have. If you want to make your custom keycaps more permanent and don’t like the dye sublimation trick, try 3D printing them.

Continue reading “Waterslide Decals For Wingding Keycaps”

Redox Redux: Split Keeb Gets A Num Pad

What’s the worst thing about split keyboards? If they have one general fault, it’s that almost none of them have a number pad. If you can fly on that thing, but struggle with using the top row numbers, you will miss the num pad terribly, trust us. So what’s the answer? Design your own keyboard, of course. [ToasterFuel] had enough bread lying around to cook up a little experiment for his first keyboard build, and we think the result is well done, which is kind of rare for first keebs.

This design is based on the Redox, itself a remix of the ErgoDox that aims to address the common complaints about the latter — it’s just too darn big, and the thumb clusters are almost unusable. We love how customized this layout is, with its sprinkling of F keys and Escape in the Caps Lock position. Under those keycaps you’ll find 100% Cherry MX greens, so [ToasterFuel] must have pretty strong fingers to pound those super clackers.

Everything else under the hood is pretty standard, with a pair of Arduino Pro Micros running the show. [ToasterFuel] had to wire up the whole thing by hand because of the num pad, and we’re impressed that he built this entire project in just three weeks. And that includes writing his own firmware!

Already found or built a split you love, but still miss the num pad? Why not build one to match your keyboard?

Injection-Molded Glass Breakthrough Shatters Ceiling Of Work Methods

Glass is one of humanity’s oldest materials, and it is still used widely for everything from drinking vessels and packaging to optics and communications. Unfortunately, the methods for working with glass are stuck in the past. Most methods require a lot of high heat in the range of 1500 °C to 2000 °C, and they’re all limited in the complexity of shapes that can be made.

As far as making shapes goes, glass can be blown and molten glass pressed into molds. Glass can also be ground, etched, or cast in a kiln. Glass would be fantastic for many applications if it weren’t for the whole limited geometry thing. Because of the limitations of forming glass, some optic lenses are made with polymers, even though glass has better optical characteristics.

Ideally, glass could be injection molded like plastic. The benefits of this would be twofold: more intricate shapes would be possible, and they would have a much faster manufacturing time. Well, the wait is over. Researchers at Germany’s University of Freiburg have figured out a way to apply injection molding to glass. And it’s not just any glass — they’ve made highly-quality, transparent fused quartz glass, and they did it at lower temperatures than traditional methods. The team used x-ray diffraction to verify that the glass is amorphous and free of crystals, and were able to confirm its optical transparency three ways — light microscopy, UV-visible, and infrared measurements. All it revealed was a tiny bit of dust, which is to be expected outside of a clean room.

Continue reading “Injection-Molded Glass Breakthrough Shatters Ceiling Of Work Methods”

Custom Num Pad Does Double Duty As Macro Pad

Why buy a num pad or a macropad when you can build something new and beautiful, open source that bad boy, and be a hero to the community? We think that should be all the justification you ever need to build instead of buy, even if you think your thing is Just Another Keypad [JAnK] as [Clewsy] claims.

At first glance, JAnK appears to be a standard number pad with four macro keys across the top. But when you roll your own ‘board, all the keys are programmable. [Clewsy] took advantage of this by adding a second layer that’s accessible with (what else?) the Num Lock key. This switches JAnK over to 21-key macro pad mode.

[Clewsy] rolled their own PCB for this and used the venerable ATMega32u4 because of its HID and USB host capabilities. Every key is backlit, and these LEDs are driven by an MP3202 LED driver and PWM from the AVR. [Clewsy] was able to build a prototype by sawing the num pad off of a stainless steel key switch plate from another build, but eventually ordered JAnK its own custom, laser-cut, stainless steel plate. The lovely enclosure is made of spotted gum wood and an acrylic base.

Putting it all together proved to be a bit problematic. [Clewsy] soldered up the minimum viable components for testing and discovered that the ATMega’s VCC and GND pins were both shorted. This killed the AVR programmer, but not the chip itself, and [Clewsy] happened to have a spare. To add insult to injury, the Num Lock light didn’t work, but [Clewsy] was able to simply reverse the LED instead of ordering a new pile of boards. Check out the detailed write-up with code and tons of pictures over on [Clewsy]’s personal site.

One of the awesome things about this build is that [Clewsy] was able to re-use the code from macr0, which began life as a proof of concept for scanning key matrices, and retired to become a music and media controller.

Teach Your Air Compressor To Blow Eggs

As fun as it is to decorate Easter eggs, the road to a hollow hen’s egg is a gross and gooey avenue. Trust us, it sucks to blow out eggs, and it’s hard to get it right. Plus, you know, there’s that whole salmonella thing. [Phil] decided to speed things up this year by using an air compressor to do the dirty work.

Of course, one must approach this problem delicately because eggs are fragile. It would be nice to drill the egg instead of poking the end with a needle, but how are you gonna pull that off without breaking it? As it turns out, all you need is a bench vise, the right piece of PVC, a bit of rubber to keep the egg safe, and some hose clamps to keep the business part together.

[Phil] built a two-stage contraption that serves both purposes — the bottom cup safely cradles the egg for drilling, and the identical top cup connects to the air compressor, which blows the goo out of the bottom hole. [Phil] might have used negative pressure instead, but doesn’t have a vacuum pump or hose. Be sure to check out the brief demo video below.

Don’t want to mess around with real eggs? There are tons of ways to beautify fake eggs, but few of them are as cool as lasers.

Continue reading “Teach Your Air Compressor To Blow Eggs”

Portable, Digital Scoreboard Goes Anywhere

It’s that time of year in both hemispheres — time to get outside and play before it gets unbearably hot (or cold). No matter what your game, don’t keep score in your head or with piles of rocks — make yourself a portable, fold-able scoreboard like [LordGuilly] did and be on the bleeding edge of display technology. It’s really more roll-able than fold-able, which is awesome because you get to unfurl it like a boss.

All you need is a place to hang it up and you’re good to go. This thing runs on a beefy 10,000 mAH USB power bank, and [LordGuilly] says that it’s easy to read even on really sunny days. As you may have guessed, those are WS2812 strips and they are set into rectangular PVC bars. The bars are set equidistant from each other in a frame made from modified version of cable tracks — plastic chain links for cable management.

Good looks aside, we especially like that there are two controller options here. If you want to assign a dedicated scorekeeper, there’s a handled version that uses an STM32 blue pill and is wired to the display. But if you’re short on people, use the ESP8266 version and update the score with the accompanying app. Check out the demo after the break so you can see it in action.

We’ve seen a few scoreboards over the years, including this beauty that’s meant for indoor games.

Continue reading “Portable, Digital Scoreboard Goes Anywhere”