Lessons In Small Scale Manufacturing From The Othermill Shop Floor

Othermachine Co. is not a big company. Their flagship product, the Othermill, is made in small, careful batches. As we’ve seen with other small hardware companies, the manufacturing process can make or break the company. While we toured their factory in Berkeley California, a few interesting things stood out to us about their process which showed their manufacturing competence.

It’s not often that small companies share the secrets of their shop floor. Many of us have dreams of selling kits, so any lessons that can be learned from those who have come before is valuable. The goal of any manufacturing process optimization is to reduce cost while simultaneously maintaining or increasing quality. Despite what cynics would like to believe, this is often entirely possible and often embarrassingly easy to accomplish.

Lean manufacturing defines seven wastes that can be optimized out of a process.

  1. Overproduction: Simply, making more than you currently have demand for. This is a really common mistake for first time producers.
  2. Inventory: Storing more than you need to meet production or demand. Nearly every company I’ve worked for has this problem. There is an art to having just enough. Don’t buy one bulk order of 3,000 screws for six months, order 500 screws every month as needed.
  3. Waiting: Having significant delays between processes. These are things ranging from running out of USB cables to simply having to wait too long for something to arrive on a conveyor belt. Do everything you can to make sure the process is always flowing from one step to another.
  4. Motion: If you have a person walking back and forth between the ends of the factory to complete one step of the manufacturing process, this is wasted motion.
  5. Transport: Different from motion, this is waste in moving the products of each individual process between sections of the assembly.
  6. Rework: Get it right the first time. If your process can’t produce a product that meets specifications, fix the process.
  7. Over-processing: Don’t do more work than is necessary. If your part specifies 1000 hours of runtime don’t buy a million dollar machine to get 2000 hours out of it. If you can find a way to do it with one step, don’t do it with three.

IMG_0371

The first thing that stuck out to me upon entering Othermachine Co’s shop floor is their meticulous system for getting small batches through the factory in a timely manner. This allows them to scale their production as their demand fluctuates. CNCs and 3D printers are definitely seasonal purchases; with sales often increasing in the winter months when hackers are no longer lured away from their workstations by nice weather.

As the seven sins proclaim. It would be a bad move for Othermachine Co. to make too many mills. Let’s say they had made an extra 100 mills while demand was at a seasonal low. If they found a design or quality problem from customer feedback they’d have to commit to rework, potentially throwing away piles of defective parts. If they want to push a change to the machine or release a new model they’d either have to rework the machines, trash them, or wait till they all sold before improving their product. Even worse, they may find themselves twiddling their thumbs waiting for their supply to decrease enough to start manufacturing again. This deprives them of opportunities to improve their process and leads to a lax work environment.

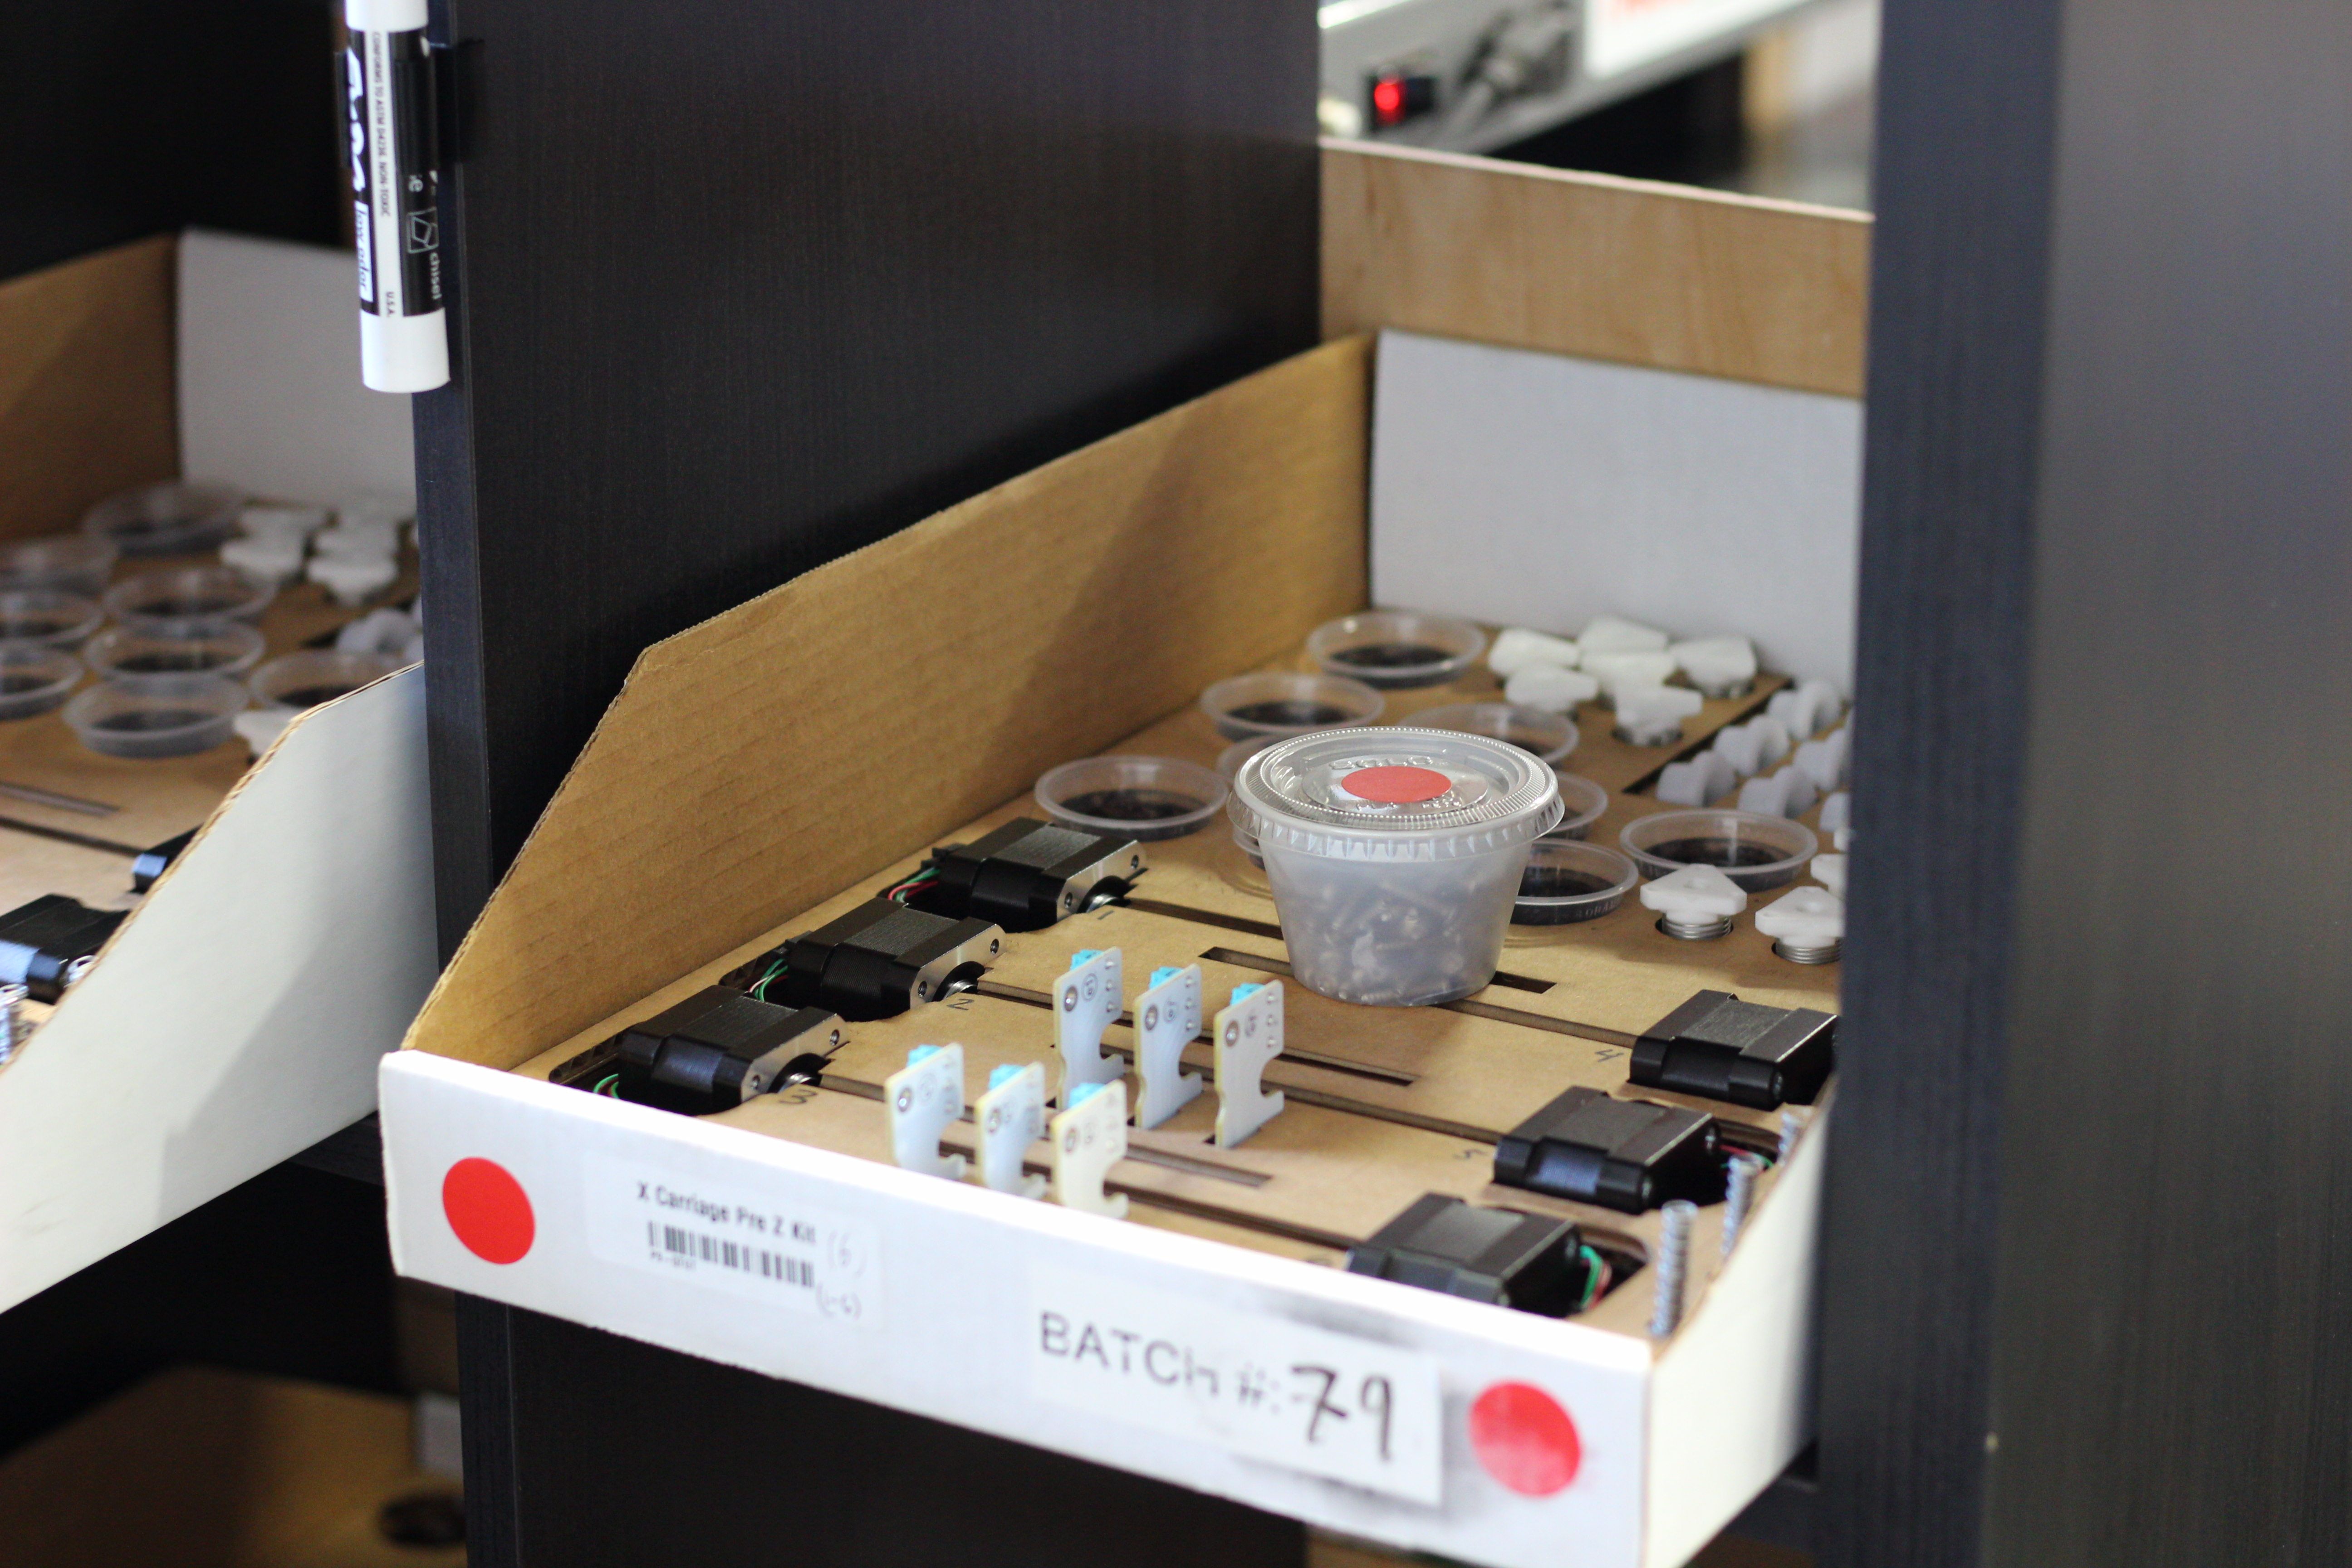
One way to ensure that parts are properly handled and inventory is kept to a minimum is with proper visual controls. To this end, Othermachine Co has custom cardboard bins made that perfectly cradle all the precision parts for each process in their own color coded container. Since the shop floor is quite small, it lets them focus on making spindle assemblies one day and motion assemblies another without having to waste time between each step. Also, someone can rekit the parts for a recently completed step easily without interrupting work on the current process going on.

IMG_0373

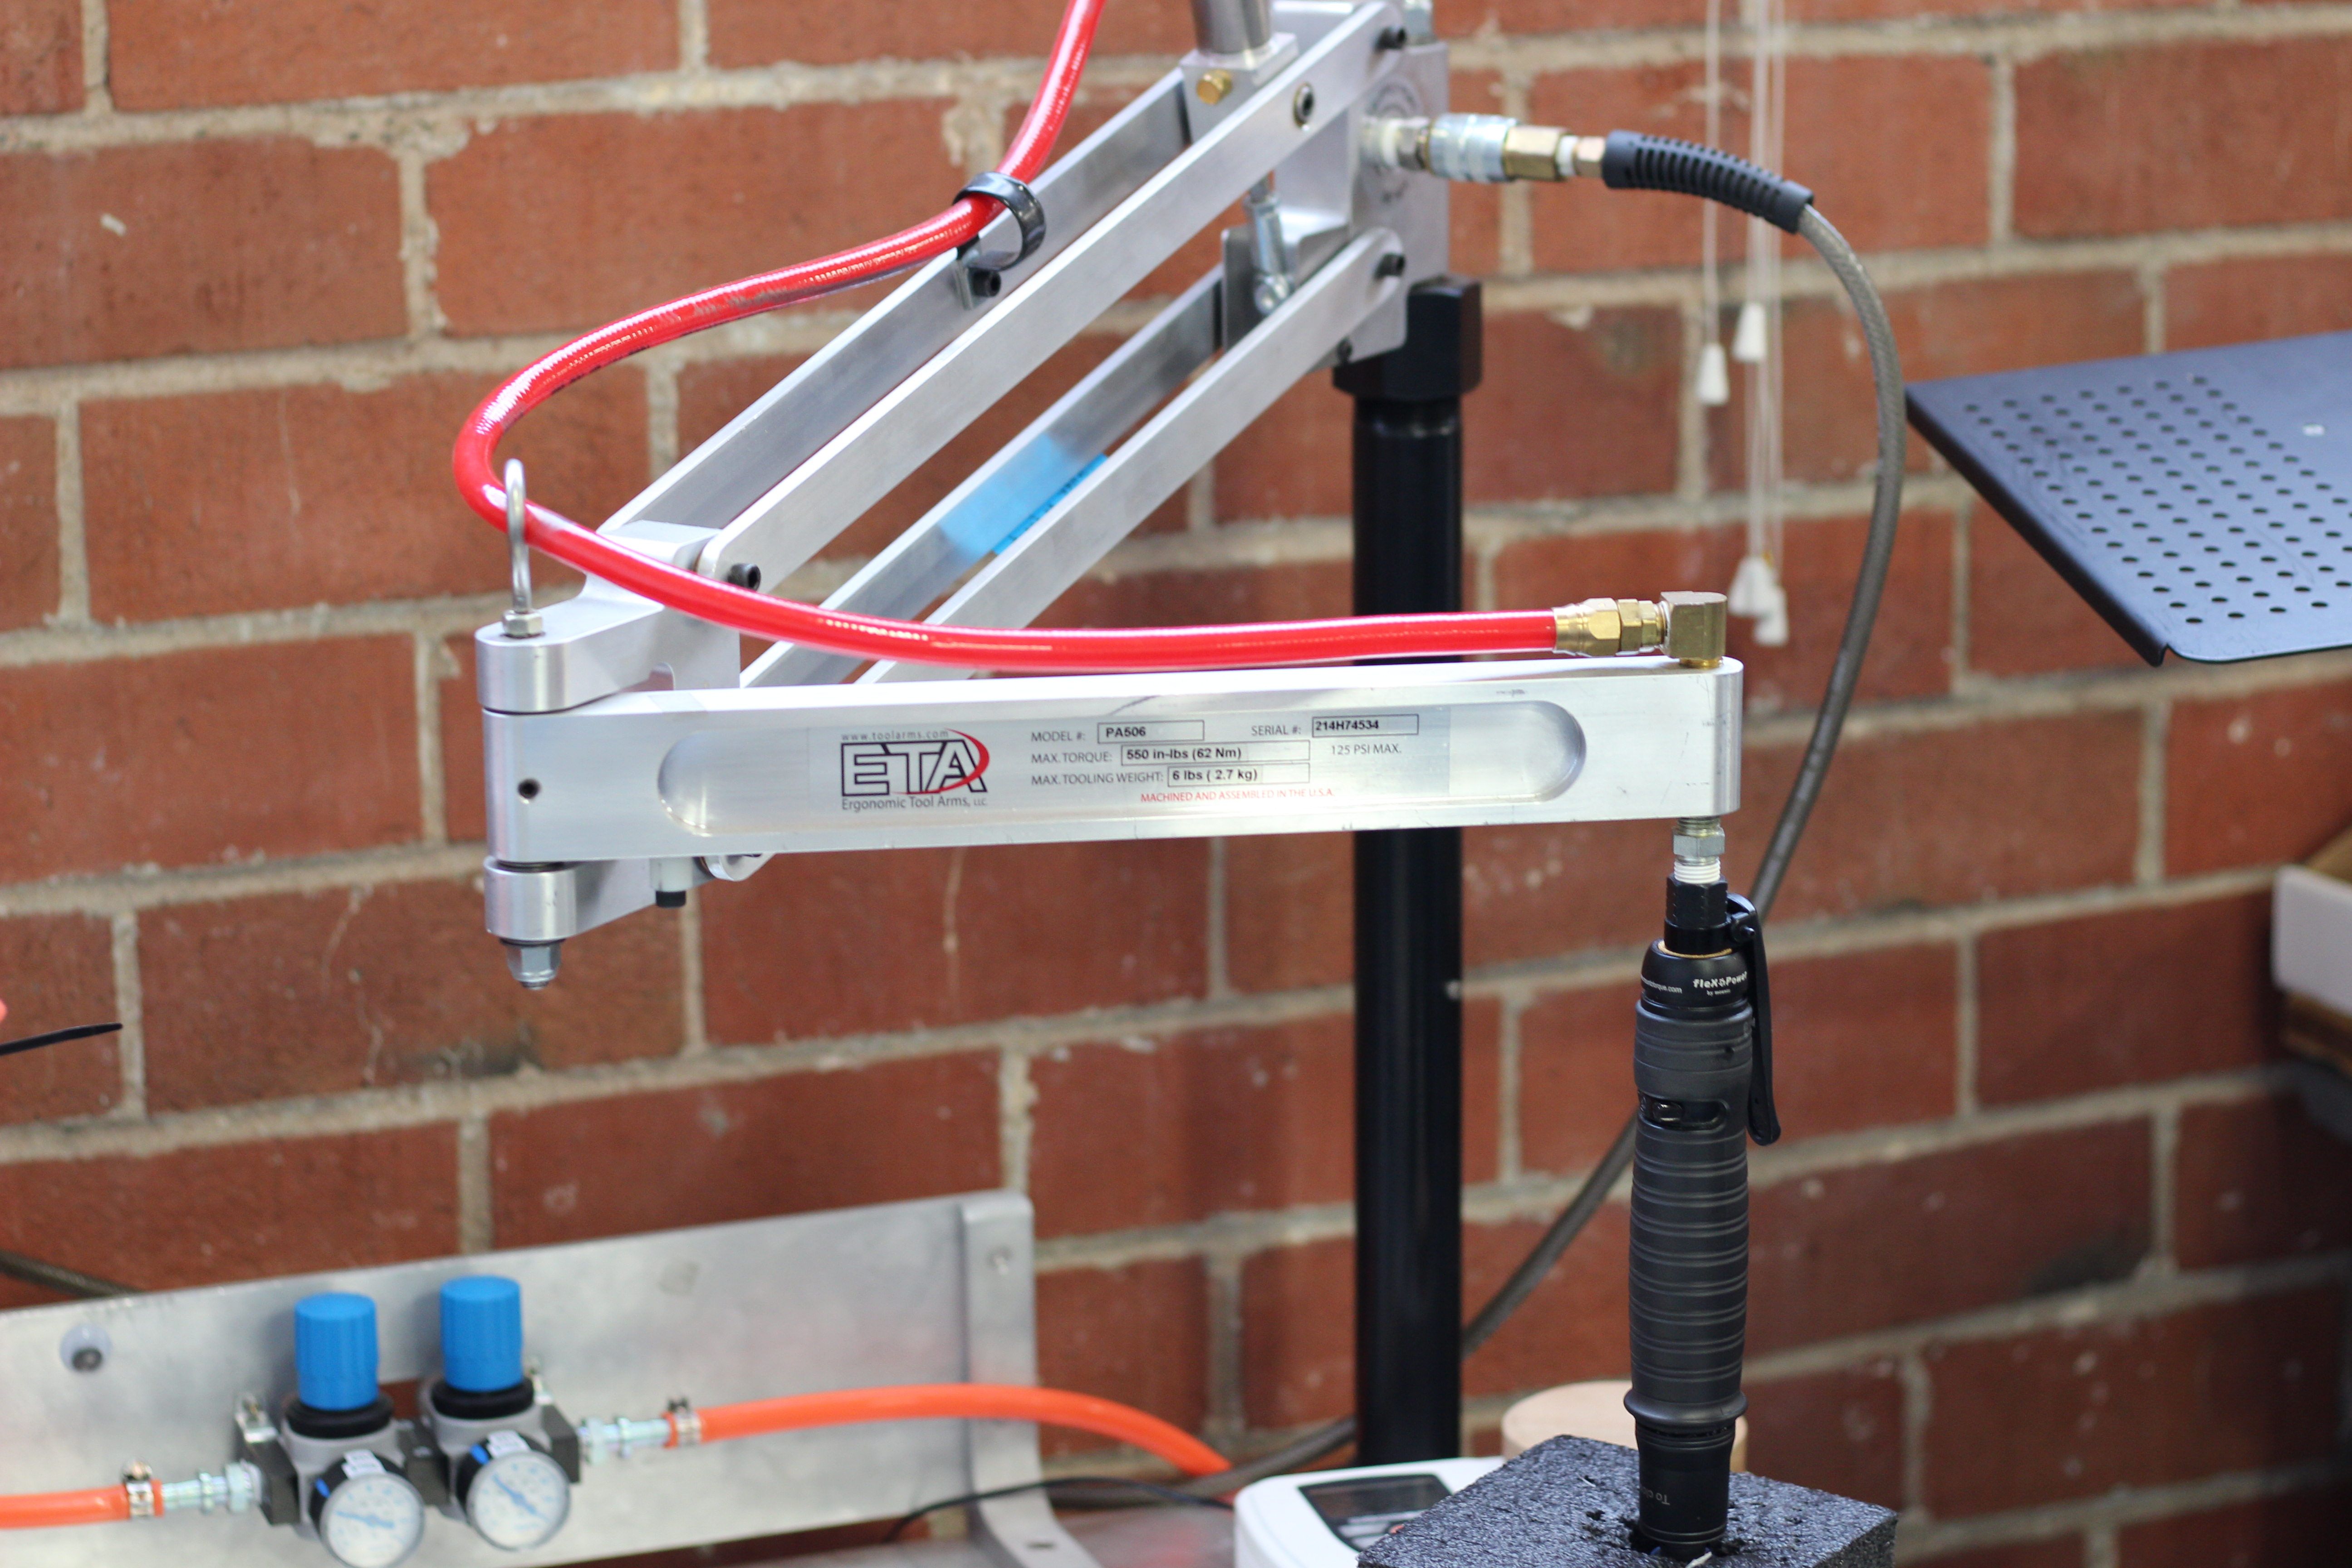
It’s hard to define what’s over processing and what isn’t. My favorite example of what isnt, and something I’ve fought for on nearly every factory floor I’ve worked on is proper torque limiting screwdrivers. They’re a little expensive, but they are a wonderful tool that helps to avoid costly rework and over processing. For example, let’s say you didn’t have a torque limiting screwdriver. Maybe your customers would complain that occasionally a screw came loose. Now, one way to solve this would be the liberal application of Loctite. Another way would be an additional inspection step. Both of these are additional and completely uneccessary steps as most screws will hold as long as they are torqued properly.

In one factory I worked in, it was often a problem that a recently hired worker would overtorque a screw, either stripping it or damaging the parts it was mating together. A torque limiting screwdriver takes the worker’s physical strength out of the equation, while reducing their fatigue throughout the day. It’s a win/win. Any time a crucial step can go from unknown to trusted with the application of a proper tool or test step it is worth it.

Another section where Othermachine Co. applied this principle is with the final machining step for the CNC bed. The step produces a large amount of waste chips. Rather than having an employee waste time vacuuming out every Othermill after it has gone through this process, they spent some time designing a custom vacuum attachment. This essentially removed an entire production step. Not bad!

IMG_0396 (2)

With the proper management of waste it is entirely possible to save money and improve a process at the same time. It takes a bit of training to learn how to see it. It helps to have an experienced person around in order to learn how to properly respond to them, but with a bit of practice it becomes a skill that spreads to all areas of life. Have any of you had experience with this kind of problem solving? I’ve really enjoyed learning from the work stories posted in the comments.

Star Track: A Lesson In Positional Astronomy With Lasers

[gocivici] threatened us with a tutorial on positional astronomy when we started reading his tutorial on a Arduino Powered Star Pointer and he delivered. We’d pick him to help us take the One Ring to Mordor; we’d never get lost and his threat-delivery-rate makes him less likely to pull a Boromir.

As we mentioned he starts off with a really succinct and well written tutorial on celestial coordinates that antiquity would have killed to have. If we were writing a bit of code to do our own positional astronomy system, this is the tab we’d have open. Incidentally, that’s exactly what he encourages those who have followed the tutorial to do.

The star pointer itself is a high powered green laser pointer (battery powered), 3D printed parts, and an amalgam of fourteen dollars of Chinese tech cruft. The project uses two Arduino clones to process serial commands and manage two 28byj-48 stepper motors. The 2nd Arduino clone was purely to supplement the digital pins of the first; we paused a bit at that, but then we realized that import arduinos have gotten so cheap they probably are more affordable than an I2C breakout board or stepper driver these days. The body was designed with a mixture of Tinkercad and something we’d not heard of, OpenJsCAD.

Once it’s all assembled and tested the only thing left to do is go outside with your contraption. After making sure that you’ve followed all the local regulations for not pointing lasers at airplanes, point the laser at the north star. After that you can plug in any star coordinate and the laser will swing towards it and track its location in the sky. Pretty cool.

Continue reading “Star Track: A Lesson In Positional Astronomy With Lasers”

Unexpected Betrayal From Your Right Hand Mouse

Some people really enjoy the kind of computer mouse that would not be entirely out of place in a F-16 cockpit. The kind of mouse that can launch a browser with the gentle shifting of one of its thirty-eight buttons ever so slightly to the left and open their garage door with a shifting to the right of that same button. However, can this power be used for evil, and not just frustrating guest users of their computer?

We’ve heard of the trusted peripheral being repurposed for nefarious uses before. Sometimes they’ve even been modified for more benign purposes. All of these have a common trend. The mouse itself must be physically modified to add the vulnerability or feature. However, the advanced mice with macro support can be used as is for a vulnerability.

The example in this case is a Logitech G-series gaming mouse. The mouse has the ability to store multiple personal settings in its memory. That way someone could take the mouse to multiple computers and still have all their settings available. [Stefan Keisse] discovered that the 100 command limit on the macros for each button are more than enough to get a full reverse shell on the target computer.

Considering how frustratingly easy it can be to accidentally press an auxiliary button on these mice, all an attacker would need to do is wait after delivering the sabotaged mouse. Video of the exploit after the break.

Continue reading “Unexpected Betrayal From Your Right Hand Mouse”

Puzzlingly Simple Tutorial On GPS Time Corrected Clock

We’re not sure if [Derek Lieber] is messing with us or proving a point. Why are you doing this [Derek]? We know there’s technically enough information to build the clock. You even included the code. Couldn’t you have at least thrown in a couple of words? Do we have to skip straight to mediaglyphics?

Anyway, if we follow the equation. The equation… If you take a gps module, a 7 segment display with an HT16K33 backpack, a digital potentiometer, a piezo, and a boarduino we suppose we could grudgingly admit that these would all fit together to make a clock. We still don’t like it though, but we’ll admit that the nice handmade case was a nice touch, and that the pictures do give us enough details to do it ourselves.

It was also pretty cool when you added the Zelda theme song as an alarm sound. Also pretty neat that, being GPS corrected, there’s no need to ever set the time. We may also like the simplicity of the only inputs being the potentiometer, which is used to set the alarm time. It’s just. Dangit [Derek]. Nice clock build, we like it.

In Paris Buying A 3D Printer Is Cheaper Than Renting Machine Time

As many of the members of the Brian Benchoff hate/fan club know, the life of a Hackaday writer is nomadic and filled with exciting adventures. Jenny List is actually crime fighting cyborg (think Bond); it’s why she knows so much about electronics. James Hobson is Iron Man. The list goes on. There are lots of unnecessary details, but to summarize: Last month I was living in Washington State, this month I am in Paris, France. It’s really nice here, the buildings are beautiful, the cathedrals stunning, and the food significantly tastier. 

However, as a contracting engineer with a project involving a deadline; I found myself in dire need of a significant amount of quick turn-around 3D printing during my working vacation to France. Through a lot of trial and tribulation, I eventually discovered that the most cost-effective way to get the prints done… was to just buy a cheap 3D printer and run it into the ground.

Appropriately, LVL1 is also home to the world's largest 3D printed trashcan (full of failed 3D prints).
Appropriately, LVL1 is also home to the world’s largest 3D printed trashcan (full of failed 3D prints).

I was spoiled by my hackerspace in Louisville, KY. They had enough 3D printers to go around and the pricing was fixed at 10 cents a gram. For the amount of printing I needed, this would be a perfectly economical arrangement. So, I set out to find a hackerspace in Paris. Whereupon I reached my first and obvious problem; I speak very little French.

Most of the hackerspaces listed in Paris are, as far as I can tell, illegally squatting in a scary part of town, exclusive to a university, exclusive to a business, or closed down.

So, I googled a bit harder. Wow! Apparently a Techshop opened up in Paris. It’s about an hour away from where I live, but having toured a Techshop before, I knew they would have the nice version of the tool I need. So, one morning bright and early I got on the metro and headed over to get a tour of the place.

What I’ve discovered is this: If you need things like a water jet cutter, welding station, or a 50 grand CNC machine, Techshop is a really economical way to get access to and play with tools like that. However, if all you want is access to a laser cutter and a 3D printer, it will set you back five-hundred dollars and you’ll have to jump through some incredibly annoying hoops just to get access to them.

Only a small fee of 400 euros to used these badboys.
Only a small fee of 400 euros to used these bad boys.

See, most pieces of equipment at a Techshop need to be reserved. Only the 150 euro and 300 euro a month membership tiers can reserve equipment. The 150 tier can reserve something for two hours, the 300, four. If you’ve ever 3D printed you can immediately spot the problem with that. For small prints this could be workable, but if you have a lot of large prints four hours is just not enough. However, there is a work around. If you’re willing to take a metro ride late at night, arriving at the Techshop at 10:00pm, you can, of course, run a print overnight.

There were two more glitches in the Techshop plan. To be able to touch the printers required a two-hour course with a 100 euros fee. The filament also ran 65 euro per 500 g. My printing needs would easily cost me tens of hours in travel and had a starting fee of 400 euros to be workable.

The entrance to Usine.io is terrifying. It's this massive pitch black hallway. I had no idea if I was in the right place until I got to the desk.
The entrance to Usine.io is terrifying. It’s this massive pitch black hallway. I had no idea if I was in the right place until I got to the desk.

Now, I’m not saying Techshop isn’t absolutely wonderful when it comes to more advanced tools. It’s probably the only Hackerspace in the world where you’re entitled to expect that the CNC machine is in working order, properly trammed, and there are actually cutting bits for it. However, if all you need is a 3D printer, don’t bother.

Now, I asked around some more and found that there was a competing space in Paris called Usine.io. It had a flat fee of 180 euros a month and the training was free. I actually did end up getting a membership here for access to a CNC and basic tools, but for 3D printing it was a bust. They only had three printers serving a sizable membership base. This left the printers with a 48 hour line to get your print started and a maximum of 40 hours of printing a month. A die-hard user of 3D printing can easily use 40 hours in 3 days. Because I had to test many iterations for my project, my need the next month was easily triple that number.

However, the shop itself is really nicely outfitted.

The last avenue available to me aside from 3D printer ownership was contracting someone with a 3D printer to run my prints for me. However, after asking around I found the service to be quite expensive. Rent isn’t cheap in Paris after all. If I just needed a single small print it would be worth it, but if I needed lots of printing it would quickly add up to be more money than I had.

That left me with one option. Which, honestly, sounded absolutely insane for someone visiting a country for a few months. Buy a printer. It’s an indication of the state of 3D printing that the price has come down so far that buying a printer is more economical than having someone do it for you. Even a few years ago this was not possible. However, European Amazon Prime had a workable enough import printer to my doorstep faster than any commercially available service could even process my order. We’ve come a long way since the Darwin. That’s for sure.

Featured Photo From Famous Paris buildings by LeFabShop

Homemade EDM Can Cut Through Difficult Materials Like Magnets With Ease

Many years ago [ScorchWorks] built an electrical-discharge machining tool (EDM) and recently decided to write about it. And there’s a video embedded after the break.

The build is based on the designs described in the book “Build an EDM” by Robert Langolois. An EDM works by creating lots of little electrical discharges between an electrode in the desired shape and a material underneath a dielectric solvent bath. This dissolves the material exactly where the operator would like it dissolved. It is one of the most precise and gentle machining operations possible.

His EDM is built mostly out of found parts. The power supply is a microwave oven transformer rewired with 18 gauge wire to drop the voltage to sixty volts instead of the oven’s original boost to 1.5kV.  The power resistor comes from a dryer element robbed from a unit sitting beside the road. The control board was etched using a hand traced schematic on the copper with a Sharpie.

The linear motion element are two square brass tubes, one sliding inside the other. A stepper motor slowly drives the electrode into the part. Coolant is pumped through the electrode which is held by a little 3D printed part.

The EDM works well, and he has a few example parts showing its ability to perform difficult cuts. Things such as a hole through a razor blade., a small hole through a very small piece of thick steel, and even a hole through a magnet.

Continue reading “Homemade EDM Can Cut Through Difficult Materials Like Magnets With Ease”

Jump In When The Water Is Just Right With A Wireless Swimming Pool Thermometer

[David]’s family acquired a swimming pool. While it’s not his favorite activity in the world, every now and then he’ll indulge in the blue plastic bin full of water occupying previously pristine land in his backyard.

As he says, cool beer is pleasant, but cool water tends to put a damper on the experience. Rather than do something pedestrian like touch the water himself to discover its temperature; he saw an opportunity for a fun little project in a wireless temperature monitor.

The heart of the device is a Telecom Design TD1208 which runs on the French SigFox network. For a small fee any device on the network can send up to 140 12byte packets of data a day. Not a lot, but certainly acceptable for the Microchip MCP9700 temperature sensor it uses. He got the board up and running, and even made his own custom helical coil antenna.

The case was 3D printed out of PLA. It’s a tiered cylindrical bobber. The wider top section floats on the water and the base acts as a ballast, holding the battery and sensor.  The bobber is powered by a combination of  a questionable Chinese lithium battery, charging circuit, and solar panel. [Dave] was keen to point out that the battery is, technically, water cooled.

He wrapped up the code for the bobber and used SigFox’s SDK to build a nice web interface. Now, when the rare mood strikes him, he can remain inside if the conditions aren’t right for a swim.